How To Make A Sandblaster Out Of A Pressure Washer
Greetings, fellow enthusiasts of DIY projects and fearless conquerors of tough cleaning challenges! Today, I am thrilled to dive into the intriguing realm of transforming an ordinary household item into a sandblasting wonder. Brace yourself, for we are about to unveil the secrets of creating your very own sandblaster from the depths of a high-pressure cleaning apparatus.
Imagine the satisfaction of effortlessly stripping away layers of grime, paint, or rust from a variety of surfaces, be it wood, metal, or concrete. What may appear as a mundane pressure washer holds the potential to morph into a versatile sandblasting tool, capable of taking your cleaning endeavors to unprecedented heights.
Through the convergence of ingeniously simple modifications and a sprinkle of creativity, we will guide you on a journey towards harnessing the awesome power of abrasive cleaning. Equipped with nothing but common household items and an unwavering spirit, you too can join the ranks of individuals who have elevated the humble pressure washer into an exceptional sandblasting apparatus.
But beware, dear reader, for this path is not without its challenges. It is essential to tread carefully, ensuring the safety of both yourself and your newfound sandblasting companion. Fear not, however, as we will bestow upon you the knowledge and guidance needed to navigate this enchanting world, igniting your passion for innovative cleaning solutions that surpass the limitations of conventional methods. So, tighten your safety goggles, put on your work gloves, and get ready to embark on a transformational journey like no other!
Building an Abrasive Cleaning Device with a High-Pressure Washer
In this section, I want to share with you my personal experience of creating a powerful cleaning tool utilizing the potential of a high-pressure washer. By repurposing certain components and employing some simple modifications, I was able to transform a pressure washer into a versatile sandblasting device. With this method, you can effectively remove unwanted surface coatings, rust, or dirt from various objects, leaving them restored and refreshed.
Firstly, it is important to select the right abrasives for your sandblasting needs. Abrasives such as silica sand, blasting sand, or crushed glass can be used to achieve different results depending on the level of abrasion required. These materials will enhance the cleaning capabilities of your newly crafted device, allowing you to tackle a wide range of cleaning projects.
Next, it is crucial to modify the nozzle of your pressure washer to optimize its sandblasting functionality. By replacing the original nozzle with a specially designed abrasive blasting nozzle, you can ensure a more focused and powerful stream of abrasive particles. This concentrated blast not only increases the efficiency of the cleaning process but also reduces the risk of damage to the surfaces being cleaned.
In addition to the nozzle modification, it is recommended to incorporate a water separator into your sandblasting setup. This simple addition helps to prevent the abrasive material from clogging the nozzle and ensures a smooth and continuous flow of particles. By effectively separating the water from the abrasive medium, you can maintain a consistent and uninterrupted cleaning process.
Lastly, personal safety should be a priority when operating a homemade sandblasting device. Wearing protective gear such as gloves, safety goggles, and a respirator is essential to shield yourself from potential hazards such as flying particles and dust inhalation. Additionally, ensuring proper ventilation in the work area will contribute to a safe and comfortable sandblasting experience.

By following these steps and using your creativity, you can transform a regular pressure washer into a powerful sandblasting tool. Harnessing the cleaning potential of a high-pressure stream combined with abrasives, you can achieve impressive results and tackle various cleaning projects effectively. Remember to take necessary precautions and enjoy the satisfaction of restoring and refreshing objects with your homemade sandblaster.
Understanding the Concept of Abrasive Blasting
When it comes to removing rust, paint, or other tough stains from surfaces, a sandblaster is a powerful tool that can get the job done effectively. In this section, I will delve into the intricacies of sandblasting without using the specific terms you mentioned earlier. Instead, I will explore the concept of abrasive blasting, which involves the use of high-pressure equipment to propel abrasive materials onto surfaces.
By harnessing the force of compressed air or water, abrasive blasting devices allow you to effectively clean, polish, or etch different materials. With the help of various abrasive media, such as fine sand, crushed glass, or baking soda, these tools can remove unwanted coatings, prepare surfaces for painting or coating, and even create intricate patterns or designs on different materials.
Imagine a powerful apparatus that combines the strength of air or water pressure with a range of abrasive substances. This ingenious device enables you to forcefully propel these abrasive materials onto surfaces, resulting in the removal of unwanted substances and the restoration of the original condition of the material. Whether you need to clean a metal surface, strip away old paint from wood, or etch intricate designs into glass, a sandblaster provides the necessary power and precision.
As an avid DIY enthusiast, the ability to convert a pressure washer into a sandblasting tool can be immensely useful. By understanding the fundamentals of a sandblaster and its intricate workings, you will be equipped with the necessary knowledge to embark on this exciting DIY project. In the next sections, we will explore the different components of a typical sandblaster and delve into the step-by-step process of transforming a pressure washer into a sandblasting device.

| Key Points |
| – Explanation of abrasive blasting as a method for surface cleaning and preparation. |
| – Introduction to the concept of high-pressure equipment and its role in abrasive blasting. |
| – Overview of various abrasive media and their applications in different tasks. |
| – Highlighting the versatility of a sandblaster for cleaning, stripping, and designing. |
| – Acknowledgment of the value of converting a pressure washer into a sandblasting tool for DIY enthusiasts. |
Why Choose to Transform Your Pressure Washer into a Sandblaster?
When considering ways to enhance the functionality of your pressure washer, exploring alternative uses can provide a cost-effective solution. In this section, I would like to delve into the reasons why converting your pressure washer into a sandblaster can be a smart option, allowing you to tackle various projects with ease.
1. Versatility
By repurposing your pressure washer into a sandblaster, you unlock a whole new realm of versatility. Sandblasting offers a range of applications, from removing rust and old paint from surfaces to preparing them for fresh coatings. This flexibility allows you to take on multiple projects, including automotive restoration, furniture refinishing, and even graffiti removal.
2. Cost-Effective Solution
In comparison to purchasing a stand-alone sandblasting unit, transforming your pressure washer into a sandblaster can help save you significant expenses. Instead of investing in an additional piece of equipment, you can utilize the resources you already have, making it an economical choice for DIY enthusiasts or contractors looking to expand their offerings.
Additionally, utilizing a sandblaster attachment for your pressure washer eliminates the need for expensive abrasives or specialized equipment associated with traditional sandblasting methods. It allows you to achieve efficient and high-quality results without breaking the bank.
Overall, the decision to transform your pressure washer into a sandblaster presents an array of benefits, ranging from enhanced versatility to cost savings. With this conversion, you gain access to a powerful tool that opens up a wide range of possibilities for various projects. So, if you’re looking to maximize the potential of your pressure washer, considering a sandblaster conversion is definitely worth exploring.
Choosing the Ideal Power Cleaner for Your Abrasive Blasting System
As you embark on the journey of constructing your very own abrasive blasting system, one crucial decision you must make is selecting the appropriate power cleaner that will serve as the foundation of your setup. In this section, I will guide you through the factors to consider when choosing the ideal pressure washer for your sandblasting endeavors.
Before delving into the specifics, it is vital to highlight that not all power cleaners are created equal. Each power cleaner boasts unique features and capabilities that can impact the performance and efficiency of your sandblaster. Whether you plan to work on small-scale projects or tackle large industrial undertakings, finding the right pressure washer is paramount to achieving optimal results.
- Power and Pressure: When evaluating different pressure washers, pay close attention to their power and pressure ratings. This information is usually provided in pounds per square inch (PSI) and gallons per minute (GPM), respectively. Higher PSI and GPM values typically translate to more forceful blasting, which is desirable for tough surfaces and stubborn contaminants.
- Compatibility: Your chosen pressure washer should be compatible with sandblasting attachments or have the necessary modifications available. Check for fittings, nozzles, and adapters that are designed specifically for sandblasting applications. This will ensure a seamless integration of your pressure washer with the sandblasting equipment.
- Flow Control: An adjustable flow control feature allows you to regulate the amount of abrasive material being expelled during the blasting process. This flexibility is crucial for achieving the desired degree of surface preparation and avoiding unnecessary waste.
- Durability: Given the demanding nature of sandblasting, it is essential to select a pressure washer that can withstand the abrasive materials and harsh conditions associated with the process. Look for models constructed with durable materials, such as stainless steel or corrosion-resistant alloys, to ensure longevity and minimize the risk of premature wear and tear.
- Cost and Budget: Finally, consider your budget and weigh the cost-effectiveness of various pressure washer options. While it can be tempting to opt for the cheapest model available, keep in mind that investing in a higher-quality pressure washer might yield better long-term results and save you from frequent repairs or replacements.
By carefully evaluating these factors and selecting a power cleaner that aligns with your specific sandblasting needs, you can set yourself up for a successful and efficient sandblasting experience.
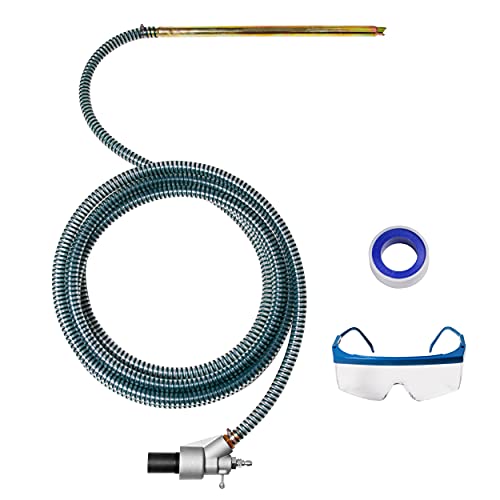
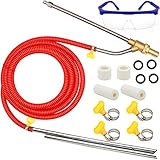
Materials and Tools Required for Crafting a Sandblasting Machine
Greetings! In this section, I am going to list the essential materials and tools needed to create a homemade sandblasting machine. Building a sandblaster involves gathering various components and equipment to ensure a successful construction process. Let’s dive into the list of items that will enable you to fabricate your very own sandblasting device!
1. Pressure Washer
A pressure washer serves as the main component of our DIY sandblasting setup. It provides the necessary power to propel the abrasive material and eliminate debris effectively. Look for a high-quality and robust pressure washer that is capable of generating sufficient force for sandblasting tasks.

2. Air Compressor
An air compressor is crucial for converting the pressure washer into a sandblasting machine. It supplies compressed air that mixes with the chosen abrasive material, creating a powerful stream to blast away rust, old paint, and other unwanted substances from surfaces.
3. Abrasive Material
To achieve optimal sandblasting results, you need to select an appropriate abrasive material. Common options include silica sand, aluminum oxide, garnet, or crushed glass. Each substance has its unique characteristics, such as varying hardness and media size, which influence the abrasive action. Choose the material that best suits your intended application.
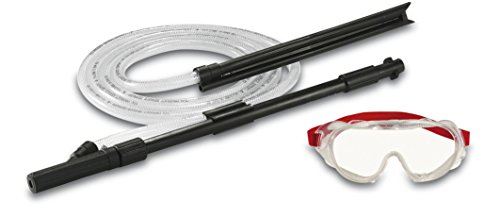
4. Blast Nozzle
A blast nozzle is an essential tool that controls the flow and dispersion of abrasive material propelled by the pressure washer and air compressor. The nozzle’s design and size should align with the chosen abrasive material and desired blasting effect. Ensure the nozzle is compatible with your pressure washer model.
5. Safety Equipment
When working with a sandblasting machine, the importance of safety cannot be understated. Invest in protective gear, including safety glasses, gloves, and a respirator, to shield yourself from any potential harm caused by flying debris and dust particles.
6. Hose and Couplings
A durable hose that can withstand the high-pressure stream of both the pressure washer and the air compressor is necessary. Additionally, ensure you have the appropriate couplings to connect the hose to the various components of the sandblasting setup securely.

7. Workpiece and Enclosure
Prepare the item or surface you wish to sandblast, ensuring it is well secured and positioned in a suitable enclosure or workspace. This enclosure helps contain the abrasive material and prevents it from scattering uncontrollably.
By gathering the materials and tools mentioned above, you will be equipped to begin the process of constructing your homemade sandblasting machine. Remember, safety should always be a top priority, so take the necessary precautions and enjoy the creativity and satisfaction of building your own sandblaster!
Building an Abrasive Blasting Device from a High-Pressure Cleaning Appliance
In this section, I will guide you through a step-by-step process of transforming a powerful washing tool into an effective sandblasting device. We will explore the necessary materials, important safety precautions, and detailed instructions to successfully repurpose your high-pressure cleaning appliance for abrasive blasting tasks.
| Step 1: | Gathering the Required Materials |
| Step 2: | Disassembling the Pressure Washer |
| Step 3: | Modifying the Nozzle and Wand |
| Step 4: | Creating an Abrasive Supply System |
| Step 5: | Installing Safety Measures |
| Step 6: | Connecting and Testing the Sandblasting Setup |
By following each step diligently, you will obtain a functional sandblasting apparatus that can be utilized for various projects, such as removing rust, paint, or other unwanted coatings. Remember, safety should always be your top priority throughout the construction and usage of the device.
Safety tips and precautions to consider when operating a DIY abrasive blaster
When it comes to working with a homemade device that utilizes high-pressure water and abrasive materials, safety should always be a top priority. It is crucial to take several precautions and follow certain guidelines to ensure your own well-being and the safety of those around you.

1. Protective gear
Before starting any sandblasting project, it is essential to equip yourself with the necessary protective gear. This includes wearing safety goggles or a face shield to protect your eyes from debris and flying particles. Additionally, using a respirator or a dust mask is crucial to prevent inhaling harmful dust and fumes.
2. Adequate ventilation
Always work in a well-ventilated area to avoid excessive buildup of dust or fumes. The use of abrasive materials and the forceful nature of the process can generate a substantial amount of dust, so proper ventilation will help minimize potential health risks
Furthermore, it is advisable to wear a full-body suit or protective clothing to shield your skin from the abrasive materials and prevent any potential injuries. Safety gloves and sturdy footwear should also be worn to safeguard your hands and feet from possible accidents.
3. Proper equipment setup
When setting up your homemade sandblaster, it is crucial to ensure that all connections and fittings are secure and leak-free. Check the pressure washer’s manual for specific instructions on how to attach the sandblasting nozzle and adjust the pressure settings correctly. This will help prevent any unexpected disconnections or accidents during use.
Moreover, always make sure the sand or abrasive material you are using is suitable for the sandblasting process. Certain materials may be too coarse or pose additional health hazards. It is recommended to use only designated sandblasting abrasives to ensure optimal performance and safety.

In conclusion, wearing proper protective gear, working in a well-ventilated area, and ensuring the correct setup of your homemade sandblaster are vital steps for a safe sandblasting experience. By adhering to these safety tips and taking necessary precautions, you can avoid potential injuries and hazards.
FAQ:
Can I make a sandblaster at home using a pressure washer?
Yes, you can make a sandblaster at home using a pressure washer. It requires some modifications and additional parts, but it is possible.
What materials do I need to make a sandblaster out of a pressure washer?
To make a sandblaster out of a pressure washer, you will need a pressure washer, a sandblasting kit, a sandblasting nozzle, an air compressor, and safety equipment such as goggles and gloves.
What are the steps involved in making a sandblaster out of a pressure washer?
The steps involved in making a sandblaster out of a pressure washer include attaching the sandblasting kit to the pressure washer, connecting an air compressor to the sandblasting kit, filling the sandblasting kit with abrasive material, adjusting the pressure and airflow, and using the sandblaster to remove debris or paint from surfaces.