How To Start A Briggs And Stratton Pressure Washer
Have you ever been faced with the challenge of tackling tough dirt and grime on your outdoor surfaces? It can be quite a daunting task, especially when you lack the proper equipment to get the job done efficiently. But fear not, for I have embarked on a quest to explore the intricacies of initiating the operational prowess of an exceptional piece of machinery.
Embarking on this adventure led me to uncover the secrets to unleashing the power of an esteemed contraption renowned for its ability to eradicate dirt and restore the beauty of various surfaces. This mechanical marvel, equipped with a high-pressure stream, surpasses conventional cleaning methods with its impeccable ability to obliterate even the most stubborn stains.
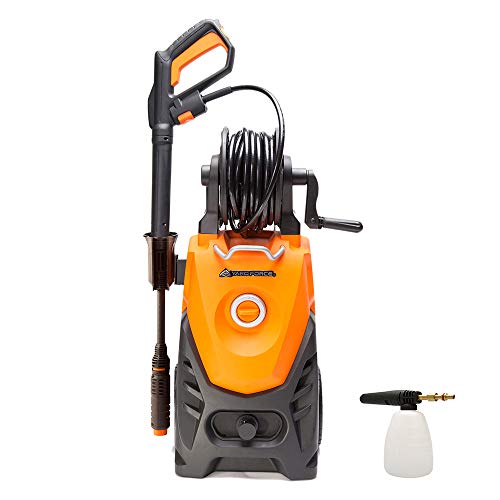
Within the realm of machinery, a splendid innovation called a “Briggs and Stratton Pressure Washer” effortlessly harnesses the forces of water pressure to provide an unparalleled cleaning experience. The sheer power it possesses is akin to being bestowed with a hidden superhuman strength, allowing you to effortlessly combat the relentless forces of dirt and debris.
Unlocking the gateway to success with this brilliant contrivance acknowledges the significance of understanding the process of initiation. So buckle up and join me on this enlightening journey as we explore the steps to acquainting yourself with the mesmerizing features of a Briggs and Stratton Pressure Washer.
Getting Your Briggs and Stratton Pressure Washer up and Running
When it comes to starting your powerful cleaning machine, there are a few simple steps you can follow to ensure a smooth and efficient operation. As someone who has personally dealt with various pressure washers, I can attest to the importance of proper starting techniques for your Briggs and Stratton pressure washer.
Firstly, it is essential to prepare your pressure washer before attempting to start it. This includes checking the oil level, ensuring there is sufficient fuel in the tank, and inspecting the spray gun for any damage or blockages. By addressing these preliminary tasks, you can avoid potential complications that may arise during the startup process.
Next, you’ll want to locate the engine control panel, which is usually positioned near the handle of the pressure washer. This panel typically features a few key components, including an ignition switch and a fuel valve. Before starting the engine, make sure the fuel valve is in the “open” position, allowing fuel to flow to the engine.
Once you’ve taken care of these preparatory steps, it’s time to focus on starting the engine itself. Start by locating the recoil starter, which can usually be found on the side or top of the engine. Firmly grasp the recoil starter handle, and with a smooth and even pull, give it a gentle yank. This action will engage the engine’s ignition system and initiate the starting process.
If the engine doesn’t start on the first pull, don’t panic. It may take a few attempts to get the engine running smoothly. Remember to maintain a steady and consistent motion when pulling the recoil starter, ensuring that you give the engine enough momentum to fire up.
Once the engine is running, you can then adjust the pressure settings to suit your cleaning needs. Most Briggs and Stratton pressure washers offer adjustable pressure controls, allowing you to customize the force and intensity of the water stream. Take a moment to familiarize yourself with these controls and select the appropriate pressure level for your cleaning task.
In conclusion, starting your Briggs and Stratton pressure washer doesn’t have to be a daunting task. By following these steps and taking the necessary precautions, you’ll be well on your way to enjoying a reliable and efficient cleaning experience. Remember to prioritize safety at all times and consult the user manual for any specific instructions related to your pressure washer model. Now, go ahead and unleash the power of your Briggs and Stratton pressure washer!
Checking the Fuel and Oil Levels
When preparing to use a Briggs and Stratton pressure washer, it is important to ensure that the fuel and oil levels are properly checked and maintained. This section will guide you through the process of checking and managing these essential fluids, which play a vital role in the proper functioning and longevity of your pressure washer.
Before starting the engine, it is crucial to verify that there is an adequate amount of fuel in the tank. Running out of fuel during operation can cause damage to the engine and result in unexpected interruptions. Therefore, it is recommended to regularly check the fuel level and refill it as needed, ensuring uninterrupted operation and optimal performance.
Additionally, checking the oil level is equally important to ensure the smooth functioning of your Briggs and Stratton pressure washer. The oil acts as a lubricant for the engine’s internal components and helps in maintaining its overall performance. Proper lubrication plays a crucial role in reducing friction and heat, extending the engine’s lifespan.
A convenient way to check the oil level is by using the oil dipstick or the oil fill cap, depending on the model of your pressure washer. Ensure that the pressure washer is on a level surface and the engine is turned off before performing the oil level check. Remove the dipstick or the oil fill cap and wipe it clean. Insert it back into the oil fill tube without fully tightening it, then remove it again to read the oil level. If the oil level is below the recommended range, add the appropriate type and amount of oil to bring it up to the required level.
Regularly monitoring the fuel and oil levels of your Briggs and Stratton pressure washer is a simple yet essential maintenance task that can significantly enhance its performance and prolong its lifespan. By ensuring that these fluids are properly maintained, you can have peace of mind knowing that your pressure washer is always ready for any task at hand.
Connecting the Water Supply
When it comes to setting up your pressure washer, one crucial step is connecting the water supply. This step plays a vital role in ensuring the proper functioning of the equipment and achieving optimal results. In this section, I will guide you through the process of connecting the water supply for your Briggs and Stratton pressure washer.
Gathering the Necessary Equipment
Before you begin, gather all the equipment you will need for this task. This includes a garden hose with a suitable length, a water source, and a spray gun with a compatible connector. Ensure that the garden hose is free from kinks or bends to maintain a steady water flow.
Attaching the Garden Hose
Start by attaching one end of the garden hose to the water source tap or faucet. Make sure the connection is secure to avoid any leaks. If necessary, you can use thread tape to provide an extra layer of sealant.
Next, take the other end of the garden hose and connect it to the water inlet on the pressure washer. This inlet is typically located at the rear or side of the machine. Again, ensure a tight connection to prevent any water loss.

Pro tip: It’s advisable to turn off the water supply before making these connections to avoid getting sprayed with water.
Once both ends are securely attached, you can turn on the water supply and check for any leaks or drips. If you notice any, tighten the connections or replace any faulty parts as needed.
Note: Some pressure washers may require additional attachments or adapters depending on the specific model. Always refer to the manufacturer’s instructions for detailed guidance on connecting the water supply.
Now that your water supply is properly connected, you can move on to the next steps in starting your Briggs and Stratton pressure washer.
Priming the Power Sprayer
Before you can start using your high-powered cleaning machine, it is important to ensure it is properly primed. Priming the power sprayer is a critical step in preparing it for operation. This process involves getting the fuel and oil mixture flowing, creating the necessary pressure within the system for optimal performance.

To begin the priming process, locate the fuel tank on the power sprayer. Check the fuel level to ensure there is enough gasoline for operation. If the fuel level is low, fill the tank with the appropriate gasoline, taking care not to overfill.
Next, locate the oil fill cap and remove it carefully. Check the oil level and add the necessary amount of oil if needed. It is important to use the type of oil recommended by the manufacturer to ensure proper lubrication and prevent damage to the power sprayer.
Once you have ensured the fuel and oil levels are adequate, it’s time to prime the fuel line. Identify the priming bulb, often located near the fuel tank or fuel filter. Firmly press and release the priming bulb multiple times to create suction and facilitate the flow of fuel into the system.
After priming the fuel line, look for the choke lever or knob, typically located near the engine. Adjust the choke according to the manufacturer’s instructions, usually by moving it to the “choke” position. This step helps to create the optimal air-to-fuel mixture for a smooth and efficient start.
With the choke set, locate the starter rope. Gently pull the rope until resistance is felt, then give it a strong, quick pull to start the engine. If necessary, repeat this process until the engine starts running smoothly.

Once the engine is running, allow it to warm up for a few minutes. During this time, check for any leaks or abnormal sounds and make any necessary adjustments before beginning your cleaning tasks.
Priming the power sprayer may seem like a small and trivial step, but it is crucial to ensure hassle-free operation and longevity of your equipment. By following these simple steps and taking the time to properly prime your power sprayer, you can confidently tackle any cleaning project with ease.
Pulling the Recoil Starter
When it comes to getting your Briggs and Stratton pressure washer up and running, one crucial step is pulling the recoil starter. This simple yet essential task kick-starts the engine and sets everything in motion. In this section, I will guide you through the process of pulling the recoil starter for your pressure washer, ensuring a smooth start and efficient cleaning performance.
Step 1: Prepare the Pressure Washer
Before pulling the recoil starter, it is important to ensure that your pressure washer is set up correctly. Make sure that the water supply is connected, the fuel tank is filled with gasoline, and all hoses are properly attached. This preparation ensures that your pressure washer is ready to start and perform optimally.
Step 2: Locate the Recoil Starter
To begin pulling the recoil starter, you need to locate it on your Briggs and Stratton pressure washer. The recoil starter is usually positioned on the side or top of the engine, depending on the model. It is a rope or cord that you will need to pull to start the engine.

Step 3: Get a Firm Grip
Once you have located the recoil starter, firmly grasp the handle or grip attached to the cord. Ensure that your grip is secure to avoid any slippage when pulling the starter.
Step 4: Apply Tension and Pull
Before pulling the recoil starter, create tension in the cord by pulling it slightly away from the engine. This tension will allow for a smooth and controlled start. Once tension is applied, pull the cord firmly and quickly to initiate the engine’s ignition. Be mindful not to pull too hard or jerk the cord excessively, as this may cause damage.
Step 5: Repeat if Necessary
If your Briggs and Stratton pressure washer does not start on the first attempt, repeat the process by pulling the recoil starter again. Sometimes, it may take a couple of pulls to get the engine going. Remember to maintain a firm grip and apply adequate tension before each pull.
By following these steps and pulling the recoil starter correctly, you will be able to start your Briggs and Stratton pressure washer effortlessly. This ensures that you can tackle any cleaning task with ease and efficiency, knowing that your pressure washer is ready to deliver optimal performance.
Operating the Power Cleaning Device
When it comes to using this efficient cleaning tool, there are a few important steps to keep in mind. In this section, I will guide you through the process of operating the power cleaning device using simple and straightforward instructions.

To begin with, ensure that you have adequately prepared the cleaning area. Clear any objects or debris that may obstruct the cleaning process. It is essential to have a safe and clean working environment.
Next, connect the power cleaning device to a suitable power source. Make sure the electrical cord is securely plugged into an appropriate outlet. A stable power connection is crucial for reliable and consistent performance.
Before starting the power cleaning device, familiarize yourself with the control panel. Take note of the controls, such as the on/off switch, pressure adjustment dial, and spray nozzle options. Understanding these controls will help you optimize the cleaning process based on your specific needs.
Once you have familiarized yourself with the control panel, it’s time to start the power cleaning device. Ensure that the device is positioned securely, maintaining a safe stance. Flip the on/off switch to the “on” position, and you will hear the device spring to life.
As the power cleaning device is now operational, you can adjust the water pressure based on the cleaning task at hand. Turn the pressure adjustment dial clockwise to increase the pressure or counterclockwise to decrease it. The choice will depend on the surface or object you are cleaning.
Finally, choose the appropriate spray nozzle for your specific cleaning needs. Whether it is a wide spray nozzle for larger surface areas or a narrow nozzle for stubborn stains, selecting the correct nozzle will maximize the efficiency and effectiveness of your cleaning efforts.
Remember to always maintain a safe distance from the cleaning surface and wear protective eyewear and gloves for added safety. With these steps in mind, you are well on your way to operating the power cleaning device with confidence and achieving outstanding cleaning results.
Shutdown and Maintenance Tips
When it comes to properly shutting down and maintaining your Briggs and Stratton pressure washer, there are a few key steps to keep in mind to ensure optimal performance and longevity. As an experienced user of these power washers, I have learned the importance of these tips firsthand.
One crucial aspect of shutting down your pressure washer is allowing it to cool down before performing any maintenance tasks. This not only protects the engine and other components from potential damage due to high heat, but it also ensures your safety while working on the machine.
After the pressure washer has cooled down, it is essential to properly drain any remaining fuel, oil, and water from the system. This prevents the buildup of stale fuel or oil that can clog the engine and lead to performance issues. Additionally, by removing any water from the system, you prevent freezing during colder months, which could cause damage to internal components.
Regularly inspecting and cleaning the air filter is another critical maintenance tip. A dirty or clogged air filter can restrict airflow to the engine, resulting in decreased performance. By cleaning or replacing the air filter as necessary, you help to maximize the efficiency and lifespan of your Briggs and Stratton pressure washer.
Properly storing your pressure washer is also crucial for its longevity. When not in use, it is recommended to store the machine and its accessories in a clean and dry location, protected from extreme temperatures. This helps to prevent rusting, corrosion, and other damage that could occur in unfavorable storage conditions.
Lastly, regular maintenance should include inspecting and tightening all bolts, nuts, and connections. Vibrations from the operation of the pressure washer can cause these components to loosen over time. By checking and tightening them regularly, you minimize the risk of parts becoming loose or detached during use, which could pose a safety hazard.
By following these shutdown and maintenance tips, you can ensure that your Briggs and Stratton pressure washer continues to perform at its best for years to come. Taking the time to properly care for and maintain your machine will not only save you time and money in the long run but will also provide you with peace of mind knowing that you are getting the most out of your investment.
FAQ:
Do I need any special tools to start a Briggs and Stratton pressure washer?
No, you do not need any special tools to start a Briggs and Stratton pressure washer. However, it is important to have the necessary equipment such as a water supply and fuel in the tank. Additionally, make sure to have a firm grip on the starter cord to ensure a smooth and successful startup.