How To Setup Foam Cannon On Pressure Washer

As an avid car enthusiast, there is nothing quite as satisfying as seeing a thick, luxurious layer of foam adorning the surface of your vehicle during a wash. It not only enhances the cleaning effect but also adds a touch of luxury to your car care routine. However, achieving that perfect foam consistency can often feel like a challenging task, especially when using a foam cannon attachment on your pressure washer.
Throughout my years of experimenting with various foam cannon setups, I have come to realize that the secret to creating a dense foam lies in the careful calibration of your pressure washer settings, the selection of the appropriate detergent, and the proper technique. By understanding these key factors, you can elevate your car wash routine to a whole new level of effectiveness and enjoyment.
Optimizing your pressure washer for foam creation
Creating a thick layer of foam starts with fine-tuning the settings on your pressure washer. It’s important to strike the perfect balance between water pressure and flow rate to achieve the desired results. Adjust the pressure regulator to a level that provides ample force to agitate the detergent while avoiding excessive force that may result in water wastage.
The selection of a foam-producing detergent is crucial
Choosing the right detergent is another critical aspect of achieving that rich, velvety foam. Look for a high-quality, concentrated foam-producing formula that is specifically designed for use with foam cannons. These detergents are formulated with advanced additives that create a thick foam that clings to the surface of your vehicle, allowing it to dwell for an extended period and break down dirt and grime effectively.
Mastering the technique for flawless foam application
Now that you have optimized your pressure washer and selected the perfect foam-producing detergent, it’s time to master the art of foam application. Start by evenly pre-wetting the surface of your vehicle to loosen any loose dirt or debris. Then, using smooth, sweeping motions, apply the foam in a controlled manner, ensuring complete coverage. Allow the foam to dwell for the recommended period before rinsing off, and be prepared to be amazed by the thoroughness of the cleaning result.
By understanding the intricacies of foam creation in conjunction with your pressure washer, you can transform your car washing routine into a luxurious and efficient experience. With a well-calibrated pressure washer, a top-quality foam-producing detergent, and expert foam application technique, you will be able to achieve that awe-inspiring foam thickness that is often seen in professional car detailing establishments. So, get ready to foam like a pro and take your car washing game to the next level!

Effective Steps to Install the Foam Attachment on Your Power Washer
When it comes to enhancing the cleaning performance of your power washer, adding a foam attachment can be a game-changer. By following a few simple steps, you will be able to seamlessly install the foam attachment without any hassle.
To begin, start by gathering all the necessary equipment and accessories needed for the installation process. This typically includes an adjustable wrench, a foam cannon or gun, a compatible hose connector, and a suitable pressure washer.
Firstly, ensure that the pressure washer is turned off and disconnected from the power source. This is crucial for safety purposes and to prevent any accidental discharge of water or foam during the installation process.
Next, locate the hose connector on the pressure washer where the foam attachment will be connected. Typically, this is a threaded connection located near the spray gun or lance. Use the adjustable wrench to carefully loosen and remove the existing connector if necessary.
Once the connector has been removed, take the foam cannon or gun and apply a small amount of Teflon tape to the threaded end of the attachment. This will help create a tight and secure seal when it is connected to the pressure washer.

Now, firmly attach the foam cannon or gun to the pressure washer’s hose connector. Ensure that it is threaded correctly and tightened securely using the adjustable wrench. Take caution not to overtighten, as it could cause damage to the attachment or the pressure washer.
Finally, double-check all the connections and make sure they are secure. Inspect for any signs of leaks or loose fittings. Once everything is in place, you are ready to connect the pressure washer to the power source and activate it to begin your foam cleaning experience.
In conclusion, installing a foam attachment on your pressure washer is a straightforward process. By following the steps outlined above, you will be able to set up the foam cannon or gun without any complications. As always, refer to the manufacturer’s instructions for any specific guidelines or recommendations tailored to your equipment.
Understanding the Foam Cannon
As an enthusiast of pressure washing, I am always looking for ways to improve the efficiency and effectiveness of my cleaning routine. One tool that has greatly enhanced my experience is the foam cannon. In this section, I will share my understanding of this amazing device and how it can revolutionize your pressure washing experience.
What is a foam cannon?

A foam cannon is a specialized attachment that can be connected to a pressure washer. Its primary function is to generate thick foam by mixing a cleaning solution with pressurized water. This foam is then applied to the surface to be cleaned, allowing for a more thorough and efficient cleaning process.
How does it work?
The foam cannon operates by utilizing the pressure generated by the pressure washer to draw the cleaning solution from a reservoir and mix it with water. The mixture is then expelled through a nozzle, producing a thick and clinging foam. This foam adheres to the surface, allowing the cleaning agents in the solution to break down dirt, grime, and other contaminants effectively.
Benefits of using a foam cannon
Using a foam cannon offers several advantages over traditional pressure washing methods. Firstly, the foam helps to lubricate the surface, reducing the chances of scratching or damaging it during the cleaning process. Additionally, the increased dwell time of the foam allows the cleaning agents to penetrate and dissolve contaminants more effectively, resulting in a cleaner end result. Moreover, the foam provides a visual indication of where the solution has been applied, ensuring complete coverage and minimizing the chances of missing any spots.

Choosing the right foam cannon
When selecting a foam cannon, it is essential to consider factors such as the size of your pressure washer, the desired foam thickness, and the type of cleaning solution you plan to use. Additionally, checking customer reviews and gathering recommendations from fellow pressure washing enthusiasts can help guide you towards the best option for your specific needs.
Tips for using a foam cannon
Once you have chosen the foam cannon that suits your requirements, it is vital to follow proper usage guidelines. This includes diluting the cleaning solution according to the manufacturer’s instructions, adjusting the foam thickness by controlling the water and detergent ratios, and allowing enough dwell time for the foam to work its magic. Additionally, rinsing off the foam thoroughly after cleaning will ensure that no residue is left behind.
In conclusion, understanding the benefits and proper usage of a foam cannon can greatly enhance your pressure washing experience. By investing in this specialized attachment and following the recommended guidelines, you can achieve a more efficient and thorough cleaning process, resulting in pristine and impressive results.
Gathering the Necessary Equipment
Assembling all the essential gear before setting up a foam cannon on a pressure washer is crucial for achieving optimal results. In this section, I will outline the various tools and accessories you will need to ensure a successful foam cannon setup.
| Equipment | Description |
|---|---|
| Pressure Washer | An apparatus that uses high-pressure water to clean and remove dirt or grime from various surfaces. |
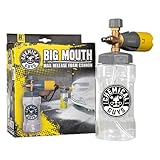
| Foam Cannon | A specialized attachment that connects to the pressure washer, capable of producing dense foam for effective cleaning. |
| Nozzle | A spray tip that controls the flow and pattern of water coming out of the foam cannon, allowing for different foam consistency and application techniques. |
| Soap Solution | A detergent specifically formulated for foam cannons, designed to produce thick foam and enhance the cleaning process. |
| Water Source | A water supply capable of delivering a steady flow of water to the pressure washer and foam cannon. |
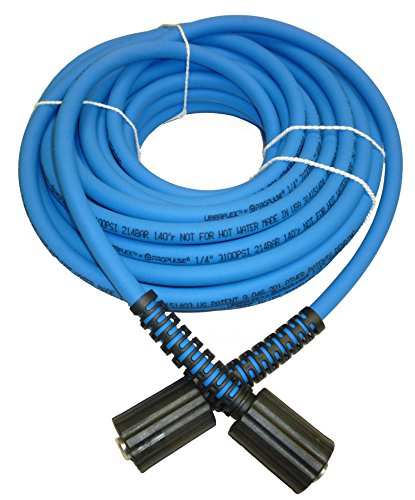
| Hose | A flexible tube that connects the pressure washer to the water source, allowing water to flow from one to the other. |
| Extension Wand | A long, detachable rod that extends the reach of the pressure washer, allowing for easier application of foam in hard-to-reach areas. |
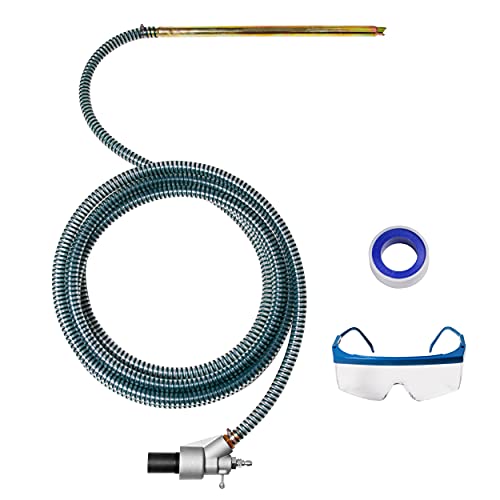
| Personal Protective Equipment (PPE) | Safety gear such as gloves and goggles to protect yourself from potential splashes or chemicals during the foam cannon setup process. |
By gathering all these necessary tools and equipment, you will be well-prepared to set up your foam cannon effectively and achieve the desired results while using your pressure washer.
Preparing the Equipment
Before diving into the process of setting up the foam cannon on a pressure washer, it’s crucial to take some steps to ensure the equipment is prepared for optimal performance. As I start this process, I make sure to inspect the pressure washer thoroughly to ensure its functionality and safety. This includes checking the power source, examining the hose connections, and assessing any visible damage or leaks.
Next, I gather all the necessary tools and materials for the setup. This typically includes the foam cannon attachment, a suitable nozzle, a bucket or container for the detergent mixture, and a suitable cleaning solution. It’s important to choose a cleaning solution that suits the cleaning task at hand, whether it’s removing dirt, grime, or other debris from the desired surface.

Once I have everything I need, I carefully attach the foam cannon to the pressure washer wand or gun. This is usually done by screwing or sliding the foam cannon onto the nozzle end of the wand, ensuring a secure connection. It’s important to follow the manufacturer’s instructions for proper attachment to avoid any damage or leaks.
After attaching the foam cannon, I connect the pressure washer to a suitable water source. This can be a standard garden hose or a dedicated water supply with adequate pressure. I make sure to check the water source for any potential blockages or restrictions that may affect the pressure washer’s performance.
Finally, I prime the foam cannon by filling the container or bucket with the desired cleaning solution. I then adjust the foam cannon’s settings, such as the dilution ratio or the foam thickness, according to the instructions provided by the manufacturer or my personal preferences. Once everything is in place, I am ready to move on to the next step of the foam cannon setup process.
Attaching the Foam Dispenser to the Pressure Blaster
When it comes to equipping your pressure blaster with a foam dispenser, the process can be straightforward and hassle-free. In this section, I’ll guide you through the steps of connecting the foam dispenser to your pressure blaster, so you can effortlessly achieve a thick lather and maximize your cleaning potential.
To begin, ensure that your pressure blaster is powered off and disconnected from any electrical source. Safety first!

Once you’ve confirmed that your pressure blaster is in a safe state, you can locate the attachment fitting on the machine. This fitting is typically found near the nozzle assembly or wand holder, which makes it easily accessible.
Gently unscrew the cap covering the attachment fitting to reveal the threaded connection point. Take care not to force the cap, as it may be tight due to previous use or handle it cautiously if it’s hot.
Now, take the foam dispenser and identify the corresponding male-threaded connector. Make sure it is clean and free of any debris that may affect the attachment process. Taking note of the thread direction is crucial in securing a tight fit, ensuring that the foam dispenser remains securely attached during operation.
Attach the foam dispenser to the pressure blaster by aligning the male-threaded connector with the attachment fitting. Gently twist the foam dispenser clockwise to engage the threads, making sure not to cross-thread the connection. Proceed with tightening the connection using your hand until it feels secure.
With the foam dispenser now attached, it’s crucial to inspect the connection for any signs of leakage or looseness. If you notice any abnormalities, double-check the connection and re-tighten if necessary.
Finally, before operating the pressure blaster with the foam dispenser, ensure that any adjustment settings on the dispenser itself, such as the foam thickness or spray pattern, are adjusted to your desired specifications.
Now that you have successfully attached the foam dispenser to your pressure blaster, you can confidently move forward in your cleaning endeavors, effortlessly applying a rich lather for an exceptional cleaning experience.
Mixing the Soap Solution
When it comes to preparing the perfect soap solution for your foam cannon, there are a few key factors to consider. As an experienced user of foam cannons, I have found that the mixture of soap and water plays a vital role in achieving the desired foam thickness and cleaning effectiveness. In this section, I will guide you through the steps of mixing the soap solution to ensure optimal foam generation during your pressure washing sessions.
Choosing the Right Soap
The first step in creating the ideal soap solution is selecting the right soap product. It is important to choose a soap that is specifically designed for use in pressure washers and foam cannons. These specialized soaps are formulated to create a rich foam while also effectively removing dirt, grime, and other contaminants from various surfaces. Look for a soap that is biodegradable and pH-neutral to ensure it is safe for both your pressure washer equipment and the environment.
Proper Dilution Ratio
Now that you have chosen the right soap, the next step is to determine the correct dilution ratio. This ratio will depend on the specific soap product you are using, as different brands and types may have varying dilution recommendations. The dilution ratio is typically stated on the soap’s packaging or instructions. It is vital to follow these instructions carefully to ensure the optimal foam quality. Generally, a higher dilution ratio will result in thicker foam, while a lower ratio may lead to a more watery consistency.
Adjusting the Foam Cannon Settings
When it comes to achieving the perfect foam consistency for your pressure washer, properly adjusting the settings of your foam cannon is crucial. Without the right settings, you may end up with either too much or too little foam, which can affect the effectiveness of your cleaning process.
1. Foam Thickness
One of the key settings to adjust on your foam cannon is the foam thickness. This determines how dense or thin the foam will be when it is discharged from the cannon. To adjust the foam thickness, locate the foam adjustment knob on your foam cannon. Turn the knob clockwise to increase the foam thickness and counterclockwise to decrease it. Experiment with different settings to find the optimal foam thickness for your cleaning needs.
2. Spray Pattern
In addition to adjusting the foam thickness, you can also modify the spray pattern of the foam cannon. The spray pattern determines the angle and width at which the foam is dispersed from the cannon. To adjust the spray pattern, look for the spray pattern adjustment dial on your foam cannon. Rotate the dial to change the angle and width of the spray pattern. This allows you to target specific areas or cover a wider surface area depending on your cleaning requirements.
- Experiment with different spray pattern settings to find the ideal coverage for your cleaning task.
- Remember to take into consideration the size and shape of the area you are cleaning to ensure you achieve thorough foam coverage.
- Keep in mind that a narrower spray pattern may result in thicker foam, while a wider spray pattern may create thinner foam.
- Regularly inspect and clean the nozzle and fittings of your foam cannon to prevent clogging and maintain optimal foam performance.
By adjusting the foam thickness and spray pattern of your foam cannon, you can customize the foam output to suit your specific cleaning needs. Take the time to experiment with different settings and techniques to find the perfect balance for achieving maximum foam coverage and cleaning efficiency.
Using the Foam Dispenser to Apply Foam
Today, I want to share with you my experience of using the foam dispenser attachment with my pressure washer. Applying foam to your car or other surfaces can help in achieving a more thorough cleaning and protecting delicate surfaces from potential damage. In this section, I will guide you through the step-by-step process of effectively using the foam dispenser to apply foam in a safe and efficient manner.
To begin, you will need to prepare your foam dispenser. Ensure that it is securely attached to the pressure washer wand or lance. Make sure all the connections are tight to avoid any leaks during the application process. It is also important to note that you should only use a foam concentrate or soap specifically formulated for use with pressure washers.
Once your foam dispenser is properly set up, it’s time to mix the foam concentrate with water. Different foam concentrates will have varying recommended dilution ratios, so be sure to follow the instructions provided by the manufacturer. Typically, you will need to dilute the concentrate with water in a separate container before pouring the mixture into the foam dispenser. This step ensures that the foam is properly activated and produces the desired thickness and quality.
With the diluted foam concentrate in the dispenser, it’s time to start applying foam to the target surface. Begin by adjusting the foam dispenser nozzle to achieve the desired foam thickness and spray pattern. It’s a good idea to start with a low-pressure setting and gradually increase the pressure until you achieve the desired foam coverage. Remember, the goal is to evenly coat the surface with foam, allowing it to dwell for a sufficient amount of time to loosen dirt and grime.
When applying foam, it’s important to work in small sections to ensure that the foam doesn’t dry before you have a chance to rinse it off. Starting from the top and working your way down, apply the foam in smooth, overlapping motions. This helps to ensure an even application and allows the foam to penetrate into all the nooks and crannies for a thorough cleaning.
After allowing the foam to dwell for the recommended amount of time (check the instructions provided with your foam concentrate), it’s time to rinse off the foam and the loosened dirt. Switch the foam dispenser attachment to the rinsing mode or remove it completely, depending on your pressure washer model. Use a high-pressure spray pattern to thoroughly rinse off the foam, starting from the top and working your way down.
Lastly, take a moment to admire the clean and shiny surface you have achieved using the foam dispenser attachment with your pressure washer. Remember to properly clean and store the foam dispenser for future use, as taking care of your equipment will ensure its longevity.
I hope this guide has been helpful in explaining how to effectively use the foam dispenser attachment with your pressure washer. By following these steps, you can achieve a more efficient and thorough cleaning experience while protecting delicate surfaces. Happy foaming!
Cleaning and Maintaining the Foam Cannon
When it comes to ensuring the longevity and performance of your foam cannon, proper cleaning and maintenance are crucial. As an avid user of foam cannons, I have discovered a few tips and tricks that can help you keep your foam cannon in top shape. In this section, I will share my personal insights on how to effectively clean and maintain your foam cannon, ensuring optimal foam generation every time you use it.
1. Regular Cleaning Routine
- After each use, it is important to thoroughly clean the foam cannon to prevent any residue build-up that can hinder its performance.
- Start by rinsing the foam cannon with clean water to remove any loose dirt or foam residue.
- Next, use a mild soap or detergent solution to clean the exterior of the foam cannon, ensuring that all surfaces are properly scrubbed.
- Rinse the foam cannon again with clean water to remove any soap residue.
- Allow the foam cannon to air dry completely before storing it away.
2. Deep Cleaning and Deposition Removal
- Over time, foam cannons can develop mineral deposits or clogs that can affect their performance. To effectively remove these deposits, deep cleaning is necessary.
- Start by filling a container with a mixture of warm water and a descaling agent or vinegar.
- Detach the nozzle and other removable parts of the foam cannon and soak them in the descaling solution for a few hours.
- Gently scrub the parts with a soft brush to remove any stubborn deposits.
- Rinse the parts thoroughly with clean water and allow them to air dry before reassembling the foam cannon.
3. Lubrication and O-ring Maintenance
- To ensure smooth operation of your foam cannon, it is essential to regularly lubricate the moving parts and inspect the O-rings for any signs of wear or damage.
- Apply a small amount of silicone lubricant to the moving parts, ensuring that they are properly coated.
- Inspect the O-rings for cracks, tears, or other damage. If any issues are found, replace them with new ones.
- Regularly check the connections and fittings of the foam cannon to ensure they are tightly secured.
By following these cleaning and maintenance tips, you can prolong the lifespan of your foam cannon and enjoy consistent foam generation every time you use it. Remember to always prioritize cleanliness and inspect your foam cannon regularly to detect any issues early on. Happy foam cannon cleaning!
FAQ:
What is a foam cannon?
A foam cannon is an attachment that can be used with a pressure washer to create thick and foamy soap suds. It allows for more effective and efficient cleaning by providing a layer of foam that clings to the surface being washed.
Why should I use a foam cannon on my pressure washer?
Using a foam cannon on your pressure washer has several benefits. Firstly, it helps to maximize the cleaning power of the soap by ensuring better coverage and longer contact time with the surface being cleaned. Additionally, the thick foam created by the foam cannon helps to lubricate the surface, reducing the risk of scratches or swirl marks when washing. It also makes the cleaning process faster and more efficient, as the foam loosens and lifts dirt and grime from the surface.