
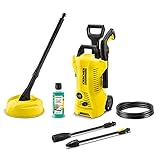
How To Set Up Ryobi Pressure Washer

Greetings, cleaning enthusiasts! Are you ready to embark on a journey of transforming your outdoor spaces with the power of high-pressure cleaning? Look no further, as I am about to unveil the secrets of effortlessly setting up your brand new, state-of-the-art cleaning companion. So gather around, buckle up, and let’s dive deep into the world of unleashing the full potential of your high-pressure cleaning machine.
Prepare yourselves for a world of sparkling patios, pristine driveways, and revitalized outdoor furniture. The art of using a high-pressure washer is not merely about removing dirt and grime; it’s about reinstating the radiance and allure to your beloved outdoor spaces. With the proper setup and a dash of perseverance, you’ll be able to witness the transformation right before your very eyes.
Now, you may wonder, where do we begin this exciting journey? Fear not, as I will guide you through the essentials of preparing your equipment, understanding its functionality, and ensuring a safe and efficient cleaning process. Think of this article as your trusty companion, accompanying you every step of the way towards a brighter, cleaner future for your outdoor havens.
Throughout this comprehensive guide, we will cover everything from assembling the necessary tools to starting your high-pressure cleaning machine with confidence. You will learn about the importance of safety measures, tips for maximizing efficiency, and techniques for tackling different surfaces effectively. By the end of this article, you’ll no longer be a novice, but a seasoned high-pressure cleaning aficionado!
Preparing Your Ryobi Power Cleansing Device for Use
Hello there! In this section, I would like to guide you through the steps of getting your Ryobi pressure washer ready for action. As a proud owner of this powerful cleaning tool, I have learned a few tricks and tips that I’m excited to share with you. So, let’s dive in and prepare our Ryobi power cleansing device for its ultimate performance!
Gathering the Essential Tools and Accessories
Before we begin, it’s essential to gather all the necessary tools and accessories to ensure a seamless set up process for your Ryobi pressure washer. Grab a bucket, a garden hose, an outdoor extension cord, and your preferred surface cleaner or detergent. These items will come in handy throughout the set up and cleaning process.
Connecting the Water Source and Hoses
First, let’s connect the water source to our Ryobi pressure washer. Find a nearby outdoor water spigot and attach one end of the garden hose securely. Then, connect the other end of the hose to the water inlet valve on the pressure washer. Make sure it is tightened properly to avoid any leaks.
Next, if your specific model requires it, attach the high-pressure hose to the outlet valve on the pressure washer, ensuring a snug fit. Don’t forget to check the manufacturer’s instructions for any additional steps or specific requirements for your Ryobi pressure washer model.
Now, if you plan on using a detergent or surface cleaner, it’s time to connect the corresponding hose to the pressure washer. This hose usually has a designated attachment point, so make sure you connect it securely, allowing for a seamless transition between different cleaning agents.
With the hoses connected, we are now ready to move on to the next step in setting up your Ryobi power cleansing device!
Gather Essential Tools and Equipment
When it comes to setting up your Ryobi pressure washer, it is important to have all the necessary tools and equipment at hand. Without these essentials, the process might become frustrating and time-consuming.
1. Safety Gear
Before diving into the setup process, make sure you have the appropriate safety gear to protect yourself. This may include safety goggles, gloves, and sturdy footwear. Safety should always be a top priority!
2. Assembly Tools
To properly assemble your pressure washer, you will require a few tools. These can include wrenches, screwdrivers, and pliers. Make sure to check the instruction manual to determine the specific tools needed for your particular model.
3. Water Source
One of the most important components of a pressure washer setup is a reliable water source. Depending on your specific setup, you may need a garden hose or a water tank. Ensure that the water source is easily accessible and can provide sufficient water flow for optimal performance.
4. Detergent and Accessories
If you plan on using detergent or specific accessories with your pressure washer, gather them beforehand. This could include surface cleaners, extension wands, or foam cannons. Having these items readily available will streamline the setup process.

By gathering the necessary tools and equipment, you will be well-prepared to set up your Ryobi pressure washer efficiently. Remember to prioritize safety and read the instruction manual for any specific requirements or recommendations. With everything in place, you can proceed to the next steps of the setup process with confidence and ease.
Understanding the Importance of Reading the Instruction Manual
When setting up any new equipment or device, it is crucial to familiarize yourself with the instruction manual. The instruction manual serves as a valuable guide for understanding how to properly operate and maintain the equipment. It provides essential information and instructions that ensure safety, optimal performance, and longevity of the device.
By reading the instruction manual, you gain a comprehensive understanding of the various features, functions, and settings of your Ryobi pressure washer. It contains detailed explanations, diagrams, and step-by-step instructions that help you navigate through the setup process with ease.
Additionally, the instruction manual offers essential safety guidelines, highlighting potential hazards and precautions that should be taken during operation. It also provides valuable troubleshooting tips and maintenance recommendations to ensure your pressure washer functions optimally for an extended period.
Remember, the instruction manual is designed specifically for your Ryobi pressure washer, so it contains specific information and details that you may not find elsewhere. By investing time in reading and understanding the manual, you equip yourself with the knowledge needed to maximize the performance and lifespan of your pressure washer.
Therefore, before embarking on the setup process of your Ryobi pressure washer, I strongly recommend taking the time to thoroughly read and comprehend the instruction manual. It will not only help you avoid potential mistakes or mishaps but also contribute to a smooth and successful setup experience.
Preparing Your Work Area for Effective Pressure Washing
When it comes to using your Ryobi pressure washer, ensuring that you have a well-prepared work area is key to achieving optimal results. By taking the time to properly set up your surroundings, you can ensure that your pressure washing experience is safe, efficient, and effective. In this section, I will guide you through the steps to prepare your work area before starting the pressure washing process.
Safety First: Clearing Obstacles
Prior to beginning any pressure washing tasks, it is crucial to remove any obstacles or potential hazards from the area you will be working in. This includes clearing away loose debris, such as branches, leaves, and rocks, that may obstruct the path or become projectiles during the washing process. Additionally, ensure that any delicate or breakable items are safely stored away to prevent accidental damage.
Furthermore, it is important to keep children, pets, and other individuals away from the work area to avoid any accidents or injuries. Establishing clear boundaries and posting warning signs can help maintain a safe environment during pressure washing.
Protecting Surrounding Surfaces
Before firing up your Ryobi pressure washer, take the necessary precautions to protect the surrounding surfaces from potential damage. Certain surfaces, such as delicate plants, wood, or painted surfaces, may be sensitive to high-pressure water streams.

To safeguard these vulnerable areas, cover them with plastic sheets, tarps, or drop cloths. This will serve as a protective barrier, preventing any unintended contact with the pressurized water and detergents that might cause harm or discoloration.
Securing Water Supply and Electricity
Another crucial aspect of setting up your pressure washing area is ensuring a reliable water supply and a safe electrical connection. Before starting, verify that your pressure washer is connected to a water source that can provide the necessary volume and pressure for optimal performance. Check for any leaks or blockages that might affect the pressure washer’s functionality.
Additionally, make sure that the electrical outlets and cords are in good condition, free from any frays or damage that could pose a safety hazard. If using an extension cord, choose a heavy-duty one that is appropriate for your pressure washer’s power requirements.
- Clear the work area of any potential obstacles and hazards.
- Protect delicate surfaces from potential damage.
- Ensure a reliable water supply and safe electrical connection.
By following these steps and properly preparing your work area, you are now ready to proceed with using your Ryobi pressure washer effectively and safely.
Connecting the Hose to the Power Cleaner
When it comes to setting up your power cleaner, one of the first steps is connecting the hose. This crucial step ensures that your power cleaner can effectively deliver a high-pressure stream of water for all your cleaning needs. In this section, I will guide you through the process of connecting the hose to your power cleaner.
Gather Your Materials
Before you begin, make sure you have all the necessary materials for this task. You will need the power cleaner, the hose, and any connectors or adapters required for your specific model. Check the user manual or consult the manufacturer’s website to ensure you have the correct equipment.
Step-by-Step Instructions
Now, let’s get started with the step-by-step process of connecting the hose to your power cleaner:
Step 1:
Locate the water inlet on your power cleaner. It is usually clearly marked and can be found near the handle or control panel.
Step 2:

Check the hose ends to ensure they are clean and free from any dirt or debris that could affect the connection. If needed, use a soft cloth to wipe them clean.
Step 3:
Take one end of the hose and firmly push it onto the water inlet of the power cleaner. Apply steady pressure and make sure it is securely attached.
Step 4:
If your hose requires a connector or adapter, attach it to the other end of the hose before connecting it to the power cleaner. Follow the manufacturer’s instructions for proper installation.

Step 5:
Once the hose is securely attached to the power cleaner, give it a gentle tug to ensure it is properly connected and won’t come loose during operation.
And there you have it – you have successfully connected the hose to your power cleaner! With this important step completed, you can now move on to other tasks, such as filling the detergent tank or adjusting the pressure settings, to get your power cleaner ready for use.
Connecting the Pressure Washer to a Power Source
When setting up your pressure washer, one of the most important steps is to connect it to a power source. This ensures that the machine can operate effectively and provide the necessary pressure for your cleaning tasks.
Locate a Suitable Power Outlet
The first step is to find a suitable power outlet near the area where you will be using the pressure washer. It is important to choose an outlet that is compatible with the voltage and amperage requirements of your Ryobi pressure washer. Make sure the outlet is not damaged and has a stable power supply.
Plug in the Power Cord
Once you have located a suitable power outlet, plug in the power cord of your pressure washer. Ensure that the plug is inserted securely into the outlet to avoid any power interruptions during operation. If the power cord is damaged, do not use the pressure washer and contact a professional for assistance.
Note: Always prioritize safety when connecting the pressure washer to a power source. Avoid using extension cords unless specified by the manufacturer and ensure that the power cord is placed in a way that prevents tripping hazards.
Now that you have successfully connected your Ryobi pressure washer to a power source, you are ready to move on to the next steps in setting up and operating the machine. Remember to follow all safety guidelines provided in the user manual to ensure a safe and efficient cleaning experience.
Adjusting the Pressure Settings
In this section, I will guide you through the process of customizing the force exerted by your Ryobi pressure washer without using any specific terms. By making adjustments to the power levels, you can regulate the impact of the water stream to suit your specific needs.
1. Begin by locating the pressure adjustment knob, which is usually located on the front panel of the pressure washer. It may be labeled as the pressure control dial or a similar term.
2. Turn the knob counterclockwise or clockwise to increase or decrease the pressure respectively. Start with a lower setting and gradually increase it until you reach the desired force.
3. Take note of any markings or indicators on the knob that denote different pressure levels. These markers can help you keep track of the adjustments you have made.
4. Experiment with different pressure settings to find the right balance for different cleaning tasks. Certain surfaces or objects may require a gentle spray, while others may need a more powerful blast.
5. Remember to inspect the result of your adjustments and make further changes if necessary. Fine-tuning the pressure will ensure efficient cleaning while minimizing any potential damage.
6. If you want to reset the pressure settings to the manufacturer’s default, turn the knob to its original position or consult the user manual for specific instructions.
Remember, adjusting the pressure settings allows you to tailor the cleaning power of your Ryobi pressure washer to the task at hand. This flexibility ensures that you achieve optimal results without risking any unnecessary damage or waste of resources.
Testing the Power Washer on a Small Area
When it comes to trying out your newly acquired power washing equipment, it is essential to conduct a preliminary test on a small surface. This step allows you to verify the effectiveness and adjust the settings before tackling larger areas. Here, I will guide you through the process of testing your power washer on a small patch to ensure you get the best results for your desired cleaning tasks.
1. Preparing the Testing Area
First and foremost, find a suitable spot in your yard or driveway to perform the test. It is crucial to choose an area with a similar surface texture and dirt level to what you intend to clean. This way, you can accurately assess the power washer’s performance based on the real conditions you will encounter later. Clear any obstacles or debris from the chosen area to avoid interference during the testing process.
2. Adjusting the Power Washer Settings
Next, it is time to adjust the essential settings on your power washer. Begin by selecting an appropriate nozzle for your desired cleaning task, considering the water flow rate and pressure level required. Take note of any recommendations or guidelines provided by the manufacturer for different surfaces or applications. This step is crucial as it ensures that the power washer operates optimally and prevents any potential damage to the test area.
Pro tip: Remember to always wear safety goggles and gloves when operating the power washer to protect yourself from any debris or harsh detergents that may splash back.
3. Conducting the Test
Once you have prepared the testing area and adjusted the power washer settings, you are ready to begin the test. Start by applying a small amount of water and detergent mixture on the designated area. This will help loosen any dirt or grime, making it easier for the power washer to remove. Gradually move the spray wand parallel to the surface, maintaining a consistent distance and angle of approximately 12 inches.
It is important to keep a steady pace and avoid staying in one spot for too long to prevent any potential damage or uneven cleaning.
Pay close attention to how the power washer performs, examining the rate at which it removes dirt and the overall cleanliness of the test area. This will give you a good indication of its effectiveness and allow you to make any necessary adjustments to achieve your desired results.
By performing this small area test, you can gain confidence in using your power washer and ensure that you maximize its cleaning potential for larger projects. Remember to always refer to the manufacturer’s instructions and guidelines for specific usage recommendations to prolong the life of your power washer and maintain its efficiency.
Begin the Cleaning Process
Once you have properly set up your Ryobi pressure washer, it is time to begin the pressure washing process. In this section, I will guide you through the steps to start cleaning your desired surface, whether it be your driveway, patio, or any other area that needs a thorough cleaning.
1. Preparing the Surface
The first step in beginning the pressure washing process is to properly prepare the surface you will be cleaning. This may involve removing any loose debris or obstacles that could potentially hinder the effectiveness of the pressure washer. Remove any furniture, potted plants, or other items that may be in the way and sweep or brush away any loose dirt or leaves.
2. Adjusting the Pressure
Next, you will need to adjust the pressure settings on your Ryobi pressure washer to ensure optimal cleaning. Depending on the surface and level of dirt or grime, you may need to increase or decrease the pressure level. Refer to the user manual for specific instructions on how to adjust the pressure settings on your particular model.
| Best pressure level for different surfaces: |
|---|
| Driveways and sidewalks: High pressure |
| Wooden decks and fences: Low to medium pressure |
| Concrete or brick walls: Medium to high pressure |
Clean and Store Your Pressure Cleaning Appliance
When it comes to the maintenance of your high-pressure cleaning device, ensuring that it is clean and properly stored is essential to prolonging its lifespan and maximizing its performance. In this section, I will share some tips and guidelines on how to effectively maintain and store your pressure washer.
Cleaning the Pressure Washer
To keep your pressure washer in top condition, regular cleaning is crucial. After each use, make sure to disconnect the power supply and allow the machine to cool down. Start by removing any excess dirt or debris from the exterior using a damp cloth. Avoid using harsh chemicals or abrasive materials that may damage the surface. Instead, opt for a mild detergent or soap solution to gently wipe down the body of the washer.
Next, focus on cleaning the nozzle and spray wand. These components often accumulate residue or clogs from the cleaning solutions used. Carefully detach the nozzle and spray wand, and rinse them using warm water to remove any dirt or obstructions. If necessary, a small brush can be used to scrub away stubborn residue. Once clean, ensure that all parts are thoroughly dried before reassembling them back onto the pressure washer.
Proper Storage
Storing your pressure washer correctly is essential to prevent any damage and maintain its functionality. Start by disconnecting all hoses and accessories from the machine, including the water supply. Drain any remaining water from the system by running the washer for a short period without engaging the spray gun. This step helps to prevent freezing and potential damage during colder months.
Store your pressure washer in a dry and well-ventilated area away from direct sunlight and extreme temperatures. Ideally, it should be placed on a sturdy shelf or rack to prevent any accidental damage or tripping hazards. It is also advisable to cover the pressure washer with a breathable cloth or tarp to protect it from dust and debris.
Remember to periodically inspect your pressure washer for any signs of wear or damage. Regularly check the hoses, connections, and seals for leaks or cracks, and replace any faulty parts as needed. By following these cleaning and storage guidelines, you can ensure that your pressure washer remains in optimal condition for years to come.
FAQ:
What is a Ryobi pressure washer?
A Ryobi pressure washer is a cleaning equipment that uses high-pressure water to remove dirt, grime, and stains from various surfaces such as driveways, decks, patios, and vehicles.
What are the main features of a Ryobi pressure washer?
A Ryobi pressure washer typically comes with features such as a powerful motor, adjustable pressure settings, different nozzle options, a detergent tank, and a long hose for reaching distant areas.
How do I assemble a Ryobi pressure washer?
Assembling a Ryobi pressure washer is quite simple. Start by attaching the handle to the main body, connect the hose to the water inlet, and then connect the wand to the hose. Finally, attach the desired nozzle and you are ready to use it.
What steps should I follow to start a Ryobi pressure washer?
To start a Ryobi pressure washer, first, make sure all the connections are properly made. Then, turn on the water supply, and turn on the power switch of the pressure washer. Finally, pull the trigger of the wand to release the water and adjust the pressure as needed.
How can I properly maintain a Ryobi pressure washer?
To maintain a Ryobi pressure washer, regularly check and clean the filters, inspect the hoses for any damages, and ensure that all connections are tight. Additionally, after each use, flush out any remaining water and store the pressure washer in a dry place to prevent rust or damage.


