How To Repair Cat Pressure Washer Pump

Greetings, fellow cleaning enthusiasts! Today, I would like to share with you my personal experience and knowledge on restoring the performance of a well-known feline-powered high-pressure cleaning contraption. This comprehensive guide aims to assist all pump aficionados in bringing back the optimal functionality of their domestic hydraulic apparatus, purr-fectly elevating the cleanliness of any given surface.
Within the depths of this article, you will find a treasure trove of tips, tricks, and valuable insights on refurbishing a pressurized water propulsion system. With precise guidance and meticulous attention to detail, you will be empowered to revive your hydrodynamic companion to its once glorious state, unleashing the full potential of its jetting capabilities.
Prepare to embark on an extraordinary journey, where the mastery of mechanics shall converge with the art of problem-solving. As we delve into the intricacies of this felinely-engineered cleansing marvel, your sense of curiosity will be awakened, and your hands will gain the dexterity necessary to perform the intricate operations required to revive its heart and soul. Remember: you hold the power to resurrect strength, power, and vigor within these hydraulic veins.
So, buckle up and join me on this rejuvenating escapade. Together, we shall unravel the mysteries that lie hidden beneath the surface of this remarkable feline-powered high-pressure cleaning apparatus, reinventing our understanding of diligent maintenance and ensuring that its cleansing paws continue to leave no tile unscrubbed, no surface unwashed, and no stain unbeatable!
Restoring the Performance of Your Feline High-Pressure Sprayer Mechanism
Greetings fellow pressure washer enthusiasts! In this section, I will guide you through the intricacies of reviving and optimizing the functionality of your beloved feline-inspired water propelling contraption. Prepare yourself for a purrfect adventure of repair and restoration!
Identifying the Culprits
The first step in resurrecting the immense power of your cat-themed hydraulic sprayer is to identify the elements responsible for its current underperforming state. I will walk you through a systematic process of scrutinizing the various components, evaluating potential wear and tear, clogs, or other intricacies that might be hindering the optimal functioning.
Implementing Meticulous Cleaning Techniques
Once we have assessed and pinpointed the problematic areas in your feline-inspired pressurized washer, it’s time to dive into the world of meticulous cleaning. I will provide you with step-by-step guidance on how to effectively disassemble and clean the different parts of the pump mechanism, using specially designed solvents and gentle brushes, ensuring a thorough restoration without causing any harm.
A crucial aspect of this cleaning process is not only to remove accumulated grime and debris but also to pay attention to the delicate inner workings that may have become compromised. By employing strategic cleaning techniques, you will eliminate unwanted impurities and restore the hydraulic system to its original feline-like agility.
Fostering Optimal Performance with Corrective Measures
After thoroughly cleaning the various components of your high-pressure sprayer pump mechanism, it’s time to evaluate and implement corrective measures. In this phase, I will guide you through the process of identifying the need for potential replacements, resealing any leaks, and ensuring proper lubrication to enhance performance and longevity.

This is also an opportune moment to consider implementing upgrades to your feline-inspired pressure washer, like integrating advanced filtration systems or incorporating sturdier materials for increased durability. By proactively taking these measures, you will not only restore the pump’s effectiveness but also optimize its overall performance, making you the envy of all other pressure washer aficionados!
| Why Cat Pressure Washer Pumps Are Special |
| No other feline-inspired hydraulic water propulsion apparatus possesses the power, grace, and precision of a Cat pressure washer pump. With its unique design and innovative engineering, this pumping mechanism surpasses the competition, delivering a performance that will leave you in awe. |
Identifying the Problem: Understanding the Root Cause
In this section, I will guide you through the process of identifying the root cause of any issues you might be experiencing with your pressure washer pump. By understanding the underlying problem, you will be better equipped to find a suitable solution.
- Abnormal noises: Pay close attention to any unusual sounds coming from the pump. It could indicate a problem with the bearings or other internal components.
- Low or no pressure: If you notice a significant decrease in pressure or a complete loss of pressure, there may be a blockage in the pump or a malfunctioning valve.
- Leaking: Look for any visible leaks around the pump. It could be a result of a damaged seal or a loose connection.
- Inconsistent water flow: If the water flow is inconsistent, it could be a sign of a clogged or damaged nozzle, or an issue with the inlet or outlet valves.
- Overheating: If the pump becomes excessively hot, it could be due to insufficient lubrication, a clogged cooling system, or an overload on the pump.
By carefully examining these common symptoms, you will be able to pinpoint the exact issue with your pressure washer pump. In the following sections, I will provide detailed instructions on how to address each specific problem, allowing you to restore your pump to its optimal performance.
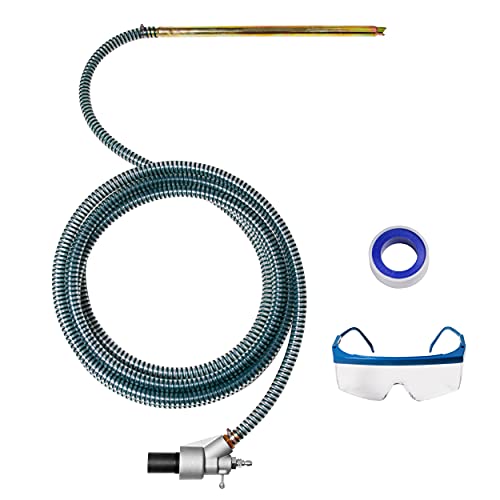
Gathering the Necessary Tools
When it comes to taking care of your cat pressure washer pump, it’s important to have the right tools in order to effectively repair and maintain it. In this section, I will guide you through the process of gathering all the necessary equipment you’ll need for the job.
1. Tool Set
First and foremost, you’ll need a comprehensive tool set that includes a variety of wrenches, screwdrivers, and pliers. These tools will come in handy when disassembling and reassembling different parts of the pump. It’s important to have a range of sizes and types to ensure that you can tackle any repair task that comes your way.

2. Safety Equipment
Working with a pressure washer pump can be dangerous, so it’s crucial to prioritize your safety. Make sure to have appropriate safety equipment, such as gloves, safety goggles, and ear protection. These items will protect you from potential hazards such as sharp edges, flying debris, and loud noises.
Furthermore, having a fire extinguisher nearby is always a good idea, as accidents can happen even with the utmost caution. Safety should always be your top priority during any repair or maintenance task.
By ensuring that you have the right tools and safety equipment before starting any repair work, you’ll be well-prepared to fix any issues that may arise with your cat pressure washer pump.
Disassembling the Pump
When it comes to dealing with a malfunctioning pressure washer pump, one of the crucial steps in the repair process is disassembling the pump. This involves taking apart various components of the pump system to access and inspect the internal parts. In this section, I will guide you through the disassembly process, providing clear instructions and helpful tips along the way.
Gather the necessary tools
Before you begin disassembling the pump, ensure that you have all the required tools at hand. These may include a wrench or socket set, pliers, screwdrivers, and possibly a rubber mallet. Having the right tools readily available will make the disassembly process smoother and more efficient.

Step-by-step disassembly process
- 1. Start by disconnecting any power sources and relieving the pressure in the pump system. Safety should always be a top priority.
- 2. Carefully remove any protective covers or housing that may be securing the pump assembly. This may involve unscrewing bolts or carefully prying them off.
- 3. Loosen and remove any fittings or connections that are attached to the pump. This may include hoses, pipes, or electrical connections. Take care not to damage these components in the process.
- 4. Once all external components are detached, locate the pump’s mounting bolts or screws that secure it to the frame or base. Loosen and remove these bolts to free the pump assembly.
- 5. With the pump assembly now separate from the main body, carefully inspect and clean each individual part. Look for any signs of damage, wear, or blockages that may be causing the pump’s malfunction.
Remember, disassembling the pump can be a complex process, and it is important to approach it with caution and patience. Take care to document each step and keep track of the removed parts to ensure proper reassembly. By disassembling the pump correctly, you will gain valuable insights into the condition of its internal components, allowing for a more accurate diagnosis and successful repair.
Inspecting and Cleaning the Pump Components
When it comes to maintaining and troubleshooting a cat pressure washer pump, one of the important steps is inspecting and cleaning the various components. By regularly examining and cleaning these parts, you can ensure that your pump operates efficiently and prolong its lifespan. In this section, I will discuss the key components you should focus on during the inspection process and provide step-by-step instructions on how to clean them.
1. Inlet and Outlet Valves
Start by inspecting the inlet and outlet valves of your pressure washer pump. These valves are responsible for controlling the flow of water into and out of the pump. Remove any debris or dirt that may have accumulated on the valves or valve seats. You can use a soft-bristle brush or a cloth to gently clean these areas. Ensuring that the valves are free from any obstructions will prevent clogs and improve the overall performance of your pump.
2. Piston and Cylinder
The piston and cylinder are critical components that contribute to the pumping action of your pressure washer. Carefully inspect the piston and cylinder for any signs of wear or damage. Look for scratches, cracks, or excessive wear on these parts. If you notice any issues, it may be necessary to replace the damaged components. To clean the piston and cylinder, wipe them down with a clean cloth to remove any dirt or grime that may have accumulated. This will help maintain optimal performance and prevent premature failure.
3. Seals and O-rings
Inspect the seals and O-rings in your pressure washer pump for any signs of wear or deterioration. These components help create a tight seal and prevent leaks. If you notice any cracks, tears, or deformities in the seals or O-rings, it is important to replace them. To clean the seals and O-rings, you can use a mild soap and water solution. Gently scrub the components and rinse them thoroughly before reinstalling. This will ensure proper sealing and prevent unwanted leaks during operation.

- Regularly inspect and clean the inlet and outlet valves to prevent clogs.
- Check the piston and cylinder for wear or damage and clean them to maintain optimal performance.
- Inspect the seals and O-rings for signs of wear and replace as necessary.
By taking the time to inspect and clean these crucial pump components, you can keep your pressure washer running smoothly and effectively. Regular maintenance will help extend the life of your pump and ensure reliable performance for years to come.
Replacing Faulty Parts
In this section, I will discuss the process of replacing faulty components in the pressure washer pump. It is essential to address any defective parts promptly to ensure the optimal functioning of the equipment.
When faced with a malfunctioning pressure washer pump, it is crucial to identify the defective part accurately. This can be done by assessing the symptoms, such as reduced water pressure or unusual noises. Once the faulty part has been determined, it is necessary to procure a suitable replacement.
Before beginning the replacement process, it is essential to ensure that the pressure washer is turned off and disconnected from any power source. This is crucial to guarantee personal safety during the repair procedure. I always recommend wearing protective gloves and eyewear to prevent any potential injuries.
Once all safety precautions have been taken, the next step is to remove the defective part from the pressure washer pump. This may involve unscrewing bolts, disconnecting hoses, or releasing clips, depending on the specific component being replaced. It is essential to carefully follow the manufacturer’s instructions or consult a professional if unsure.

After removing the faulty part, it is recommended to compare it with the replacement component to ensure they are identical. This verification helps prevent complications in the installation process and guarantees compatibility. If they match, proceed to install the new part according to the manufacturer’s guidelines.
Once the replacement part has been securely installed, reconnect any disconnected hoses or clips and tighten any bolts or screws. It is crucial to ensure everything is properly fastened to prevent leaks or further damage. After completing the installation, it is advisable to test the pressure washer to verify that the replacement part has resolved the issue.
Replacing faulty parts in a pressure washer pump can significantly extend its lifespan and ensure reliable performance. By addressing and replacing defective components promptly, one can continue to enjoy the benefits of a fully functional and efficient pressure washer.
Ensuring Smooth Operation: Lubricating the Machinery
As a diligent maintenance enthusiast, I understand the significance of keeping the various components of my pressure washer functioning efficiently. One essential aspect of this maintenance routine involves ensuring proper lubrication for the moving parts of the machine. By regularly applying lubricants to these components, you can reduce friction and wear, promote smooth operation, and extend the lifespan of your pressure washer.
Why Lubrication Matters
Effective lubrication is crucial for the optimal performance of any mechanical system, including pressure washers. By reducing friction between the different moving parts, lubricants prevent excessive heat generation and potential damage caused by metal-to-metal contact. Additionally, lubrication helps to minimize wear and tear, preventing premature failure of key components, such as the pump, motor, and bearings.

Choosing the Right Lubricant
When it comes to lubricating your pressure washer’s moving parts, using the appropriate lubricant is essential. Different components may require specific types of lubricants, such as oil, grease, or silicone-based products. Refer to the manufacturer’s guidelines or consult the user manual to determine the recommended lubricant for each specific part. It’s important to choose high-quality lubricants that are compatible with the materials used in your pressure washer, ensuring optimal performance and protection.
Remember to apply the lubricant sparingly and avoid over-lubricating, as excessive lubrication can attract dirt and debris, leading to clogs and potential damage. Regularly inspect the lubricated parts to ensure they are adequately coated and reapply lubricant as needed, especially after significant usage or prolonged periods of inactivity.
By prioritizing regular lubrication as part of your pressure washer maintenance routine, you can optimize its performance, reduce the risk of damage, and enjoy the benefits of a smoothly operating machine for years to come.
Reassembling the Pump
Now that the necessary repairs have been made and all the parts have been cleaned and inspected, it is time to put everything back together and restore the functionality of the pump.
Before reassembling the pump, it is important to carefully review the disassembly process and ensure that all steps are followed in reverse order. This will help prevent any mistakes or missed components during reassembly.
Start by identifying the different parts and components that make up the pump. This can be done by referring to the pump’s user manual or by using an online diagram. It is crucial to know how each piece fits together and the correct orientation for each part.
Once the parts have been identified, begin by aligning and securing the housing or casing of the pump. This may involve using screws or fasteners to properly attach the housing and create a secure seal. Take care to apply the correct amount of torque to ensure the parts stay in place without being over-tightened.
Next, reattach any necessary hoses or fittings to the pump. It is essential to connect these components correctly to maintain a proper flow of water and prevent any leaks or inefficiencies. Use the appropriate tools, such as pliers or wrenches, to tighten any hose clamps or connectors securely.
Finally, reinstall any additional accessories or features that were previously removed. This may include items like pressure gauges, control knobs, or safety switches. Double-check that these components are functioning correctly and securely attached.
Once all the parts have been reassembled, it is recommended to conduct a brief test run to ensure that the pump is operating as expected. This can involve connecting the pump to a water source and running it for a short period to check for any abnormal noises, leaks, or other issues. If any problems are detected, it may be necessary to revisit the reassembly process and make adjustments as needed.
Remember, proper reassembly is crucial for ensuring the pump’s optimal performance and longevity. Take your time, pay attention to detail, and consult any available resources to help guide you through the reassembling process.
Testing the Restored Hydraulic Pump
Once the hydraulic pump has been thoroughly repaired and restored to its optimal condition, it is essential to conduct a series of tests to ensure its functionality and effectiveness. These tests serve as a critical evaluation of the pump’s performance, allowing me to assess its capability to generate and maintain the desired hydraulic pressure.
One of the primary tests I conduct is the pressure test, wherein I connect the pump to a pressure gauge that accurately measures the pressure output. By carefully observing the readings, I can determine if the pump is able to produce the required pressure levels consistently or if there are any irregularities that need further attention.
In addition to the pressure test, another vital evaluation is the flow rate test. This involves measuring the amount of fluid that the pump can deliver within a specific time frame. By assessing the flow rate, I can ensure that it aligns with the manufacturer’s specifications and that the pump operates efficiently.
An essential aspect of testing the repaired hydraulic pump is inspecting its overall performance under different load conditions. For this purpose, I simulate various scenarios that replicate real-world usage. By subjecting the pump to different loads and observing its response, I can verify its ability to withstand and deliver consistent performance in different operational situations.
| Test | Procedure | Result |
|---|---|---|
| Pressure Test | Connect the pump to a pressure gauge and observe the pressure readings | Determine if the pump consistently generates the desired pressure levels |
| Flow Rate Test | Measure the amount of fluid delivered by the pump within a specified time frame | Ensure that the flow rate aligns with manufacturer’s specifications |
| Load Performance Test | Subject the pump to various load conditions and observe its response | Evaluate its ability to withstand and deliver consistent performance under different loads |
By conducting these comprehensive tests, I can confidently ascertain the reliability and effectiveness of the repaired hydraulic pump. Should any issues arise during the testing process, I can further fine-tune and optimize the pump to ensure its efficiency and longevity.
Preventive Maintenance Tips
In this section, I will share some valuable tips on how to ensure the longevity and optimal performance of your pressure washer pump, without the need for repair or replacement. Taking proactive measures to maintain and care for your equipment is essential in avoiding costly breakdowns and downtime in the future.
Regular Cleaning and Inspection
One of the most crucial preventive measures is to regularly clean and inspect your pressure washer pump. This involves removing any dirt, debris, or buildup that may accumulate on the pump’s surface. By keeping the pump clean, you can minimize the risk of clogs or damage caused by foreign materials. Additionally, a routine inspection allows you to identify any worn-out or damaged parts that may require immediate attention.
Proper Lubrication
Another important preventive maintenance tip is to ensure proper lubrication of your pressure washer pump. Lubrication is essential for reducing friction and heat, which can cause wear and tear on the pump’s components. It is recommended to refer to the manufacturer’s guidelines to determine the appropriate lubricant and intervals for lubrication. By maintaining adequate lubrication, you can extend the lifespan of your pump and enhance its overall performance.
Furthermore, I strongly recommend keeping a maintenance log to track and schedule routine maintenance tasks, such as cleaning, inspection, and lubrication. This helps ensure that preventive measures are consistently carried out, reducing the likelihood of unexpected breakdowns or malfunctions.
Note: The preventive maintenance tips mentioned here are general guidelines and may vary depending on the specific model and manufacturer recommendations. Always refer to the user manual and follow the manufacturer’s instructions for your particular pressure washer pump.
FAQ:
What are the common issues that can occur with a cat pressure washer pump?
There are several common issues that can occur with a cat pressure washer pump. These include low or no pressure, leaking water, abnormal noises, and poor performance.
How can I diagnose the problem with my cat pressure washer pump?
To diagnose the problem with your cat pressure washer pump, you can start by checking the water supply and connections, inspecting the hose and nozzle, examining the pump for leaks or damage, and testing the pressure output. If these initial checks do not identify the problem, further inspection or professional help may be required.
What steps can I take to repair a cat pressure washer pump?
The steps to repair a cat pressure washer pump may vary depending on the specific issue, but here are some general steps you can follow. First, turn off the pressure washer and disconnect it from the power source. Then, inspect and clean the pump intake filter, check for any clogs in the system, and ensure all connections are tight and secure. If there are any damaged or worn-out parts, they may need to be replaced. Finally, reassemble the pump and test it to ensure it is working properly.