
How To Fit A Bottle To A Pressure Washer
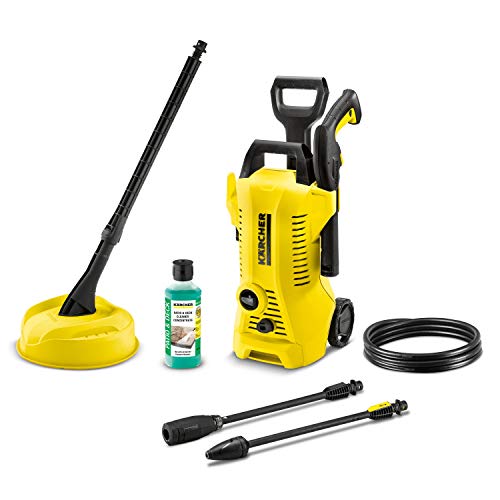
When it comes to maintaining a spotless and pristine environment, having effective cleaning equipment is essential. One crucial component of these tools that often goes overlooked is the compatibility of the bottle with the pressure washer. Understanding how to seamlessly integrate these two elements can significantly enhance the overall performance and efficiency of your cleaning process.
As a professional cleaner with years of experience in the industry, I have encountered numerous instances where the incorrect bottle and pressure washer combination led to subpar results. It is vital to recognize that not all bottles are designed to withstand the intense pressure exerted by power washers. By choosing the right bottle and following the appropriate steps to fit it securely, you can avoid potential malfunctions and ensure smooth operations.
One simple yet often disregarded consideration is the importance of selecting a bottle that can withstand the force of the pressure washer without deforming or leaking. To optimize your cleaning experience, it is crucial to choose a bottle made from durable materials that can endure the robust spray of water. Additionally, the compatibility of the bottle’s nozzle with your pressure washer’s attachment is equally important. Ensuring a secure and tight connection between these components minimizes the risk of leakage and guarantees efficient flow.
Creative Ways to Attach a Container to Your Powerful Stream Cleaner
When it comes to enhancing the functionality of your high-pressure washer, finding innovative methods to connect a receptacle to it can make all the difference. In this section, I will share some ingenious ideas and techniques that I have personally experimented with to connect a variety of containers to my robust pressure sprayer. These methods will assist you in effectively utilizing the forceful stream of water for various cleaning tasks without explicitly relying on traditional fitting mechanisms.
1. Harnessing the Power of Velcro
Velcro, also known as hook-and-loop fasteners, can be an excellent alternative to standard bottle attachments. By strategically placing strips of Velcro on both the pressure washer and the container, you can create a secure and customizable connection. This allows you to attach containers of different shapes and sizes effortlessly, ensuring a stable fit while maintaining the integrity of the water pressure.
2. Embracing the Magic of Magnets
If you’re looking for a more versatile and quick solution, magnets can come to your rescue. Adding magnets to both the pressure washer and the bottle provides a simple and efficient attachment method. The magnetic force ensures a strong bond, allowing you to effortlessly swap containers as needed. From bottles to buckets, this method offers flexibility and adaptability to your cleaning routine.
By exploring unconventional methods like these, you can elevate the capabilities of your pressure washer and adapt it to various cleaning tasks. Remember to always prioritize safety and ensure that the chosen attachment method is securely fastened before operating the machine.
Exploring the Advantages of Incorporating a Cleaning Solution Container
When it comes to enhancing the performance and effectiveness of your cleaning routine, considering the inclusion of a cleaning solution container can prove to be a game-changer. This indispensable accessory offers several notable benefits that can significantly enhance your cleaning experience while ensuring remarkable results.
1. Maximizing Cleaning Efficiency
The integration of a cleaning solution container allows you to optimize the cleaning process by providing a convenient method of dispensing cleaning solutions directly into the pressure washer. With this container at your disposal, you can effortlessly mix the appropriate cleaning solution, enabling the pressure washer to effectively tackle even the most stubborn dirt, grime, and stains.
2. Versatility in Cleaning Solutions
By incorporating a cleaning solution bottle, you gain the flexibility to explore and utilize a wide range of cleaning solutions tailored to meet specific cleaning requirements. Different surfaces and materials may demand different cleaning agents, and the container allows you to seamlessly switch between various solutions, ensuring optimal performance and desired outcomes.

Furthermore, the cleaning solution container enables you to experiment with homemade cleaning solutions, providing an economical yet effective alternative to commercially available products. This versatility ensures that you have the freedom to choose the most suitable cleaning solution for every cleaning task.
In conclusion, the integration of a cleaning solution bottle into your pressure washer setup delivers outstanding benefits that go beyond just having a properly functioning cleaning equipment. By considering this invaluable accessory, you can elevate your cleaning game, improve efficiency, and achieve remarkable cleanliness with ease.
Choosing the Right Bottle Attachment for Your Pressure Washer
In this section, I will discuss the importance of selecting the appropriate bottle attachment for your pressure washer. As an experienced user, I have found that the right bottle attachment can significantly enhance the effectiveness of your cleaning tasks, ensuring optimal performance and achieving desired results.
Finding the Right Capacity
The first aspect to consider when choosing a bottle attachment is its capacity. The capacity of the bottle determines how much cleaning solution or detergent it can hold. It is crucial to select a bottle attachment that can accommodate an adequate amount of cleaning solution for your specific cleaning needs. Too small of a capacity may result in frequent refilling, slowing down your cleaning process, while a larger capacity may be unnecessary and wasteful.
Evaluating the Spray Pattern
The spray pattern of the bottle attachment is another vital factor to consider. Different attachments offer different spray patterns, such as wide spray, narrow spray, or even adjustable patterns. The spray pattern determines the coverage of the cleaning solution and how effectively it can reach different surfaces. It is essential to choose a bottle attachment with a spray pattern that matches the cleaning task at hand. For instance, a narrow spray pattern may be more suitable for concentrated cleaning of stubborn stains, while a wide spray pattern is ideal for larger surface areas.

To assist you further in making an informed decision, I have compiled a table below that summarizes the key factors to consider when choosing the right bottle attachment for your pressure washer:
| Factor | Description |
|---|---|
| Capacity | Determines how much cleaning solution the bottle can hold. |
| Spray Pattern | Determines the coverage and efficiency of the cleaning solution. |
By carefully evaluating the capacity and spray pattern of different bottle attachments, you can select the one that best suits your cleaning needs. Remember, choosing the right bottle attachment will not only enhance the performance of your pressure washer but also improve the quality and efficiency of your cleaning tasks.
Step-by-Step Guide to Installing the Container Attachment
In this section, I will guide you through the process of properly installing the container attachment onto your high-pressure cleaning device. By following these step-by-step instructions, you will be able to securely attach the container and ensure effective use of the equipment.
- Prepare the equipment: Before starting the installation process, gather all the necessary tools and components. Ensure you have the container attachment, the appropriate fittings, and any additional parts required for installation.
- Inspect the area: Thoroughly inspect the area where the container attachment will be installed. Ensure there are no obstructions or debris that could interfere with the installation process or hinder the proper functioning of the equipment.
- Identify the mounting location: Determine the suitable location on your high-pressure cleaning device where the container attachment will be mounted. It should be easily accessible and securely fixed to prevent any leaks or accidents during operation.
- Attach the fittings: With the provided fittings, connect the container attachment to the designated location on your pressure washer. Follow the manufacturer’s instructions on how to correctly fit the fittings and ensure a tight seal.
- Secure the attachment: Once the fittings are properly attached, secure the container attachment to your pressure washer using the provided locking mechanism or brackets. This will prevent any accidental detachment during use.
- Test for leaks: After installation, it is crucial to test for leaks. Ensure there are no visible leaks around the connection points or container attachment. If any leaks are detected, carefully inspect the fittings and make any necessary adjustments or replacements.
- Load the container: Once the attachment is securely installed and tested for leaks, it’s time to load the container with your desired cleaning solution or detergent. Follow the manufacturer’s guidelines for proper loading and capacity.
- Start the pressure washer: With the container attachment properly installed and loaded, start your pressure washer according to the manufacturer’s instructions. The cleaning solution will now be automatically mixed and applied to the desired surfaces, enhancing the cleaning effectiveness.
- Maintain and clean: Regularly inspect and clean the container attachment to ensure its optimal performance. Follow proper maintenance procedures and guidelines provided by the manufacturer for long-lasting use.
By following these step-by-step instructions, you can easily and effectively install the container attachment on your pressure washer, expanding its capabilities and enhancing your cleaning experience.
Tips for Properly Mixing Cleaning Solutions for Pressure Washing
When it comes to pressure washing, getting the right mixture of cleaning solutions is essential for achieving optimal cleaning results. In this section, I will share my personal tips and recommendations for properly mixing cleaning solutions to ensure effective and efficient pressure washing.

1. Understand the Cleaning Requirements
Before you start mixing your cleaning solutions, it’s important to understand the specific cleaning requirements of the surface or object you are planning to pressure wash. Different materials and stains may require different cleaning solutions or concentrations, so it’s crucial to assess the situation and determine the appropriate approach.
2. Choose the Right Cleaning Solution
Once you have identified the cleaning requirements, it’s time to select the appropriate cleaning solution. There are a variety of cleaning solutions available for pressure washing, each designed to tackle different types of dirt, stains, and surfaces. Carefully read the labels and instructions to ensure you choose the right cleaning solution for your specific needs.
| Surface Type | Recommended Cleaning Solution | Optimal Concentration |
|---|---|---|
| Concrete | All-purpose cleaner | 1:10 (cleaner:water) |
| Wood | Mild detergent | 1:20 (detergent:water) |
| Brick | Brick cleaner | 1:5 (cleaner:water) |
| Vinyl siding | Specialized vinyl siding cleaner | As per manufacturer’s instructions |
Note: These recommended cleaning solutions and concentrations are general guidelines. Always refer to the manufacturer’s instructions and adjust accordingly for specific products.
By understanding the cleaning requirements and choosing the right cleaning solution, you can effectively mix the cleaning solution for pressure washing. Remember to follow the instructions provided by the manufacturer and adjust the concentration as needed. Properly mixed cleaning solutions will help you achieve superior cleaning results and maintain the longevity of your pressure washer.
Filling the Container with Cleaning Solution
When it comes to preparing your pressure washer for cleaning, one crucial step is filling the container with the appropriate cleaning solution. In this section, I will guide you through the process of adding the cleaning solution to the bottle, ensuring maximum efficiency and optimal cleaning results.

Gathering the necessary supplies
Before starting the filling process, it is important to have all the necessary supplies at hand. Ensure that you have a suitable cleaning solution that is compatible with your pressure washer, as well as a clean and empty bottle with a secure lid. Additionally, have a measuring cup or funnel available to facilitate the filling process.
Filling the bottle with the cleaning solution
Begin by securely attaching the lid to the bottle, ensuring it is tightly sealed to prevent any leakage during operation. If your cleaning solution comes in a concentrated form, consult the instructions provided to determine the appropriate dilution ratio. Use a measuring cup or funnel to pour the recommended amount of cleaning solution into the bottle. Be sure to pour it slowly and steadily to avoid any spills.
| Step | Description |
|---|---|
| 1 | Securely attach the lid to the clean bottle. |
| 2 | Refer to the instructions for your cleaning solution to determine the required dilution ratio. |
| 3 | Slowly and steadily pour the recommended amount of cleaning solution into the bottle, using a measuring cup or funnel. |
| 4 | Once the bottle is filled, ensure that the lid is tightly sealed to prevent any leakage. |
After filling the bottle with the cleaning solution, it is important to securely secure the lid to prevent any accidental spills during use. Make sure to follow the manufacturer’s instructions for attaching and sealing the lid.
By properly filling the container with the appropriate cleaning solution, you can ensure that your pressure washer operates at its best, delivering effective cleaning results for various surfaces and applications.
Adjusting the Pressure and Spray Pattern for Optimal Cleaning
When it comes to achieving the best cleaning results with your pressure washer, one important aspect to consider is adjusting the pressure and spray pattern. By carefully fine-tuning these settings, you can optimize the cleaning process and achieve efficient and effective results.

First and foremost, it’s crucial to understand the impact of pressure on the surface being cleaned. Adjusting the pressure allows you to control the force at which water is expelled from the pressure washer. This can be particularly useful when dealing with delicate surfaces that require a gentle touch, or when tackling stubborn dirt and grime on tougher surfaces.
Additionally, adjusting the spray pattern can greatly enhance cleaning efficiency. With the ability to switch between a wide spray pattern and a narrow jet, you can tailor the spray to suit the specific cleaning task at hand. A wider spray pattern covers a larger area, making it ideal for general cleaning or rinsing surfaces, while a narrow jet provides concentrated power for more focused cleaning or removing tough stains.
It’s important not to underestimate the significance of finding the right balance between pressure and spray pattern. Understanding the surface you are cleaning and its condition will help you determine the appropriate pressure setting. Likewise, considering the type of dirt or grime will guide you in selecting the optimal spray pattern. By making these adjustments, you can ensure that your pressure washer is operating at its best and delivering the desired level of cleaning power.
Remember, every cleaning task is unique, and experimentation may be necessary to find the perfect pressure and spray pattern combination. Be sure to test different settings on a small, inconspicuous area before proceeding to clean larger surfaces. By taking the time to adjust and optimize these factors, you can achieve optimal cleaning results with your pressure washer.
In conclusion, adjusting the pressure and spray pattern of your pressure washer is crucial for achieving optimal cleaning. By understanding the impact of pressure and selecting the appropriate spray pattern, you can customize the cleaning process to suit your specific needs. With careful adjustments and experimentation, you can maximize the efficiency and effectiveness of your pressure washer for a variety of cleaning tasks.
Common Mistakes to Avoid When Attaching a Container to a High-Pressure Cleaning Device
When it comes to connecting a receptacle to a powerful cleansing apparatus, it is crucial to be aware of the common errors that can arise. In this section, I will share my personal experiences and insights to help you steer clear of such blunders. By avoiding these mistakes, you can ensure a smoother and more successful attachment process.
1. Inadequate Container Compatibility
One of the most common errors people make is choosing a container that is not compatible with their high-pressure cleaning device. It is essential to carefully inspect the specifications and requirements of both the receptacle and the cleaning apparatus before attempting to connect them. Failure to do so can result in leaks, poor performance, or even damage to the equipment.
2. Improper Seal and Connection
Another mistake to avoid is not ensuring a proper seal and connection between the container and the cleaning device. A loose or faulty connection can lead to leaks, pressure loss, and inefficient cleaning. It is crucial to follow the manufacturer’s instructions carefully and use any provided seals or adapters to create a secure and watertight attachment. Regularly inspect and maintain the connection to avoid any potential issues.
3. Overfilling the Container
Overfilling the container is a common oversight people tend to make. It is important to remember that the container needs sufficient empty space for pressure to build up correctly. By overfilling, you may compromise the performance of the pressure washer and risk damaging both the container and the cleaning device. Always adhere to the recommended fill level stated by the manufacturer to ensure optimal efficiency and longevity.
4. Neglecting Safety Precautions
Lastly, neglecting safety precautions is a significant mistake that should be avoided when attaching a container to a high-pressure cleaning device. These devices can generate substantial force and should be handled with care. Always wear appropriate protective gear, such as gloves and safety glasses, and follow all safety guidelines provided by the manufacturer. Failing to do so can result in accidents, injuries, or damage to property.

| Common Mistake | Consequences | Prevention |
|---|---|---|
| Inadequate Container Compatibility | Leaks, poor performance, potential equipment damage | Thoroughly assess specifications and requirements before attachment |
| Improper Seal and Connection | Leaks, pressure loss, inefficient cleaning | Follow manufacturer’s instructions, inspect and maintain connection |
| Overfilling the Container | Compromised performance, potential damage | Adhere to recommended fill level |
| Neglecting Safety Precautions | Accidents, injuries, property damage | Wear protective gear, follow safety guidelines |
Cleaning and Maintaining Your Attachment for Optimal Performance
When it comes to keeping your cleaning equipment in top shape, proper maintenance is essential. In this section, I will share some valuable tips and techniques to ensure that you can clean efficiently and effectively with your bottle attachment. By following these steps, you can prolong the lifespan of your attachment and optimize its performance.
Regular Cleaning
To maintain optimal functionality of your bottle attachment, it is important to clean it regularly. After each use, make sure to rinse the attachment with water to remove any residue or cleaning solution. You can also use a mild detergent if necessary. Pay special attention to the nozzle and all the crevices where dirt might accumulate. Additionally, if your attachment comes with detachable parts, remember to clean them separately to avoid clogs and blockages.
Inspecting and Replacing Parts
It is crucial to inspect your attachment regularly to identify any signs of damage or wear. Check the seals, connections, and nozzle for any cracks or leaks. If you notice any issues, it is recommended to replace the damaged parts promptly to maintain optimal performance and prevent further damage. Always refer to the manufacturer’s instructions for proper replacement and assembly procedures.
Note: Regularly inspecting and replacing worn-out parts will not only enhance your attachment’s performance but also prevent any potential accidents or malfunctions.
Proper storage is also important to maintain the longevity of your attachment. Store it in a clean and dry area, away from direct sunlight and extreme temperatures. This will help prevent degradation and unnecessary wear on the materials.
In conclusion, cleaning and maintaining your bottle attachment is essential for optimal performance and longevity. By following these simple steps, you can ensure that your attachment remains in excellent condition and continues to serve you well during all your cleaning tasks.
Exploring Versatile Applications and Cleaning Tasks for an Optimized Pressure Washing Experience
When it comes to maximizing the potential of a pressure washer equipped with a specialized bottle fitting, the possibilities are endless. In this section, I will share my personal experiences and insights into the practical applications and various cleaning tasks that can be accomplished with this innovative feature.
1. Revitalizing Outdoor Surfaces
One of the most common and rewarding applications of a bottle-fitted pressure washer is its ability to effortlessly restore the beauty of outdoor surfaces. Whether it’s rejuvenating a weathered and stained wooden deck, removing dirt buildup from concrete pathways, or restoring the sparkle of outdoor furniture, the bottle fitting ensures efficient and targeted application of cleaning agents, ensuring remarkable results.
2. Tackling Tough Stains and Grease
For those challenging cleaning tasks that demand extra firepower, the bottle-fitted pressure washer is a game-changer. With the ability to seamlessly dispense specialized solvents or degreasers, stubborn stains, and grease on surfaces such as grills, garage floors, or even automotive parts are no match. The concentrated cleaning solution combined with the high-pressure water stream ensures deep penetration and thorough cleaning, saving valuable time and effort.
3. Sanitizing and Disinfecting
Especially in the wake of ongoing health concerns, the bottle-fitted pressure washer becomes an indispensable tool for maintaining cleanliness and hygiene. By utilizing appropriate cleaning agents, it becomes effortless to sanitize and disinfect outdoor play equipment, patio areas, or even trash bins, ensuring a safer and healthier environment for your family or customers.
- Removing algae and mildew from fences, siding, and outdoor structures
- Cleaning windows and exterior glass surfaces for a streak-free shine
- Prepping surfaces for painting or staining by effectively removing old coatings
- Reviving the appearance of boats, RVs, and other recreational vehicles
With the right bottle-fitted pressure washer and suitable cleaning solutions, the possibilities for achieving flawless results are virtually limitless. These versatile applications and tasks not only save time and effort but also elevate the overall cleaning experience to a new level of efficiency and satisfaction.


