How To Convert A Pressure Washer Into Sandblaster
Are you looking to revamp your old pressure washer and give it a new purpose? Imagine transforming it into a powerful tool that can efficiently strip away layers of dirt, grime, and rust from various surfaces. By delving into the world of sandblasting, you can achieve professional-level results at a fraction of the cost.
Discover the art of repurposing and embark on an exciting journey as I guide you through the process of converting your reliable pressure washer into a versatile sandblasting machine. Unleash your creativity and take on projects that will leave your friends and neighbors in awe.
With the proper knowledge and tools, you can harness the potential of sandblasting to restore faded surfaces, prepare materials for painting, or even create intricate designs on glass or metal. This guide will equip you with the necessary information to turn your pressure washer into a robust sandblaster, expanding its capabilities beyond your expectations.
Follow me as we explore the step-by-step process of modifying your pressure washer, selecting the right materials, and mastering the technique of sandblasting. Armed with determination and a few readily available components, you can inject new life into your existing equipment and embark on countless thrilling projects.
Transforming a Power Jet Cleaner into an Abrasive Cleaning Tool
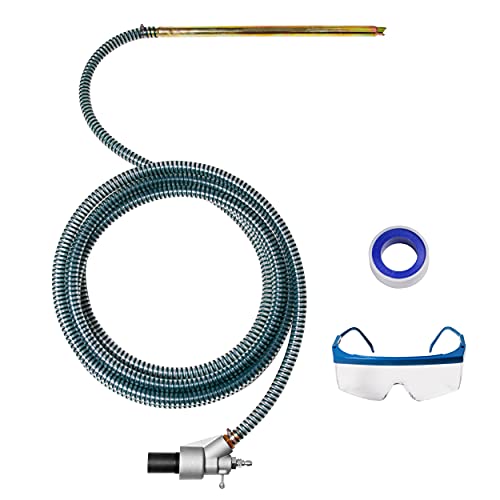
Gathering the Necessary Equipment:
- High-pressure hose
- Abrasive media container
- Blasting nozzle
- Goggles and protective gear
First and foremost, you will need a high-pressure hose compatible with your power jet cleaner. This will ensure a strong and steady flow of abrasive media. Additionally, you will require an abrasive media container, which can be easily attached to your machine to hold and dispense the sand or other suitable materials.
Modifying the Power Jet Cleaner:
- Disconnect the power supply
- Remove the nozzle and spray wand
- Attach the high-pressure hose to the power washer outlet
- Connect the abrasive media container to the hose
- Install the blasting nozzle onto the end of the hose
To begin the transformation, start by disconnecting the power supply to ensure safety during the modification process. Then, remove the nozzle and spray wand that are typically used for water spraying purposes. Instead, attach the high-pressure hose directly to the power washer outlet. Next, connect the abrasive media container to the hose, making sure it is securely fastened. Finally, install the blasting nozzle onto the end of the hose, ensuring a tight fit to prevent any media leakage during operation.
Note: It is highly recommended to wear goggles and other protective gear when operating the sandblasting machine to protect yourself from potential hazards.
Using Your Sandblasting Power Jet Cleaner:
- Choose the appropriate abrasive media
- Adjust the pressure settings
- Start from a suitable distance
- Maintain a steady and controlled motion
- Clean and store your equipment properly
Before using your newly converted sandblasting power jet cleaner, it’s important to select the appropriate abrasive media for your specific cleaning task. This can range from sand to crushed walnut shells, depending on the surface you aim to clean. Additionally, you should adjust the pressure settings of the power washer to ensure optimal performance.
When using the sandblasting power jet cleaner, start from a suitable distance to avoid causing damage to the surface. Maintain a steady and controlled motion, ensuring even coverage and effective removal of debris. After you are done, clean your equipment thoroughly and store it properly to ensure its longevity.
By following these steps, you can repurpose your pressure washer into a sandblaster, dramatically expanding its functionality and saving you money on purchasing a separate machine. With this DIY approach, you can achieve professional-grade abrasive cleaning results right in the comfort of your own workshop or garage.

Understanding the Distinction between High-Pressure Cleaning and Abrasive Blasting Techniques
As I delve into the world of industrial cleaning methods, something that has always fascinated me is the difference between high-pressure washers, also known as pressure washers, and sandblasters, also known as abrasive blasters. Both these techniques are widely used for various applications, yet they have distinct characteristics. Let’s explore the dissimilarities between pressure washers and sandblasters in detail.
The Power of High-Pressure Cleaning
High-pressure cleaning, when employed with a pressure washer, utilizes the forceful expulsion of water at elevated pressures to remove dirt, grime, and contaminants from surfaces. This technique relies primarily on the impact and velocity of the water stream to dislodge and rinse away unwanted substances. Pressure washers have different nozzles that allow varying degrees of pressure and spray patterns, offering versatility in cleaning tasks.
Pressure washers are commonly used in tasks where a strong water force is required to clean surfaces without the need for aggressive abrasives. They are ideal for cleaning exterior surfaces such as driveways, decks, fences, and vehicles. Pressure washers can effectively remove loose paint, mud, mold, algae, and other resilient particles.
The Precision of Abrasive Blasting
In contrast to pressure washers, abrasive blasting techniques involve the utilization of sandblasters to propel abrasives, such as sand, beads, or crushed glass, against a surface. This process creates a kinetic force that erodes the targeted materials. Abrasive blasting is particularly useful for removing stubborn coatings, rust, corrosion, and welding residues from various surfaces.
By adjusting the flow rate, type of abrasive used, and distance between the nozzle and the surface, abrasive blasters offer greater control and precision in surface preparation. They are frequently employed in industrial settings for tasks such as rust removal, graffiti removal, and restoration projects.

- Pressure washers rely on water pressure to dislodge and clean surfaces.
- Abrasive blasters use kinetic force to remove stubborn coatings and residues.
- Pressure washers are versatile for a variety of cleaning tasks.
- Abrasive blasters provide greater control and precision in surface preparation.
- Each method has its own advantages and applications, depending on the cleaning requirements.
Understanding the variances between pressure washers and sandblasters is crucial for anyone seeking to choose the right cleaning technique for a specific task. Both methods have their unique advantages and applications, so it is essential to evaluate the cleaning needs and desired outcomes before making a decision.
Choosing the Right Power Cleaner for the Transformation
When it comes to transforming a regular power cleaner into a sandblaster, the first crucial step is selecting the most suitable machine for the conversion. In this section, I will guide you through the process of making an informed decision and choosing the right power cleaner that fits your requirements.
1. Power
One of the essential factors to consider when selecting a power cleaner for the transformation is its power capability. Look for a machine that provides sufficient pressure and flow rate to effectively propel the abrasive material during sandblasting. A powerful motor or engine is necessary to generate the force required to achieve optimal results.
2. Capacity

Another critical aspect to pay attention to is the capacity of the power cleaner. Consider the size and weight of the sandblasting tasks you intend to undertake. A larger capacity allows for longer, uninterrupted sandblasting sessions, while a smaller capacity might be more suitable for smaller or occasional projects.
3. Durability
Since the conversion involves using abrasive materials, it is paramount to choose a power cleaner that is built to withstand their harsh nature. Look for models that are constructed from durable materials, such as stainless steel or reinforced plastic, to ensure longevity and resistance to corrosion.
4. Versatility
While the primary purpose of the power cleaner is to serve as a sandblaster, opt for a model that offers versatility in its functionality. Some machines come with different nozzle attachments or adjustable pressure settings, allowing you to use them for various cleaning tasks besides sandblasting.

5. Safety Features
Your safety should be a top priority when selecting a power cleaner for the conversion. Ensure that the machine has appropriate safety features, such as a trigger lock or a pressure relief valve, to prevent any accidents or injuries during the sandblasting process.
Conclusion
Choosing the right power cleaner for the conversion is crucial to ensure a successful transformation into a sandblaster. Consider the power, capacity, durability, versatility, and safety features of the machine to make an informed decision that suits your specific sandblasting needs. By selecting the appropriate power cleaner, you will lay a solid foundation for a smooth and effective sandblasting experience.
Gathering the Required Materials and Tools
In this section, I will explain the process of gathering all the necessary materials and tools required to successfully transform your pressure washer into a sandblaster. By following these steps, you will be well-prepared for the conversion process and ensure that you have everything you need to complete the project.
Materials
To effectively convert your pressure washer into a sandblaster, you will need to gather the following materials:
| 1. | A suitable sandblasting nozzle |
| 2. | A high-pressure hose |
| 3. | A sandblasting gun |
| 4. | A sandblasting media (such as fine silica sand or other abrasive material) |
| 5. | A container for holding the abrasive material |
| 6. | Protective equipment (safety glasses, gloves, and a respirator mask) |
Tools
In addition to the materials listed above, you will also need the following tools:
| 1. | A wrench or adjustable pliers |
| 2. | A screwdriver |
| 3. | A drill (if necessary for attaching the sandblasting nozzle) |
| 4. | A measuring tape or ruler |
| 5. | A marker or pencil for marking measurements |
| 6. | A bucket or container for mixing the sandblasting media |
By ensuring that you have all the necessary materials and tools before starting the conversion process, you will save time and be able to complete the project smoothly. It is important to have a clear understanding of the required items and gather them beforehand, allowing for a seamless transition from a pressure washer to a sandblaster.
Preparing the Power Washing Unit for the Transformation
Before embarking on the process of turning your power washing unit into a sandblaster, it is crucial to properly prepare the equipment for the conversion. This section will guide you through the necessary steps to ensure a smooth and successful transition.
Step 1: Thoroughly Clean the Power Washing Unit

It is imperative to start with a clean power washing unit to avoid any residual debris interfering with the sandblasting process. Using a hose, rinse off any dirt or grime from the exterior of the machine. Take care to remove any loose particles or materials that may have accumulated in the nooks and crannies.
Step 2: Inspect Hoses and Connections
Inspect all hoses and connections to ensure they are in good condition and free from any visible damage. Look for any cracks, leaks, or weak spots that may compromise the efficiency and safety of the unit during the sandblasting operation. Replace any damaged hoses or fittings to guarantee optimal performance.
Step 3: Understand the Safety Features
Before proceeding further, familiarize yourself with the safety features of your power washing unit. These features may include automatic shut-off mechanisms, pressure relief valves, or protective shields. Understanding these safety measures will enable you to operate the converted sandblaster with confidence, minimizing any potential risks.

Step 4: Prepare Necessary Tools and Materials
Gather all the tools and materials that will be required for the conversion process. This may include a conversion kit, sandblasting nozzle, appropriate abrasive material, safety goggles, gloves, and a face mask. Having everything ready in advance will save time and ensure a smooth workflow during the modification.
Step 5: Follow Manufacturer’s Instructions
Finally, carefully read and follow the manufacturer’s instructions or guidelines for your specific power washing unit. Since different models may have varying requirements and compatibility, it is essential to adhere to the manufacturer’s recommendations to achieve optimal results without risking damage to the equipment.
By thoroughly preparing your power washing unit for the transformation, you lay the foundation for a successful conversion into a sandblaster. Proceeding with a clean and well-inspected machine, equipped with the necessary safety features and materials, will allow for a seamless transition and ensure efficient sandblasting performance.
Building the Sandblasting Attachment
In this section, I will share my experience and step-by-step process of creating a sandblasting attachment for my pressure washer. It was a challenging but rewarding project that allowed me to repurpose my pressure washer for a new and useful function.
Gathering the Materials
The first step in building the sandblasting attachment is to gather all the necessary materials. These include a sandblasting nozzle, a sandblasting hose, a control valve, an adapter, and various fittings. I found most of these items at my local hardware store, but some were ordered online.
Assembling the Attachment
Once I had all the materials, I started assembling the sandblasting attachment. I attached the sandblasting nozzle to the end of the sandblasting hose and secured it with clamps. Then, I connected the other end of the hose to the control valve, making sure to tighten the fittings properly. Finally, I attached the adapter to the control valve, allowing me to connect the attachment to my pressure washer.
It’s important to follow the instructions provided with the materials and ensure that all connections are tight and secure. Safety should always be a priority when working with high-pressure equipment.
Testing and Adjusting
After assembling the attachment, I tested it to see if it functioned properly. I turned on the pressure washer and adjusted the control valve to control the flow of abrasive material. I also made sure to wear protective gear, including goggles and gloves, to protect myself from any potential hazards. If necessary, I made adjustments to the control valve until I achieved the desired blasting pressure.
It’s essential to test the attachment in a safe and controlled environment, away from other people or objects that could be at risk of damage. I also took precautions to protect the surface I was blasting, such as covering it with a tarp or using a blasting cabinet.
- Gather all the necessary materials, including a sandblasting nozzle, hose, control valve, adapter, and fittings.
- Assemble the sandblasting attachment by connecting the nozzle, hose, control valve, and adapter together.
- Test the attachment to ensure it functions properly and make any necessary adjustments to achieve the desired blasting pressure.
Building the sandblasting attachment for my pressure washer allowed me to expand its functionality and make it a versatile tool for various tasks. With proper setup and precautions, it provides an effective and efficient way to remove rust, paint, and other surface contaminants.
Please note that the specific steps and materials required may vary depending on your pressure washer and sandblasting needs. Always refer to the manufacturer’s instructions and exercise caution when working with high-pressure equipment.
Connecting and Testing the Sandblasting System
In this section, I will guide you through the process of connecting and testing the sandblasting system for your newly transformed pressure washer. As an enthusiast myself, I understand the excitement of exploring new possibilities with our equipment, so let’s dive right in!
Gathering the Necessary Supplies
Before beginning the connection process, it is important to gather all the supplies you will need. This ensures a smooth and uninterrupted experience. The list of supplies includes:
- A sandblasting nozzle
- A sandblasting hose
- A sandblasting gun
- A suitable connector for your pressure washer
- Adequate safety equipment, such as goggles and gloves
Connecting the Sandblasting System
Once you have all the necessary supplies, it is time to connect the sandblasting system to your pressure washer. Start by ensuring that both the pressure washer and sandblasting system are turned off to avoid any accidents.
Next, locate the appropriate connector for your pressure washer. This connector will serve as the link between your pressure washer and the sandblasting system. Carefully attach the connector to the pressure washer, making sure it is secure and tightly fitted.
After securing the connector, attach the sandblasting hose to the other end of the connector. Ensure that it is also securely fastened to prevent any leaks or disconnections during operation.
Once the hose is connected, attach the sandblasting gun to the opposite end of the hose. Double-check that everything is tightly connected before moving on to the next step.
Testing the Sandblasting System
Before using the sandblasting system on any surface, it is crucial to test it first to ensure its proper functioning. Safety should always be a priority, so make sure you are wearing the necessary protective equipment.
Connect your pressure washer to a water source and turn it on. Slowly open the sandblasting system’s nozzle and adjust the pressure according to your needs. Aim the nozzle at a designated test area and release the sandblasting material. Observe the performance and adjust the pressure if necessary.
Pay attention to the efficiency of the sandblasting system and make sure it is effectively removing the desired material from the test surface. If there are any issues, troubleshoot them accordingly before proceeding with your sandblasting tasks.
Remember to always read the instruction manual provided with your sandblasting system for any specific guidance or safety precautions.
With the sandblasting system connected and tested, you are now ready to embark on your sandblasting adventures. Enjoy exploring the possibilities and achieving fantastic results with your converted pressure washer!
Tips and Techniques for Successful Sandblasting
In this section, I will share some valuable tips and techniques that I have personally learned and used for effective sandblasting. Sandblasting is a powerful method that uses high-pressure to blast abrasive materials onto a surface to remove rust, paint, or other unwanted coatings. Mastering the art of sandblasting requires practice and knowledge of the right techniques.
1. Safety First: Before starting any sandblasting project, it is crucial to prioritize safety. Always wear appropriate protective gear, including goggles, a respirator, gloves, and suitable clothing to protect your skin from abrasive materials and dust particles. Make sure to work in a well-ventilated area or use an exhaust system to remove harmful airborne particles.
2. Choose the Right Abrasive Material: Selecting the right abrasive material is essential to achieve optimal results. Consider the surface you’ll be working on and the coating you want to remove or prepare for painting. Common abrasive materials include sand, aluminum oxide, glass beads, and walnut shells. Each material has different levels of hardness and is suitable for specific applications.
3. Adjusting Pressure and Flow: Finding the right balance between pressure and flow is critical for effective sandblasting. Too much pressure can damage the surface, while too little may not remove the coating efficiently. Experiment with different settings and adjust the pressure and flow according to the desired outcome and the type of surface you are working on.
4. Maintain the Correct Distance: Maintaining the proper distance between the sandblaster nozzle and the surface is crucial. Holding the nozzle too close can lead to uneven blasting or damage the surface, while holding it too far may result in ineffective cleaning. Practice with different distances to find the sweet spot for your specific sandblasting job.
5. Overlapping Strokes: To ensure thorough and consistent cleaning, it is important to overlap your sandblasting strokes. Avoid focusing on one spot for too long, as it can wear down the surface or create unevenness. Move the sandblaster continuously in a controlled and overlapping motion to achieve a smooth and even finish.
6. Regular Equipment Maintenance: Proper maintenance of your sandblasting equipment is crucial for longevity and efficient performance. Regularly clean the nozzle, filters, and hoses to avoid clogging and ensure a consistent flow of abrasive material. Check for any signs of wear and tear and replace parts as needed.
7. Practice and Patience: Sandblasting requires practice to develop the right technique and achieve desired results. Patience is key as it may take time to become proficient. Start with small projects and gradually work your way up to larger and more complex ones. With practice, you’ll gain confidence and refine your sandblasting skills.
Remember, proper sandblasting technique is essential to achieve optimal results and avoid any damage to the surface you are working on. Take the time to learn and implement these tips and techniques to enhance your sandblasting experience.
Maintaining and Cleaning Your Transformed High-Pressure Cleaning Device
Ensuring the proper maintenance and cleaning of your modified pressure washer is crucial for its longevity and optimal performance. Taking care of your converted cleaning equipment will not only help it to function effectively but also extend its lifespan, allowing you to continue enjoying the benefits of sandblasting with ease. In this section, I will share some essential maintenance and cleaning tips that you should follow regularly.
1. Regular Inspection and Cleaning
Regularly inspect your converted high-pressure cleaning device for any signs of wear and tear. Check the nozzle, hose, and other attachments for any clogs, cracks, or damage. Properly clean them to remove any dirt, debris, or sand particles that may have accumulated during usage. It is also essential to check the sandblasting media container for any remaining abrasive material, ensuring that it is emptied and cleaned thoroughly.
2. Lubrication of Moving Parts
Lubricating the moving parts of your sandblasting equipment is essential to prevent friction, rust, and ensure smooth functioning. Apply a suitable lubricant to the trigger mechanism, nozzle holder, and any other movable components, following the manufacturer’s instructions. Regular lubrication will not only prolong the lifespan of your converted pressure washer but also enhance its overall performance.
| Maintenance Task | Frequency |
|---|---|
| Inspecting nozzle, hose, and attachments | After each use |
| Cleaning sandblasting media container | After each use |
| Lubricating moving parts | Monthly |
| Checking hose for leaks or damage | Monthly |
| Inspecting and cleaning filters | Every 3 months |
Remember, proper maintenance and cleaning of your converted pressure washer-turned-sandblaster are crucial for its longevity and continued performance. By incorporating these simple yet essential maintenance tasks into your routine, you can ensure that your equipment remains in optimal condition, delivering efficient and effective sandblasting results for years to come.


