How To Convert A Pressure Washer Into A Paint Sprayer

As an avid DIYer, I’m always on the lookout for creative ways to repurpose my tools and equipment. One such transformation that I recently undertook involved converting my trusty high-pressure cleaning device into a versatile and efficient paint sprayer. Not only did this save me the hassle of purchasing a separate paint sprayer, but it also allowed me to achieve professional-looking finishes with ease.
To embark on this exciting endeavor, I needed to explore the inner workings of my pressure washer and understand its potential as a paint applicator. By leveraging the power of water pressure, a pressure washer can harness a continuous stream of liquid and propel it at high speeds. It didn’t take long for me to realize that I could tap into this tremendous force and utilize it as a means of spraying paint evenly and smoothly onto various surfaces.
Of course, this conversion process required a few key modifications and adjustments. Firstly, I had to replace the original nozzle of the pressure washer with a specialized paint gun attachment. This allowed me to control the flow of paint and adjust the spray pattern to my desired width and intensity. Additionally, I made sure to clean and flush out any remnants of cleaning solution from the pressure washer’s system, ensuring a clean slate for my painting endeavors.
Once I had transformed my pressure washer into a bona fide paint sprayer, the possibilities were endless. Whether I was tackling a large-scale exterior project, such as painting my home’s siding or fences, or experimenting with intricate details on furniture refinishing projects, my newly repurposed tool proved to be remarkably adaptable. Not only did it provide me with greater accuracy and speed, but it also ensured consistent coverage and minimized any brush or roller marks.
So, if you’re looking for a cost-effective and efficient solution to your painting needs, perhaps it’s time to reconsider the versatility of your pressure washer. With a little bit of ingenuity and some strategic modifications, you too can unlock the potential of this unsuspecting tool and unleash your artistic prowess with ease.
Choosing the Perfect Power Washing Machine to Transform Into a Painting Device
As I delve into the world of recreating traditional pressure washers into effective paint sprayers, the first crucial step is to carefully select the ideal power washing machine. This pivotal decision will determine the overall success and functionality of the transformed tool.
Considering the range of available options, it is important to evaluate various factors before making a final choice. The power output, water flow rate, and nozzle compatibility are some of the key aspects to consider. Additionally, the durability, ease of use, and overall design of the pressure washer should align with the specific requirements for a paint sprayer conversion.
By meticulously assessing and cross-referencing these factors, one can ensure that the chosen pressure washer possesses the necessary capabilities to be effectively transformed into a reliable paint sprayer. This careful evaluation will ultimately enhance the quality and efficiency of the painting process, resulting in satisfactory and professional-looking results.
Gathering the Necessary Materials and Tools
In this section, I will discuss the steps to follow in order to gather all the required materials and tools for converting a pressure washer into a paint sprayer. First and foremost, it is important to have a clear understanding of the specific project requirements and the desired outcome.

1. Research and Planning
Before starting the conversion process, it is crucial to conduct thorough research to identify the appropriate materials and tools. This involves understanding the various components involved in a paint sprayer and determining how they can be adapted to fit a pressure washer. Additionally, planning the project beforehand will help in ensuring the availability of all the required items.
2. Purchase the Essential Materials
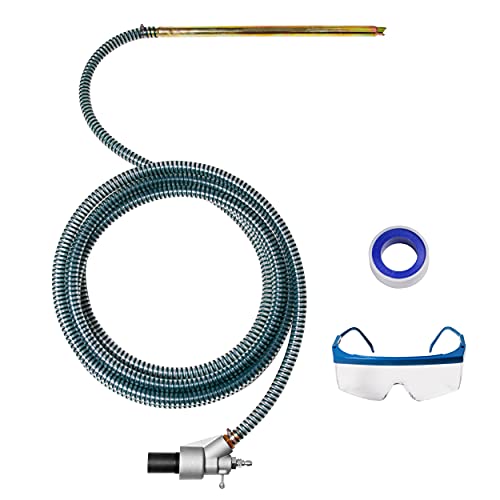
Once the research and planning are complete, it is time to purchase the necessary materials. Some of the essential items include a paint sprayer gun attachment, appropriate-size nozzles, paint filters, and high-pressure hose connectors. It is important to ensure that the materials are compatible with the specific pressure washer being used.
An important aspect to consider is the quality of the materials. Opting for high-quality components will result in better performance and durability. It is recommended to consult with experts or read customer reviews to make informed purchasing decisions.
3. Gather the Required Tools
In addition to the materials, certain tools will also be needed for the conversion process. These include wrenches, pliers, screwdrivers, and pipe tape. It is important to have the necessary tools readily available to ensure smooth and efficient execution of the project.
Furthermore, it is advisable to have safety equipment such as gloves, safety goggles, and a dust mask. These precautions will help protect against any potential hazards that may arise during the conversion process.

| Materials | Tools |
|---|---|
| Paint sprayer gun attachment | Wrenches |
| Appropriate-size nozzles | Pliers |
| Paint filters | Screwdrivers |
| High-pressure hose connectors | Pipe tape |
By properly gathering the necessary materials and tools, a pressure washer can be successfully transformed into a paint sprayer. This ensures the availability of all the required components for the subsequent steps in the conversion process.
Step 3: Adapting Your High-Pressure Cleaning Tool for Efficient Application of Pigments
Now that we have established a solid foundation for repurposing our powerful high-pressure cleaning device, it is time to take the next crucial step in transforming it into a reliable tool for paint application. In this section, I will guide you through the process of modifying the existing components of your pressure washer to ensure optimal performance and precision when using it as a paint sprayer.
To begin the modification process, it is essential to assess and adjust the nozzle of your pressure washer. Since the purpose of this adaptation is to achieve effective paint spraying, we need to replace the original nozzle with a specialized paint-friendly alternative. This replacement nozzle typically features a wider orifice, allowing for the smooth flow of paint particles while maintaining a consistent pressure.
Additionally, it is important to ensure proper filtration of the paint before it enters the system. To achieve this, consider incorporating a paint filter, specifically designed for paint sprayers, into the setup. This safeguard prevents unwanted debris or impurities from obstructing the nozzle or damaging the internal components of your modified pressure washer.
Furthermore, it is crucial to adjust the pressure settings on your pressure washer for the best paint spraying results. Lowering the pressure will help achieve a more controlled and accurate application, preventing overspray or uneven coverage. Testing and fine-tuning the pressure levels before commencing your paint project is highly recommended.

- Replace the original nozzle with a paint-friendly alternative.
- Incorporate a paint filter to ensure a clean paint flow.
- Adjust the pressure settings for optimal paint spraying.
By implementing these modifications and adjustments to your pressure washer, you are one step closer to transforming it into a reliable and efficient paint sprayer. The next section will guide you through the necessary steps to prepare your chosen paint for application and ensure a smooth and successful painting process.
Step 4: Testing and Adjusting the Paint Sprayer Conversion
Now that we have successfully transformed our pressure washer into a paint sprayer, it is time to test and make any necessary adjustments to ensure optimal performance. This step is crucial in achieving a smooth and even paint application.
Evaluating the Spray Pattern
Initially, start by connecting the converted paint sprayer to a water source and adjusting the pressure to a low setting. This will allow us to evaluate the spray pattern without wasting any paint. Hold the sprayer at a consistent distance from the surface, and proceed to paint a test area.
Inspect the test area, paying attention to the quality of the spray pattern. Ideally, the pattern should be even with no signs of splattering or uneven coverage. It should resemble a fine mist that evenly coats the surface.
If the spray pattern is not satisfactory, it may be necessary to make some adjustments. This can be done by tweaking the nozzle settings, pressure, or even the mixture of paint and thinner. The goal is to achieve a balanced and consistent spray pattern.

Testing for Clogging or Blockages
Another important aspect of testing the paint sprayer conversion is checking for any clogging or blockages that could hinder the smooth flow of paint. This can be done by filling the paint sprayer with a small amount of paint and spraying it onto a surface.
Observe if there are any interruptions or inconsistencies in the flow of paint. If there are, it is likely that there is a clog or blockage that needs to be cleared. In this case, refer to the manufacturer’s instructions for troubleshooting tips or consult a professional for assistance.
| Step 4: Testing and Adjusting the Paint Sprayer Conversion |
|---|
| 1. Evaluate the spray pattern by painting a test area. |
| 2. Adjust the nozzle settings, pressure, or paint mixture if necessary. |
| 3. Test for any clogs or blockages by spraying a small amount of paint. |
| 4. Clear any clogs or seek professional assistance if needed. |