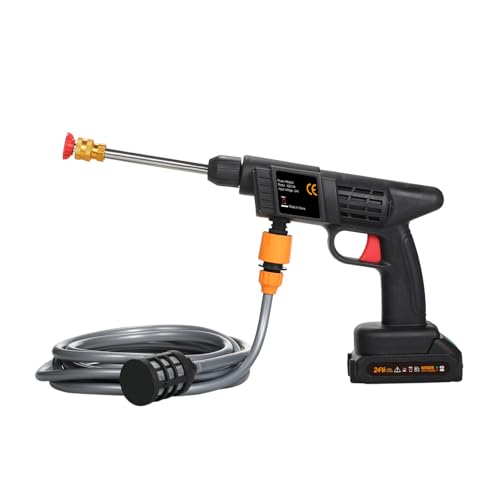
How To Connect Karcher Pressure Washer To Indoor Tap

Have you ever found yourself wishing for an easier way to connect your powerful cleaning equipment to your home’s tap? Look no further! With a few simple steps, you can quickly and efficiently link your high-pressure washer to your indoor water source, ensuring a seamless cleaning experience for your household chores.
Imagine the convenience of effortlessly supplying water to your cleaning device without the hassle of searching for outdoor faucets or dealing with long hoses. By connecting your high-pressure washer directly to your indoor tap, you save valuable time and energy, allowing you to focus on what truly matters – achieving that spotless shine.
Not only does connecting your high-pressure washer to your indoor tap provide practicality, but it also offers an enhanced cleaning experience. With a stable and reliable water supply from your household plumbing system, you can unleash the full potential of your cleaning equipment, benefiting from its superior performance and efficiency. Say goodbye to low-pressure frustration and say hello to a comprehensive and satisfying cleaning process.
Unlock the potential of your cleaning routine today by following our foolproof guide to connecting your high-pressure washer to your indoor water source. With our step-by-step instructions, even those without prior experience can effortlessly achieve a hassle-free setup. Whether you’re tackling challenging outdoor surfaces or handling indoor cleaning tasks, this article will equip you with the knowledge and confidence necessary to connect your high-pressure washer in no time!
Connecting Your Karcher Pressure Washer to a Faucet Inside Your Home
When it comes to using your Karcher pressure washer indoors, one of the key steps is connecting it to an indoor faucet. In this section, I will guide you through the process of setting up your pressure washer with an indoor tap, ensuring a smooth and efficient operation.
Gather the Necessary Equipment
Before you start connecting your Karcher pressure washer, it is important to gather all the required equipment. Some of the essential items you will need include:
- A faucet adapter: This will facilitate the connection between your pressure washer and the indoor tap.
- A garden hose: Ensure you have a suitable length of garden hose to reach from your pressure washer to the indoor faucet.
- A bucket or container: This will be needed to catch any excess water that may come out during the connection process.
Follow These Steps to Connect the Pressure Washer
Now that you have everything ready, it’s time to connect your Karcher pressure washer to the indoor tap. Here’s how:
- Locate a suitable indoor tap: Identify a faucet inside your home that has a compatible thread size with the faucet adapter.
- Turn off the water supply: Before proceeding, ensure that the water supply to the chosen indoor tap is turned off.
- Attach the faucet adapter: Screw the faucet adapter onto the indoor tap, ensuring a secure connection.
- Attach the garden hose: Connect one end of the garden hose to the faucet adapter and the other end to your pressure washer’s water inlet.
- Check for leaks: Turn on the water supply briefly and inspect all connections for any signs of leaks. Tighten if necessary.
Once you have successfully connected your Karcher pressure washer to the indoor tap, you can proceed to use it for your cleaning tasks. Remember to always follow the manufacturer’s instructions and safety guidelines to ensure the proper operation of your pressure washer.
Understanding the Components
When it comes to setting up a pressure washing system in your home, it is essential to have a thorough understanding of the various components involved.
As I embarked on my journey to connect a pressure washer to an indoor tap, I quickly realized the importance of familiarizing myself with the different parts that make up the system.

It is crucial to be acquainted with the specific hardware required for the setup, such as connectors, adapters, and hoses. These components play a vital role in ensuring a secure and efficient connection between the pressure washer and the indoor tap.
Additionally, understanding the function of each component allows for easier troubleshooting and maintenance. By comprehending how the parts work together, you can identify and resolve any issues that may arise during the connection process.
Moreover, having a grasp of the different components helps in optimizing the performance of the pressure washer. Knowing which parts are responsible for regulating water flow, controlling pressure levels, and providing adequate filtration ensures that the machine operates at its best.
Before attempting to connect a pressure washer to an indoor tap, it is essential to thoroughly understand the role and functionality of each component involved. This knowledge ensures a successful and efficient setup, allowing you to make the most of your pressure washing experience.
Choosing the Right Connector
When it comes to connecting the Karcher pressure washer to an indoor tap, one of the most important steps is choosing the right connector. The connector plays a crucial role in ensuring a secure and efficient connection between the pressure washer and the tap, allowing for smooth water flow and optimal performance.

First and foremost, it is important to consider the compatibility of the connector with your indoor tap. Not all connectors are universal, and different taps may require specific types of connectors. Therefore, it is advisable to check the specifications of your tap and determine the appropriate connector size and fitting before making a purchase.
Another factor to consider when choosing a connector is the material it is made of. Connectors are available in various materials, including brass, stainless steel, and plastic. Each material has its own advantages and disadvantages. For example, brass connectors are known for their durability and corrosion resistance, while plastic connectors may be more cost-effective but may not be as long-lasting.
In addition to compatibility and material, it is also worth considering other features of the connector, such as adjustable fittings or integrated shut-off valves. These features can provide added convenience and flexibility during the connection process and while using the pressure washer.
Lastly, it is always a good idea to read reviews and seek recommendations from others who have used connectors for similar purposes. Their experiences can provide valuable insights and help you make an informed decision when choosing the right connector for your Karcher pressure washer and indoor tap.
Preparing Your Indoor Faucet
In this section, I will share some important steps you can take to ensure your indoor faucet is ready for connecting your pressure washer. By following these steps, you will be able to safely and effectively use your pressure washer indoors without any issues.

Check the Water Supply
Before connecting your pressure washer to the indoor faucet, it is crucial to check the water supply. Ensure that the water flow is not obstructed and there are no leaks or damages to the faucet. This will help prevent any water leakage or potential accidents during the pressure washing process.
Install a Thread Adapter
Many indoor faucets have different thread sizes compared to the standard connections of pressure washers. To connect your pressure washer, you might need to install a thread adapter. This adapter will allow you to securely attach the pressure washer hose to the faucet without any leaks. Make sure to choose the correct thread adapter size for your faucet.
- Turn off the indoor faucet and disconnect any attachments or accessories.
- Clean the faucet threads by removing any dirt or debris.
- Screw the thread adapter onto the faucet, ensuring a tight fit.
- Hand-tighten the adapter, making sure it is securely in place.
Test for Leaks
Once you have connected the thread adapter, it is essential to test for any leaks before using the pressure washer. Turn on the faucet and check for any water leakage around the connection points. If you notice any leaks, tighten the connections further or consider using plumber’s tape for a better seal.
Now that you have prepared your indoor tap, you are ready to connect your Karcher pressure washer and start your cleaning tasks with confidence!
Connecting the Power Washer
When it comes to setting up your power washer, having the right connections is crucial for a smooth and efficient cleaning experience. In this section, I will guide you through the steps of connecting your power washer to your indoor water supply.

Step 1: Gathering the Necessary Materials
Before getting started, make sure you have all the required materials at hand. You will need a supply hose, a tap adapter, and a garden hose connector. These components are essential for establishing a secure and leak-free connection.
Step 2: Attaching the Tap Adapter
Begin by attaching the tap adapter to your indoor tap. The tap adapter should be compatible with your tap’s size and threading. Carefully screw it onto the tap, making sure it is tight and secure. This adapter will serve as the point of connection for your power washer.
Step 3: Connecting the Supply Hose
Next, connect one end of the supply hose to the tap adapter. Ensure that the hose is firmly attached, as any looseness may result in leaks or a loss of pressure. Make sure the connection is tight by using a wrench if necessary.
Now, take the other end of the supply hose and attach it to the power washer. This connection should be straightforward, usually involving a simple twist-lock mechanism. Ensure a secure attachment to prevent any water leakage during operation.
Step 4: Securing the Garden Hose Connector
Finally, attach the garden hose connector to the power washer. This connection will allow you to connect your high-pressure hose, which is essential for directing the water flow onto the desired surface. Make sure the connector is tightly secured to prevent any leaks or water loss.

With all the necessary connections in place, you are now ready to turn on your indoor tap and start using your power washer. Remember to follow the manufacturer’s instructions for operation and maintenance to ensure optimal performance and longevity of your equipment.
| Materials Needed | Steps to Follow |
|---|---|
| Supply hose | Step 2: Attaching the Tap Adapter |
| Tap adapter | Step 3: Connecting the Supply Hose |
| Garden hose connector | Step 4: Securing the Garden Hose Connector |
Ensuring Proper Water Flow
When connecting a pressure washer to an indoor tap, it is crucial to ensure that the water flow is correct. The proper water flow will not only help the pressure washer function efficiently but also prevent any potential damage or accidents that could occur due to inadequate water pressure or flow.
1. Check the Water Pressure
Before connecting the pressure washer, it is essential to assess the water pressure available from the indoor tap. Inadequate pressure can result in reduced performance of the pressure washer and may not yield the desired cleaning results. It is recommended to check the water pressure using a pressure gauge or consult a professional plumber to ensure it meets the manufacturer’s requirements.
2. Use an Appropriate Water Supply Hose
Choosing the right water supply hose is another crucial factor when it comes to ensuring correct water flow. The hose should have the proper diameter and length to provide sufficient water volume to the pressure washer. Using a hose that is too narrow or too long can restrict the water flow, leading to decreased cleaning efficiency and potentially damaging the pressure washer.
- Select a hose with a diameter that matches the pressure washer’s inlet fitting.
- Avoid excessively long hoses as they can cause a drop in water pressure.
- Ensure the hose is in good condition and free from any kinks or leaks that could hinder the water flow.
3. Clean and Check the Indoor Tap
It is important to clean and check the indoor tap before connecting the pressure washer. Accumulated dirt, debris, or mineral deposits can clog the tap or its filter, affecting the water flow. Use a brush or a cloth to remove any dirt or deposits from the tap and inspect the filter for any blockages. Cleaning the tap will help maintain a steady and uninterrupted water flow during the pressure washing process.

- Remove the tap aerator or filter if necessary and clean it thoroughly.
- Check for any leaks or damages to the tap, ensuring it is in proper working condition.
By following these steps to ensure correct water flow, you can optimize the performance of your pressure washer and achieve effective cleaning results, all while avoiding any potential issues that may arise from an improper water supply.
Troubleshooting Common Issues
In this section, I will address some common issues that may arise when connecting a pressure washer to an indoor water source. These issues can cause inconvenience and hinder the optimal performance of your pressure washer. However, with some guidance, most of these problems can be easily resolved.
1. Insufficient Water Pressure
- Check if the water supply valve is fully open.
- Inspect the hoses for any kinks or blockages.
- Ensure that there are no leaks in the hose connections.
- If using a hose reel, make sure it is fully unwound to allow for proper water flow.
- If your pressure washer has a built-in water filter, clean or replace it if necessary.
2. Water Leaks
- Inspect all hose connections for any loose fittings. Tighten them if needed.
- Check the O-rings or gaskets in the hose connections and replace them if they are damaged or worn out.
- Make sure the hose connections are properly threaded and not cross-threaded.
- If the pressure washer is equipped with a quick-connect system, ensure that the connectors are securely locked in place.
3. Nozzle Issues
- If you experience low pressure or uneven spray, check the nozzle for any clogs. Clean or replace it if necessary.
- Make sure you are using the correct nozzle for the desired pressure and spray pattern.
- If the nozzle is damaged or worn out, it may need to be replaced to achieve optimal performance.
4. Tripping Circuit Breaker
- Verify that the circuit breaker can handle the power requirements of the pressure washer. If necessary, use a dedicated circuit for the appliance.
- Inspect the power cord for any damage or frayed wires. Replace it if needed.
- Make sure the electrical connections are secure and not loose.
- If other devices are connected to the same circuit, unplug them temporarily to reduce the power load.
By troubleshooting these common issues, you can ensure that your pressure washer operates smoothly and effectively, delivering optimal cleaning results. Remember to always refer to the manufacturer’s instructions and guidelines for specific troubleshooting steps related to your model.
Tips for Safe and Effective Pressure Washing
When it comes to pressure washing, safety and effectiveness are key factors to consider. In this section, I will share some valuable tips based on my personal experience to ensure that your pressure washing tasks are carried out successfully, without any harm or damage.
1. Understand the Proper Technique
One of the most important aspects of pressure washing is understanding the correct technique. It is essential to have a good grasp of how to handle the equipment and apply the right amount of pressure without causing any damage. Being aware of the proper technique will not only help you achieve better results but also minimize the risk of accidents.

2. Wear Protective Gear
Safety should always be a priority when pressure washing. Make sure to wear appropriate protective gear, such as safety goggles to protect your eyes from debris, gloves to shield your hands, and non-slip footwear to prevent falls. Additionally, consider wearing ear protection, as pressure washers can be quite noisy.
3. Preparing the Surface
Before starting any pressure washing job, it is essential to prepare the surface properly. Remove any loose debris, such as leaves or dirt, and cover nearby plants or delicate objects that may be sensitive to the force of the water. This will help prevent damage and ensure a more effective cleaning process.
4. Using the Correct Nozzle
The nozzle you choose for your pressure washer can make a significant difference in the outcome of your cleaning tasks. Different nozzles have various spray patterns and pressure levels, so it is important to select the appropriate one for the surface you are cleaning. Using the wrong nozzle could result in damage or inefficient cleaning.
5. Keep a Safe Distance
Maintaining a safe distance between the pressure washer and the surface you are cleaning is crucial. This distance will depend on the type of surface and the pressure level of your equipment. It is recommended to start with a greater distance and gradually decrease it until you find the optimal distance for effective cleaning without causing any harm.
Following these tips will help ensure a safe and efficient pressure washing experience. Remember, it is always better to take precautions and invest some time in preparation to avoid any unwanted accidents or damage. Happy pressure washing!
Proper Maintenance and Storage
When it comes to ensuring the longevity and optimal performance of your pressure washer, proper maintenance and storage are key. It is essential to establish a routine maintenance schedule and follow a few important guidelines to keep your equipment in top shape.
Regularly inspecting your pressure washer for any signs of wear or damage is crucial. This can help you identify any potential issues or parts that may need replacement. Additionally, cleaning the machine thoroughly after each use is essential to prevent the buildup of dirt and debris that could affect its performance.
Proper storage is also vital for protecting your pressure washer when it’s not in use. Storing it in a dry and well-ventilated area can help prevent the risk of corrosion and damage caused by moisture. It’s also recommended to cover your pressure washer with a protective cover to shield it from dust, dirt, and any potential accidental spills.
It is important to pay attention to the manufacturer’s instructions for any specific maintenance or storage recommendations. This will ensure that you are following the correct procedures for your specific pressure washer model. Lastly, investing in regular servicing and professional maintenance can further enhance the lifespan and efficiency of your pressure washer.
| Maintenance Tips: | Storage Guidelines: |
|---|---|
| Inspect regularly for wear and damage | Store in a dry and well-ventilated area |
| Clean thoroughly after each use | Cover with a protective cover |
| Follow manufacturer’s instructions | Keep away from moisture and potential spills |
| Consider professional servicing | – |