How To Change Nozzle On Sun Joe Pressure Washer

Have you ever wished to amplify the efficiency of your trusty pressure cleaning companion, but felt puzzled about how to do it? Look no further! In this exclusive guide, I will disclose an invaluable insight that will revolutionize your pressure washer game. Prepare to unlock the hidden potential within your high-pressure system as we embark on a journey to revolutionize your cleaning endeavors.
Picture this: you are standing in front of your powerful water-propelling apparatus, ready to commence your cleaning mission. Yet, despite its acclaimed prowess, you believe there might be another gear you can shift into, another level of performance you can tap into. And you’re absolutely right! The key to enhancing your pressure washer lies within a seemingly insignificant component – the crucial element that determines the trajectory of your water flow.
Now, let me introduce you to the game-changer – the mystical mechanism capable of transforming your cleaning experience. We are about to delve into the world of interchangeable fittings, a small hero that holds the power to elevate your pressure washer’s performance to astonishing heights. You may be wondering how this unassuming device can make such a difference – but trust me, the results will leave you astounded. Brace yourself as we explore the mesmerizing art of nozzle replacement.
Prepare to be awestruck by the versatility and precision the right nozzle can bring to your pressure cleaning endeavors. The variety of nozzle options available is vast, catering to different cleaning tasks and surfaces. Whether you seek a wider spray pattern for larger areas or a focused jet for those stubborn stains, the art of swapping nozzles allows you to tailor your pressure washer’s performance to meet each unique cleaning challenge you face. Join me on this enlightening journey as we unravel the intricacies of nozzle replacement and discover the true potential of your pressure washer.
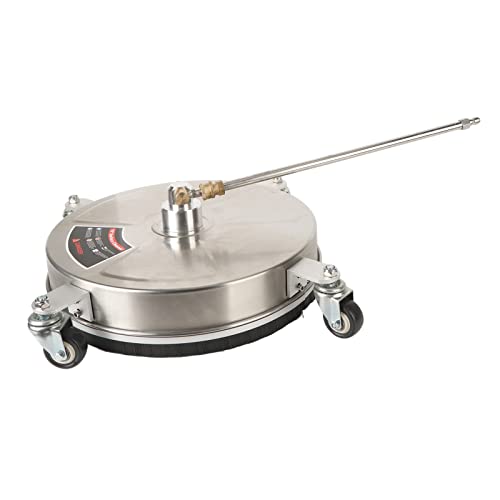
Replacing the Attachment Tip on my Powerful Cleaning Machine
As an owner of a reliable and efficient cleaning tool, I understand the importance of regular maintenance and part replacement. Today, I will guide you through the process of changing the attachment tip on your high-performance cleaning device, which ensures optimal functionality and effectiveness. Follow these simple steps to extend the lifespan of your pressure washer and continue enjoying exceptional cleaning results.
Gather the Necessary Tools and Materials
- A new attachment tip compatible with your Sun Joe pressure washer
- A pair of protective gloves
- A cloth or towel for cleaning and wiping
Step-by-Step Instructions
- Turn off your Sun Joe pressure washer and unplug it from the power source to ensure safety during the replacement process.
- Allow the pressure washer to cool down for a few minutes to avoid any potential burns.
- Using your gloves, firmly grasp the current attachment tip and carefully twist it counterclockwise to unscrew it from the wand. Be cautious not to damage the nozzle threads or surrounding components.
- Gently clean the threads of the wand using a cloth or towel to remove any debris or dirt that may impede the installation of the new attachment tip.
- Take the new attachment tip and align it with the threads on the wand. Rotate it clockwise until it is securely fastened, ensuring a tight seal.
- Once the new attachment tip is properly attached, plug the pressure washer back into the power source and turn it on to test its functionality.
- Run water through the pressure washer for a few minutes to flush out any remaining debris or impurities that may have accumulated during the replacement process.
By regularly replacing the attachment tip on your Sun Joe pressure washer, you can ensure optimal performance and maintain the pristine condition of your cleaning machine. With these straightforward steps, you’ll be ready to tackle any cleaning task with ease and efficiency. Remember, proper maintenance guarantees a long-lasting and reliable pressure washer that will continue to meet your cleaning needs for years to come.
Understanding the Significance of Nozzle Maintenance
When it comes to maintaining the optimal functionality of your pressure washer, paying attention to nozzle maintenance is essential. The nozzle plays a crucial role in determining the efficiency and effectiveness of your cleaning tasks. In this section, I will highlight the importance of nozzle maintenance and how it contributes to a superior cleaning experience.
The Key to Optimal Performance
Nozzle maintenance is the key to ensuring the optimal performance of your pressure washer. Over time, nozzles can get clogged or damaged due to the accumulation of dirt, debris, and mineral deposits. This can significantly affect the water pressure and spray pattern, resulting in reduced cleaning power. By regularly inspecting and cleaning the nozzles, you can prevent these issues and maintain consistent and powerful water flow.
Extended Nozzle Lifespan
Proper maintenance of your pressure washer’s nozzles can significantly extend their lifespan. The nozzles are subjected to high-pressure water streams, which can cause wear and tear over time. However, by taking the time to clean and care for them, you can minimize the chances of premature nozzle failure. By ensuring the longevity of your nozzles, you will not only save money on replacements but also guarantee uninterrupted cleaning performance.
Regular cleaning and inspection of your nozzles are the cornerstones of effective pressure washer maintenance.

Protecting the nozzles from damage and keeping them free from debris are essential for achieving outstanding cleaning results every time.
Gathering the Essential Tools and Equipment
When it comes to making any kind of nozzle change on a pressure washer, having the right tools and equipment is crucial. In this section, I will guide you through the necessary items you will need before starting the process. It is important to gather these tools beforehand to ensure a smooth and efficient nozzle replacement.
Tool Selection
One of the key factors in successfully changing a nozzle is having the appropriate tools at hand. Here are some essential tools you should consider gathering:
- Wrenches: Wrenches are indispensable when it comes to loosening and tightening various components of the pressure washer. Select a wrench that fits the size of the nozzle you will be replacing.
- Protective gloves: To keep your hands safe from any potential injuries during the process, I highly recommend wearing a pair of durable and protective gloves.
- Safety goggles: Since pressure washers involve high-pressure streams of water, it is essential to protect your eyes by wearing safety goggles. This will prevent any water or debris from causing harm.
Equipment Preparation
Before attempting to change the nozzle, it is important to prepare your pressure washer and workspace. Here are a few steps to follow:
- Power off the pressure washer: Always start by disconnecting the power source to avoid any accidental operation or injury.
- Secure the pressure washer: Make sure your pressure washer is stable and secure by placing it on a flat and level surface. This will prevent any unwanted movement during the nozzle change process.
- Clear the surrounding area: Remove any obstacles or clutter from the area around the pressure washer to provide ample space for maneuvering and working comfortably.
- Inspect the nozzle compartment: Take a moment to inspect the nozzle compartment to familiarize yourself with its location and ensure it is accessible for nozzle replacement. If needed, refer to the user manual for assistance.
By gathering the necessary tools and properly preparing your equipment, you will be well-equipped to successfully change the nozzle on your pressure washer. These steps will help ensure a smoother transition and minimize the chances of any complications during the process.

Disconnecting the Pressure Washer from the Power Source
When it comes to safely disconnecting a pressure washer from its power source, there are a few key steps that I always follow to ensure a smooth and hazard-free process. By following these guidelines, you can protect yourself and others from potential harm and maintain the longevity of your equipment.
- Start by turning off the pressure washer. This can usually be done by flipping the power switch or pressing the designated button. It’s important to make sure that the pressure washer is completely powered down before proceeding.
- Next, locate the power cord and unplug it from the electrical outlet. It’s crucial to handle the power cord with care, avoiding any tugs or pulls that can cause damage.
- If your pressure washer is cordless and operates on a battery, remove the battery pack by following the manufacturer’s instructions. This will disconnect the power source and ensure that the pressure washer is not accidentally started while performing maintenance tasks.
- Once the power source is disconnected, take a moment to inspect the cord or battery pack for any signs of wear or damage. If you notice any frayed wires, exposed insulation, or other issues, it’s essential to address them before using the pressure washer again.
- I recommend storing the power cord or battery pack in a safe and dry location, away from potential hazards. This will help prevent any damage or accidents and ensure that the power source remains in good condition for future use.
By following these steps, you can easily and safely disconnect your pressure washer from the power source. Remember to always prioritize your safety and the proper maintenance of your equipment to enjoy optimal performance and longevity.
Removing the Old Nozzle
When it comes to maintaining and upgrading your pressure washer, one important task is replacing the nozzle. In this section, I’ll guide you through the process of removing the old nozzle to make way for a new one, ensuring optimal performance and efficiency.
Step 1: Preparing the Pressure Washer
Before embarking on the nozzle removal process, it’s essential to ensure the pressure washer is turned off and disconnected from the power source. Safety should always be a top priority when working with any equipment. Once you’ve taken these precautions, I recommend inspecting the nozzle and surrounding components for any signs of damage or wear.
Step 2: Turning Off the Water Supply
Next, locate the water supply and turn it off to prevent any accidental water flow during the nozzle removal. This step is crucial to avoid unnecessary mess and potential hazards.

At this point, you may want to consider wearing gloves to protect your hands from any residual water or debris that may be present around the nozzle.
Step 3: Loosening the Nozzle
Now, it’s time to loosen the nozzle. Using an adjustable wrench or nozzle removal tool, grip the base of the nozzle firmly. Rotate it counterclockwise until it becomes loose enough to be removed by hand.
Keep in mind that the nozzle may be tightly secured, so you might need to apply a bit of force or use a lubricating agent to facilitate the removal process. Be careful not to use excessive force that could damage the nozzle or other parts of the pressure washer.
Once the old nozzle is loosened, continue unscrewing it until it can be completely removed. You may need to twist it back and forth gently while pulling it out to avoid any resistance.
Remember to set the old nozzle aside for proper disposal or recycling, depending on local regulations. This will help minimize environmental impact and ensure responsible waste management.

With the old nozzle successfully removed, you’re one step closer to installing a new one that suits your specific needs. In the next section, I will guide you through the process of selecting and installing the appropriate replacement nozzle.
Continue reading: How to Choose and Install a New Nozzle for Your Pressure Washer
Cleaning the Nozzle Housing
When it comes to maintaining the nozzle housing of your pressure washer, it’s essential to regularly clean it to ensure optimal performance. In this section, I will guide you through the process of cleaning the nozzle housing to keep it free from dirt, debris, and clogs.
To begin, make sure you have disconnected the pressure washer from the power source and turned off the water supply. This will prevent any accidents or damage while you clean the nozzle housing. Once you have done that, follow the steps below:
| Step | Description |
|---|---|
| 1 | Start by removing the nozzle from the housing. This can be done by twisting it counterclockwise until it loosens. |
| 2 | Inspect the nozzle for any visible dirt or debris. If you notice any, gently brush it off using a soft-bristle brush to avoid damaging the nozzle. |
| 3 | Next, take a damp cloth or sponge and wipe the inside of the housing to remove any residue or buildup. Be thorough but gentle to prevent scratching the surface. |
| 4 | If you encounter stubborn dirt or clogs, you can use a small, thin brush or a toothpick to dislodge them. Be careful not to apply too much force to avoid damaging the housing. |
| 5 | Once the housing and nozzle are clean, rinse them with water to remove any remaining debris or cleaning solution. |
| 6 | Dry the nozzle and housing thoroughly before reassembling them. This will prevent any water from entering the pressure washer and causing damage. |
By regularly cleaning the nozzle housing of your pressure washer, you can ensure proper water flow and prevent any potential clogs or malfunctions. Remember to follow these steps to maintain your equipment’s performance and prolong its lifespan.

Installing the New Attachment
In this section, I will explain the step-by-step process of installing the new attachment for your pressure washer. By following these instructions, you will be able to effortlessly replace the existing accessory and enjoy the enhanced performance of your Sun Joe pressure washer.
Step 1: Begin by locating the attachment area on the pressure washer. This can usually be found on the front or side of the device. Make sure the pressure washer is turned off and unplugged before proceeding.
Step 2: If there is an existing attachment in place, carefully remove it by unscrewing it counterclockwise. Use caution when handling the attachment as it may still retain some water pressure. Once removed, set it aside for proper disposal or storage.
Step 3: Take the new attachment and inspect it for any damage or defects. Ensure that it is the correct nozzle for your specific pressure washer model. This information can usually be found in the user manual or on the manufacturer’s website.
Step 4: Align the nozzle with the attachment area and insert it firmly but gently. Begin by turning it clockwise to secure it in place. Be careful not to overtighten, as this may cause damage to the attachment or pressure washer.

Step 5: Once the new attachment is securely fastened, double-check that it is properly aligned and positioned. This will ensure optimal performance and prevent any potential leaks or malfunctions.
Step 6: After confirming the correct installation, you can now turn on your Sun Joe pressure washer and test the new attachment. Adjust the pressure and spray pattern as needed for your specific cleaning task.
Remember, it is always important to consult the user manual and follow the manufacturer’s guidelines when replacing any parts or accessories on your pressure washer. By taking proper care and maintenance, you can prolong the lifespan of your equipment and enjoy efficient cleaning for years to come.
Reconnecting the Pressure Washer to the Power Source
In this section, I will guide you through the process of reconnecting the pressure washer to its power source. Once you have successfully changed the nozzle on your Sun Joe pressure washer, it is important to ensure that it is properly connected to the power source before using it again. Follow the steps below to reconnect your pressure washer and get it ready for use.
Step 1: Turning off the Pressure Washer
Before reconnecting the pressure washer to the power source, make sure it is turned off and the nozzle is detached. This will prevent any accidents or injuries during the reconnection process. Additionally, ensure that the power switch is set to the “off” position to avoid any electrical mishaps.

Step 2: Locate the Power Cord
Next, locate the power cord of your Sun Joe pressure washer. It is usually attached to the unit and may have a protective cover. Carefully remove any coverings or tangled cords to ensure a smooth reconnection process.
Step 3: Inspect the Power Cord and Outlet
Before plugging in the pressure washer, inspect both the power cord and the outlet for any signs of damage. Look for frayed wires, exposed insulation, or bent prongs. If any issues are detected, do not attempt to connect the pressure washer and seek professional assistance to avoid electric shock or further damage.
Step 4: Connect the Power Cord to the Outlet
|
|
|
|
1. Locate a suitable power outlet near the area where you will be using the pressure washer. Ensure that the outlet is in good condition and compatible with the power requirements of your pressure washer. |
2. Insert the power cord’s plug into the outlet until it is fully inserted and secure. Make sure the connection is firm and there are no loose connections. |


Once the power cord is securely connected to the outlet, you can proceed with other necessary steps, such as turning on the pressure washer and adjusting the settings to your desired pressure level. Always follow the manufacturer’s instructions and guidelines for safe and optimal use of your Sun Joe pressure washer.
Testing the New Attachment
In this section, I will share my experience testing the different nozzle attachment that I recently acquired for my pressure washer. It was exciting to try out this new accessory and see how it would enhance the performance and versatility of my equipment.
Firstly, I want to emphasize the significance of choosing the right attachment for your pressure washer. Every nozzle has its unique characteristics and functions, allowing you to adjust the water stream’s flow and intensity to suit your specific cleaning needs. By testing out this new nozzle, I aimed to determine its effectiveness in various cleaning tasks.
With the new nozzle attachment in hand, I began by testing it on some relatively light-duty pressure washing tasks, such as washing my patio furniture and cleaning my car. I was pleased to find that the nozzle offered excellent control over the water pressure, allowing me to switch between a wide fan spray and a concentrated stream. This versatility was particularly handy when trying to remove stubborn dirt and grime from different surfaces.
Next, I moved on to more challenging cleaning tasks, such as removing tough stains from my driveway and tackling a heavily soiled outdoor shed. The new attachment proved to be highly effective in these more demanding situations as well. The intense, focused stream it provided was great for targeting specific areas, while the wider spray pattern helped cover larger surfaces quickly.
In conclusion, testing out the new nozzle attachment for my pressure washer was a rewarding experience. It showcased the importance of selecting the right tool for the job and the impact it can have on the cleaning process. With this new attachment, I feel confident in tackling a wide range of cleaning tasks, knowing that I have a reliable and versatile tool at my disposal.
Properly Storing the Pressure Washer and Nozzle
When it comes to maintaining your pressure washer and its accessories, proper storage is essential to ensure their longevity and optimal performance. In this section, I will share some tips on how to store your pressure washer and nozzle correctly, helping you get the most out of your equipment for years to come.
Clean and Dry the Nozzle
Before storing the nozzle, it is crucial to clean and dry it thoroughly. This step prevents any debris or moisture from causing damage or clogging the nozzle, which can affect its performance during future usage. Use a soft brush or cloth to remove any dirt or residue, and ensure that it is completely dry before proceeding with the storage process.
Store in a Safe and Protected Area
Find a suitable location to store your pressure washer and nozzle that is safe and protected from the elements. Extreme temperatures, direct sunlight, and moisture can all adversely affect the performance and lifespan of your equipment. Consider storing it in a well-ventilated area away from direct sunlight, and ensure that the nozzle is placed in a dry and secure spot.
- Use a storage shed or garage if available, as they provide an extra layer of protection against the weather and potential theft.
- If storing the pressure washer and nozzle outdoors is the only option, consider investing in a weatherproof cover specifically designed for pressure washers to shield it from the elements.
- Avoid storing the nozzle in areas where it may be prone to accidental damage or where it could be knocked over easily.
Protect the Nozzle
To ensure the nozzle remains in top condition, it is advisable to protect it during storage. You can use a plastic cap or a nozzle cover to shield it from dust, dirt, and any accidental impacts that could potentially damage the delicate nozzle components. Additionally, storing the nozzle in its designated compartment, if provided by the manufacturer, can help prevent any mishandling or misplacement.
By following these guidelines for properly storing your pressure washer and nozzle, you can prolong their lifespan and maintain their performance levels. Remember, a well-preserved pressure washer and nozzle will enable you to tackle various cleaning projects effectively for years to come.
FAQ:
Why would I need to change the nozzle on my Sun Joe pressure washer?
There are several reasons why you may need to change the nozzle on your Sun Joe pressure washer. Firstly, different nozzles offer different spray patterns and pressures, allowing you to adjust the cleaning power for various tasks. Additionally, over time, the nozzle may become clogged or damaged, reducing the effectiveness of the pressure washer. Changing the nozzle can help restore optimal performance.
How do I change the nozzle on my Sun Joe pressure washer?
The process of changing the nozzle on a Sun Joe pressure washer is relatively simple. First, make sure the pressure washer is turned off and disconnected from the power source. Next, locate the nozzle attachment point on the end of the wand. Some models may require a twist or push-and-pull motion to remove the old nozzle. Once the old nozzle is removed, align the new nozzle with the attachment point and firmly push or twist it into place. Ensure that the nozzle is securely attached before using the pressure washer.