How To Attach Halfords Pressure Washer Hose

Greetings! Today, I am here to impart some invaluable knowledge about the mysterious process of fastening a fundamental component of your beloved cleansing apparatus. In this tutorial, we will traverse the intricate landscape of joining the vital conduit responsible for the reliable and efficient flow of water.
Embarking on a quest to integrate the integral extremities, we shall explore the ingenious mechanisms involved in the interconnection of said parts. Throughout this educational discourse, we will delve into the various strategies and techniques required to unite the indispensable channels of liquid formation. Rest assured, my dear readers, by the end of this article, you will be well-equipped with the necessary expertise to approach this task with confidence and prowess.
As we embark on this compelling journey, it is prudent to acknowledge the importance of acquainting oneself with the multitude of options at your disposal. We shall navigate through the vast expanse of possibilities, varying from the conventional to the innovative. This exploration will leave no stone unturned, as we delve into the realm of alternative devices and methods, ensuring a comprehensive understanding of this art form.
Prepare to be captivated by the intricacies of this seemingly simple process, as we grasp the essence of connecting these integral sections without the fear of leakage or obstruction. Welcome to the realm of hose attachment mastery – where knowledge truly becomes power!
Attaching the Hose to your Pressure Washer: A Step-by-Step Guide
In this section, I will guide you through the process of connecting your pressure washer hose effectively and efficiently. By following these steps, you will be able to get your pressure washer up and running in no time.
Gather the Necessary Tools
Before starting the attachment process, it is important to gather all the tools you will need. These may include a wrench, pliers, and any other specific tools recommended by the manufacturer. Having these tools readily available will save you time and ensure a smooth installation process.
Step-by-Step Instructions
Once you have gathered all your tools, you can begin attaching the hose to your pressure washer. Follow these simple steps:
| Step | Description |
|---|---|
| Step 1 | Locate the inlet valve on your pressure washer. This is usually marked by an arrow or a symbol. |
| Step 2 | Inspect the hose connection fitting and make sure it is clean and free from any debris or dirt. |
| Step 3 | Align the threads of the hose with the threads of the inlet valve. |
| Step 4 | Once aligned, gently screw the hose onto the inlet valve in a clockwise direction. Use a wrench or pliers, if necessary, to ensure a tight fit. |
| Step 5 | When the hose is securely attached, turn on the pressure washer and check for any leaks or irregularities in the connection. |
| Step 6 | If everything looks good, you are ready to start using your pressure washer with the newly attached hose. |
By following these steps, you will be able to confidently attach your pressure washer hose, ensuring a secure and reliable connection. Remember to always refer to the manufacturer’s instructions for any specific guidelines or recommendations. Happy pressure washing!
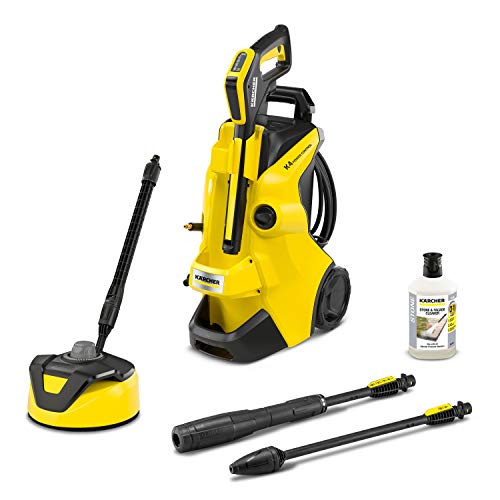
Understanding the Components of a Halfords Pressure Washer Hose
In this section, I will provide a comprehensive overview of the various components that make up a Halfords pressure washer hose. Understanding these components is essential for proper attachment and maintenance of the hose, ensuring optimal performance and longevity.
1. Nozzle
The nozzle is a crucial component of the pressure washer hose, responsible for directing the flow of water. It is available in different sizes and types, allowing for various spray patterns and pressure levels. The nozzle determines the cleaning power and versatility of the pressure washer hose.

2. Trigger Gun
The trigger gun serves as the control mechanism for the pressure washer hose. It features a handle with a trigger that, when squeezed, activates the flow of water. The trigger gun allows the user to start and stop the pressure washer easily, providing convenience and control during cleaning tasks.
3. High-Pressure Hose
The high-pressure hose is the main component that carries water from the pressure washer to the nozzle. It is designed to withstand high water pressure and is typically made of durable materials such as reinforced rubber or PVC. The high-pressure hose is essential for delivering water with sufficient force for effective cleaning.
- Inner Tube: The inner tube is the part of the high-pressure hose that comes into direct contact with the water. It is designed to be resistant to abrasion and chemical degradation.
- Reinforcement: The reinforcement layer provides strength and durability to the hose, preventing it from bursting under high pressure. It is usually made of braided steel wire or synthetic fibers.
- Outer Cover: The outer cover protects the high-pressure hose from external factors such as UV rays, abrasion, and harsh weather conditions. It is typically made of synthetic rubber or thermoplastic materials.
By understanding the various components that make up a Halfords pressure washer hose, you can ensure proper attachment and maintenance, ultimately maximizing the performance and lifespan of your pressure washer hose.
Preparing Your Pressure Cleaner for Hose Attachment
In this section, I will guide you through the necessary steps to get your pressure cleaner ready for attaching a hose. Ensuring proper preparation is crucial to ensure the optimal performance and longevity of your pressure cleaner.
Step 1: Inspect the Connections

Before attaching a hose to your pressure cleaner, it is essential to inspect the connections for any signs of damage or wear. Look for any cracks, leaks, or loose fittings that could potentially affect the performance of the machine. If any issues are found, it is recommended to replace or repair the affected parts before proceeding.
Step 2: Clean the Nozzle and Wand
The nozzle and wand of your pressure cleaner are important components that directly impact the water flow and pressure. Before attaching a hose, ensure that the nozzle and wand are clean, free from debris or blockages. Use a damp cloth or brush to remove any dirt or buildup, ensuring that the water can flow through them smoothly.
Step 3: Check the Water Source
Another important aspect to consider is the water source for your pressure cleaner. Ensure that the water supply is turned on and flowing properly to avoid any issues during the cleaning process. Additionally, check the water quality and ensure it is free from contaminants that could potentially clog the hose or damage the pressure cleaner.

Step 4: Prepare the Hose
Now that you have inspected and cleaned the necessary components, it’s time to prepare the hose for attachment. Make sure the hose is clean and free from any twisting or kinks. Straighten the hose if needed, ensuring a smooth and uninterrupted flow of water from the pressure cleaner.
Step 5: Attach the Hose
Once the hose is prepared, carefully connect it to the pressure cleaner. Ensure that it is securely attached, avoiding any leaks or loose connections. Double-check the fittings and tighten them if necessary.
Step 6: Test the Setup
Before using your pressure cleaner, it is important to test the setup to ensure everything is functioning correctly. Turn on the water supply and trigger the pressure cleaner to verify that the water is flowing smoothly through the hose and nozzle. Check for any leaks or abnormal noise during the testing phase.
In conclusion, ensuring the proper preparation of your pressure cleaner before attaching a hose is crucial for optimal performance and longevity. By inspecting connections, cleaning components, checking the water source, preparing the hose, attaching it securely, and testing the setup, you can confidently use your pressure cleaner for various cleaning tasks.
Identifying the Correct Connection Point for Your Pressure Cleaner
Hello there! In this section, I will guide you through the process of determining the appropriate attachment point for your pressure cleaner. It’s important to identify the correct connection point to ensure proper functionality and avoid any damage.
Step 1: Assessing the Components
Before proceeding, take a moment to familiarize yourself with the various parts of your pressure cleaner. Look for components that resemble a nozzle or connector.

For instance, your pressure cleaner might have a brass or plastic attachment point located near the outlet valve.
Step 2: Checking the User Manual
Always refer to the user manual that came with your pressure cleaner. It usually contains valuable information on identifying the correct attachment point for connecting the hose.
The user manual may describe the attachment point as a “pressure hose connection” or something similar.
Step 3: Examining the Quick Connect System

If your pressure cleaner features a quick connect system, take a closer look at the connectors. Typically, the attachment point will be marked with an arrow or labeled accordingly.
Keep an eye out for indicators such as “In,” “Out,” or specific symbols that indicate where the hose should be connected.
Step 4: Consulting the Manufacturer’s Website
If you’re unable to locate the attachment point using the previous steps, consider visiting the manufacturer’s website. They often provide detailed illustrations or videos demonstrating the connection process.
Look for any specific terms related to the attachment point, such as “hose inlet” or “connection port.”

Step 5: Seeking Professional Assistance
If you’re still uncertain about the correct attachment point, it may be best to reach out to a professional or contact the pressure cleaner manufacturer directly. They can offer personalized guidance based on your specific model.
Remember, using the correct attachment point ensures optimal performance and extends the lifespan of your pressure cleaner.
By following these steps, you should now be able to confidently identify the correct attachment point on your pressure cleaner. Happy cleaning!
Inspecting the Hose for Any Damage or Blockages
When it comes to using a pressure washer effectively, inspecting the hose for any signs of damage or blockages is crucial. This step is often overlooked, but it can make a significant difference in the performance and longevity of your pressure washer.
First and foremost, take the time to visually inspect the hose from end to end. Look out for any visible signs of wear and tear, such as cracks, frays, or bulges. These can indicate potential weak points that may lead to leaks or bursts while using the pressure washer.
Next, run your hands along the entire length of the hose, feeling for any irregularities or abnormalities. Pay close attention to areas where the hose bends or connects to other components, as these are common trouble spots. If you notice any soft spots, kinks, or lumps, it could be a sign of internal damage or blockages.
In addition to the physical inspection, consider testing the hose for any blockages. Disconnect one end of the hose and hold it upright while gently tapping the other end. This can help dislodge any debris or obstructions that may have accumulated inside the hose.
If you come across any significant damage or blockages during your inspection, it is essential to address them promptly. Depending on the severity of the issue, you may need to replace the hose entirely or try to clear blockages using appropriate methods. Remember, neglecting to fix these problems can not only affect the performance of your pressure washer but also pose a safety risk.
By regularly inspecting your pressure washer hose for damage or blockages, you can ensure optimal performance and extend its lifespan. It is a small task that can save you from costly repairs or replacements in the long run. Take the time to inspect your hose before each use, and if you notice any issues, address them promptly.
Connecting the Halfords Pressure Washer Hose to the Attachment Point
When it comes to assembling your Halfords pressure washer, one crucial step is connecting the hose to the attachment point. This connection point allows for the proper flow of water and ensures that your pressure washer functions effectively. In this section, I will guide you through the process of securely attaching the hose to the attachment point.
1. Preparing the attachment point
Before connecting the hose, it is essential to ensure that the attachment point is clean and free from any debris or obstructions. Use a damp cloth to gently wipe away any dirt or grime that may hinder the connection. This step ensures a tight and secure fit.
2. Aligning the hose and attachment point
With the attachment point prepared, it is now time to align the hose with the attachment point. Take the hose end and carefully position it over the attachment point, making sure that it fits snugly. This alignment ensures a smooth and efficient flow of water during operation.
Important note: During this step, it is essential to handle the hose and attachment point with care to avoid any damage or accidental disconnection. Ensure a firm grip while aligning the components.
Pro tip:
If you find it challenging to align the hose and attachment point, consider using a gentle twisting motion. This technique can help guide the hose into place and create a tight connection.
3. Securing the connection
Once the hose and attachment point are aligned, it is time to secure the connection. Carefully push the hose down onto the attachment point, applying gentle pressure until you feel it lock into place. You may hear a click or notice a slight resistance when the attachment is secure.
Double-check the connection by gently tugging on the hose to ensure it is firmly attached. If there is any movement or signs of loosening, repeat step 3 and apply slightly more pressure during the attachment process.
Please note:
It is crucial to check the manufacturer’s instructions for your specific Halfords pressure washer model, as the attachment method may vary slightly. Always follow the provided guidelines to ensure the correct and secure connection of the hose.
With the hose securely attached to the pressure washer’s attachment point, you are ready to start cleaning and tackle any outdoor tasks with confidence. The proper connection guarantees a smooth flow and optimal performance, allowing you to make the most of your Halfords pressure washer.
Properly Securing the Hose to Ensure a Leak-Free and Secure Connection
When it comes to effectively using a pressure washer, one of the most important steps is ensuring that the hose is properly secured to the machine. Failing to do so can lead to frustrating leaks or unexpected disconnects, diminishing the overall performance and efficiency of your pressure washer. Follow these steps to ensure a secure and leak-free connection.
1. Inspect and Clean the Hose Connection Points
Before attaching the hose, take a moment to thoroughly inspect the hose connection points on both the pressure washer and the hose itself. Look for any signs of damage, dirt, or debris that may interfere with the ability to create a tight seal. Clean off any dirt or debris and repair any damages if necessary.
2. Properly Align the Hose with the Connection Point
When attaching the hose, make sure it is properly aligned with the connection point on the pressure washer. Ensure that the hose end is securely inserted into the appropriate slot or connector. It’s essential to align the hose correctly to prevent any misalignment or kinks that could lead to leaks or disconnections during operation.
| Pressure Washer | Hose |
|---|---|
| 1 | 2 |
Table: Example of Properly Aligned Hose Connection
3. Use a Hose Clamp or Sleeve for Added Security
To provide extra stability and prevent any potential leaks, consider using a hose clamp or sleeve at the connection point. These additional accessories help to secure the hose tightly to the pressure washer, minimizing the risk of accidental disconnection or loosening during use.
By following these steps and ensuring a secure and leak-free hose connection, you can optimize the performance and efficiency of your pressure washer. Enjoy a hassle-free cleaning experience without worrying about frustrating leaks or unexpected disconnects!
Checking the Water Flow and Pressure Before Use
When preparing to use a pressure washer, it is important to ensure that the water flow and pressure are at an optimal level. Before connecting the hose and starting the machine, I always check these factors to guarantee an efficient and successful cleaning process.
One of the first steps is to examine the water source and ensure that it is turned on and providing a steady flow. Without proper water flow, the pressure washer will not be able to function effectively. I make sure to inspect the water inlet valve and clear any debris or obstructions that may affect the water supply.
Once I have confirmed a consistent water flow, I move on to checking the pressure. This can be done by using a pressure gauge or relying on the built-in pressure indicator on the pressure washer. I adjust the pressure settings accordingly to match the cleaning task at hand. For more delicate surfaces, a lower pressure is recommended to avoid any damage, while tougher stains may require a higher pressure setting.
I also pay attention to the nozzle selection, as different nozzles offer different spray patterns and pressures. By choosing the appropriate nozzle, I can customize the water flow and pressure to effectively clean various surfaces. The user manual or the manufacturer’s recommendations usually provide guidance on which nozzle to use for specific cleaning tasks.
Before starting the pressure washer, I always double-check all connections and ensure that they are tight and secure. Any leaks or loose fittings can negatively impact the water flow and pressure, so it is crucial to address these issues before proceeding.
- Confirm a steady water flow from the source
- Remove any debris or obstructions from the water inlet valve
- Check the pressure using a gauge or the built-in pressure indicator
- Adjust the pressure settings to match the cleaning task
- Select the appropriate nozzle for desired spray pattern and pressure
- Ensure all connections are tight and secure to avoid leaks
By thoroughly checking the water flow and pressure before use, I can ensure that my pressure washer performs optimally and delivers the desired results in my cleaning tasks.
Proper Storage and Maintenance of the Halfords High-Pressure Water Hose
When it comes to keeping your Halfords high-pressure water hose in excellent condition and maximizing its lifespan, proper storage and maintenance are crucial. By following a few simple steps, you can ensure that your hose remains functional and efficient, avoiding unnecessary replacements and repairs.
Storing the Hose
After each use, it is important to store your high-pressure water hose correctly. This not only prevents damage but also ensures easy access and convenience for future use. One recommended method is to coil the hose loosely and secure it with a twist tie or a hose reel, if available. This prevents kinks and tangled messes that can affect the hose’s integrity over time.
Maintaining the Hose
Maintaining your high-pressure water hose involves regular inspections and proactive care to identify and address any potential issues promptly. Before each use, visually inspect the hose for signs of wear, such as cracks, leaks, or bulges. Additionally, ensure that all connectors are tightly sealed to prevent any water leakage during operation.
| Maintenance Step | Description |
|---|---|
| Cleaning | Regularly clean the hose using a mild detergent and water to remove any dirt, debris, or chemicals that may have accumulated during use. Avoid using abrasive cleaners or rough brushes that could damage the hose’s outer surface. |
| Drying | Thoroughly dry the hose after each use to prevent moisture buildup, which can lead to mold, mildew, and deterioration. Hang the hose in a shaded area or use a towel to remove excess water. |
| Storage Temperature | Store the hose in a cool and dry place away from direct sunlight and extreme temperatures. Exposure to heat and cold can weaken the hose material, leading to reduced durability and potential malfunctions. |
| Winter Care | In colder climates, it is crucial to drain the water from the hose before storing it for the winter. Freezing temperatures can cause the water inside the hose to expand, resulting in damage. Consider using an insulated cover or storing the hose indoors during winter months. |
By following these storage and maintenance guidelines, you can ensure that your Halfords high-pressure water hose remains in optimal condition, providing reliable performance for your cleaning needs while prolonging its lifespan.
Troubleshooting Common Issues with the Pressure Washer Hose
As an experienced user of pressure washers, I understand the frustrations that can arise when dealing with issues related to the hose. In this section, I will share some valuable insights and offer troubleshooting tips to help you overcome common problems that may arise when using a pressure washer hose.
1. Leakage
One of the most common issues with pressure washer hoses is leakage. It can be quite frustrating to have water spraying uncontrollably from a hose connection. To address this issue, first, ensure that all connections are securely tightened. If the leakage persists, inspect the hose for any visible damage or cracks. If you notice any, it is advisable to replace the damaged section of the hose.
2. Reduced Water Flow
Another common problem with pressure washer hoses is a decrease in water flow. This can greatly impact the efficiency and effectiveness of your pressure washer. To troubleshoot this issue, start by checking if the hose is kinked or twisted. Straightening out any kinks or twists should restore the water flow. If the issue persists, examine the hose for obstructions such as debris or dirt. Clearing any blockages should help improve water flow.
In addition to the above troubleshooting tips, it is essential to inspect your pressure washer hose regularly for wear and tear. Remember to store the hose properly, avoiding extreme temperatures and any sharp objects, to prolong its lifespan. By addressing common issues promptly and taking the necessary preventative measures, you can ensure that your pressure washer hose performs optimally during your cleaning tasks.
FAQ:
Can I use any other hose instead of the Halfords pressure washer hose?
While it is possible to use other hoses with a pressure washer, it is recommended to use the specific hose designed for your pressure washer model, like the Halfords pressure washer hose. This ensures proper compatibility and reduces the risk of leaks or damages. Using a different hose may not provide the optimal performance and could potentially damage the pressure washer or compromise safety.
Is it necessary to use Teflon tape when attaching the Halfords pressure washer hose?
Using Teflon tape is not always necessary, but it can be a good practice to ensure a tight and leak-free connection when attaching the Halfords pressure washer hose. Teflon tape is used as a sealant for threaded connections and helps prevent water leakage. If you are experiencing leaks when attaching the hose, applying Teflon tape to the threads can help create a more secure seal. However, always refer to the manufacturer’s instructions for your specific pressure washer model to determine if Teflon tape is recommended.
Can I attach additional accessories to the Halfords pressure washer hose?
Yes, you can attach additional accessories to the Halfords pressure washer hose, depending on the compatibility and design of your pressure washer. Many pressure washers have different nozzles or attachments available for specific cleaning tasks, such as a rotary brush or a soap dispenser. To attach these accessories, simply disconnect the pressure washer gun from the hose, then connect the desired accessory to the hose. Make sure to tighten the attachment securely before using the pressure washer.