How To Assemble Karcher K4 Full Control Pressure Washer
Ever dreamt of creating a powerful cleaning tool that can tackle even the toughest grime and dirt? Look no further, as I delve into the world of ultimate cleaning solutions with the step-by-step guide on assembling the remarkable K4 Full Control Pressure Washer. With my experience and expertise, I will guide you through the process of constructing this outstanding piece of machinery, and in no time, you’ll be ready to take on any cleaning challenge.
As we embark on this journey, I want to emphasize the importance of attention to detail. Each component of the K4 Full Control Pressure Washer plays a pivotal role in its flawless performance. From the sturdy frame to the intricate nozzle system, every piece has been designed to deliver maximum power and efficiency.
Now that we’ve set the stage, let’s dive straight into the heart of the matter. Brace yourself as I reveal the secrets behind each step of assembling this masterful creation. Equip yourself with patience and curiosity, and together, we will unravel the mysteries of this exceptional machine.
Throughout this guide, I will provide useful tips and insights to ensure that each component finds its rightful place in the grand puzzle. From connecting the high-pressure hose to fitting the trigger gun, I’ll walk you through the process with utmost precision. Rest assured, by the end of this journey, not only will you have built an extraordinary cleaning tool, but you will also have gained a wealth of knowledge about pressure washers and their inner workings.
Understanding the Components: A Comprehensive Guide to the K4 Full Control Pressure Washer
When it comes to effectively cleaning outdoor spaces, having a reliable pressure washer is essential. The K4 Full Control Pressure Washer from Karcher is a versatile and powerful tool that can assist you in achieving outstanding results. In order to maximize its performance, it is essential to understand the various components that make up this innovative machine.
The Motor: The Powerhouse Behind the Clean
At the heart of the K4 Full Control Pressure Washer is its motor, a crucial component that provides the power needed for optimal cleaning performance. The motor’s strength enables the pressure washer to generate high-pressure water flow, effectively removing dirt, grime, and debris. With its reliable and efficient motor, the K4 Full Control can tackle even the toughest cleaning tasks effortlessly.
The Pump: Creating the Perfect Pressure
Working hand in hand with the motor, the pump is responsible for creating the necessary pressure required to achieve thorough cleaning. The K4 Full Control Pressure Washer is equipped with a high-quality pump that ensures a consistent supply of water at the desired pressure level. With the ability to adjust the pressure settings according to your specific cleaning needs, this pressure washer offers versatility and precision.
The Spray Gun: Putting the Power in Your Hands
One of the most important components of the K4 Full Control Pressure Washer is the spray gun. This ergonomic tool allows you to control the cleaning power effortlessly. With its intuitive design and user-friendly features, the spray gun enables you to adjust the pressure and select the ideal spray pattern for various surfaces. Whether you need a gentle mist or a powerful jet, the spray gun puts you in full control.
The Lance: Your Extension for Every Cleaning Task
Complementing the spray gun is the lance, a versatile accessory that extends your reach and enhances the effectiveness of the pressure washer. With the lance, you can easily maneuver around objects and clean hard-to-reach areas with precision. Whether it’s removing dirt from large surfaces or targeting stubborn stains, the lance is an essential component that ensures a thorough and efficient cleaning experience.
The Detergent Tank: Adding Extra Cleaning Power
To tackle particularly stubborn dirt and grime, the K4 Full Control Pressure Washer is equipped with a detergent tank. This convenient component allows you to apply cleaning solutions directly to the surface, enhancing the cleaning power of the pressure washer. By utilizing the detergent tank, you can ensure a deep and thorough clean, especially on tough stains and heavily soiled areas.
- Motor: The powerhouse behind the clean.
- Pump: Creating the perfect pressure.
- Spray Gun: Putting the power in your hands.
- Lance: Your extension for every cleaning task.
- Detergent Tank: Adding extra cleaning power.
Understanding the various components of the Karcher K4 Full Control Pressure Washer allows you to harness its full potential. By knowing how each component works and utilizing them effectively, you can achieve exceptional cleaning results and maintain the beauty of your outdoor spaces effortlessly.
Safety Precautions
In this section, I will discuss some important safety precautions to keep in mind while handling the K4 pressure washer.
Safety should always be a top priority when operating any type of machinery, including pressure washers. To ensure a safe and efficient usage of the K4 pressure washer, it is essential to follow these guidelines:
1. Protective Gear: Always wear appropriate protective gear, such as safety goggles, gloves, and sturdy footwear, to protect yourself from potential hazards like debris, chemicals, or high-pressure water.
2. Familiarize Yourself: Before operating the pressure washer, thoroughly read and understand the instruction manual provided by the manufacturer. Familiarize yourself with the different components and controls of the K4 pressure washer.

3. Location: Select a well-ventilated area with sufficient space and a stable surface to assemble and operate the pressure washer. Ensure there are no flammable materials nearby to prevent accidents.
4. Power Supply: Before connecting the pressure washer to a power source, make sure to inspect the power cord for any damage. Only connect to a grounded outlet and use a residual current device (RCD) for added protection against electric shock.
5. Water Supply: Check the water source for any contaminants or debris that may clog the pressure washer. Ensure a constant and adequate water supply to prevent damage to the pump and maintain a steady flow.
6. Use Proper Nozzles: Choose the appropriate nozzle for the task at hand. Different nozzles provide varying spray patterns and pressures. Always switch off the pressure washer before changing nozzles to avoid accidents.
7. Safe Operation: Maintain a firm grip on the pressure washer while in use and avoid pointing the spray gun at yourself or others. Do not spray directly at electrical components, outlets, or power cables.

8. Cleaning and Maintenance: Regularly inspect and clean the pressure washer, paying attention to any signs of wear or damage. Perform routine maintenance as recommended by the manufacturer to ensure optimal performance and longevity of the K4 pressure washer.
Following these safety precautions will help minimize the risk of accidents and ensure a safe and successful operation of the K4 pressure washer.
Protective Measures to Follow During Assembly
When putting together a pressure washing machine, it is crucial to prioritize safety to prevent any accidents or damage. Here are some essential protective measures to keep in mind during the assembly process.
| Protective Measure | Description |
|---|---|
| 1. Eye Protection | Wear safety goggles or glasses to shield your eyes from any debris or chemicals that may be released during the assembly. |
| 2. Hand Protection | Put on sturdy gloves to safeguard your hands from sharp edges, tightening screws, or other potential injuries. |
| 3. Proper Clothing | Wear appropriate clothing, including long sleeves and pants, to protect your skin from any possible contact with moving parts or chemicals. |
| 4. Ventilation | Ensure there is proper ventilation in the assembly area to avoid inhaling fumes or chemicals emitted during the process. |
| 5. Stability | Place the pressure washer on a stable surface to prevent it from tipping over or falling during assembly, reducing the risk of damage or injury. |
| 6. Electrical Safety | Ensure the pressure washer is not connected to a power source while assembling to avoid any electrical shocks or accidents. |
| 7. Follow Instructions | Carefully read and follow the assembly instructions provided by the manufacturer to ensure proper installation and usage. |
| 8. Use Tools Properly | Utilize the appropriate tools for each assembly step, following the instructions, to prevent any damage to the pressure washer or yourself. |
By following these protective measures, you can guarantee a safe and successful assembly of your pressure washer, allowing you to enjoy its efficient cleaning power without any mishaps.
Unboxing the Power Cleaner
Introduction
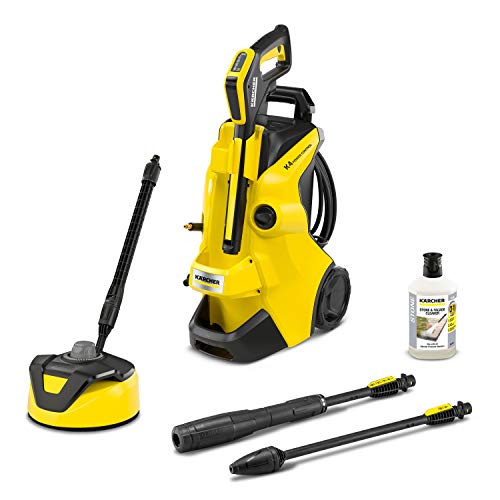
In this section, I will share my experience of unboxing the power cleaner. As a proud owner of the K4 Full Control Pressure Washer, I am excited to take you through the unboxing process and highlight the key components included in the package.
What’s Inside
When I received the package, it was securely wrapped, ensuring the safety of the contents during transit. Opening it up, I found a sturdy box that held all the necessary components for assembling the power cleaner.
The first thing that caught my attention was the detailed instruction manual. It provided step-by-step guidance on how to assemble and operate the power washer effectively. The manual was well-organized, with clear and concise instructions, making it easy to follow along.
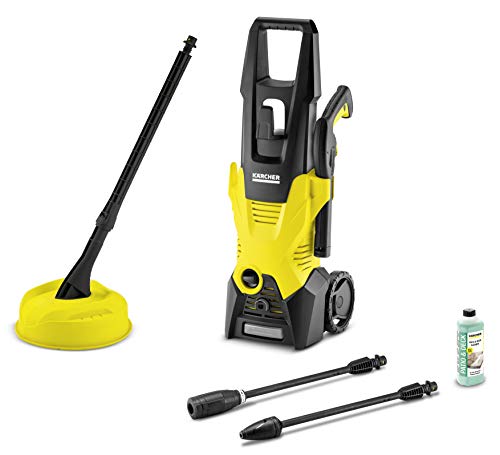
Nestled inside the box, I discovered the main body of the power cleaner. Its sleek design and compact size were immediately noticeable. The body felt sturdy and well-constructed, giving me confidence in its durability.
Alongside the main body, I found the various accessories that enhance the functionality of the power cleaner. These included the high-pressure hose, spray gun, and a range of nozzles. Each accessory was carefully packed and labeled, ensuring their easy identification during the assembly process.
Additionally, the package also included a detergent tank, which is a great feature for achieving optimal cleaning results. The detergent tank attaches seamlessly to the power cleaner, allowing for convenient application of detergents during use.

Lastly, I noticed the presence of essential safety equipment, such as protective goggles and gloves. These accessories were included to ensure that users prioritize their safety while operating the power cleaner.
Overall, the unboxing experience of the K4 Full Control Pressure Washer was impressive. The careful packaging, detailed manual, and the inclusion of all necessary components speak to the manufacturer’s commitment to providing a seamless assembly process for users.
In the next section, I will guide you through the assembly process of the power cleaner, step by step, ensuring you have a hassle-free experience from start to finish. Stay tuned!
Unboxing and Handling the Packaging: A Step-by-Step Guide
Introduction
In this section, I will guide you through the process of unboxing and handling the packaging of your new K4 pressure washer by Karcher. By following these step-by-step instructions, you can ensure that you unwrap and handle the packaging correctly and efficiently.

Step 1: Unveiling the Package
Start by locating the package of your K4 pressure washer. Gently remove any outer tape or straps securing the packaging material. Once the outer layer is removed, you will see the neatly packed components of the pressure washer.
Step 2: Organizing the Components
After removing the outer packaging, carefully separate the different components of the pressure washer. Place them on a clean and flat surface to make it easier to identify and access each part during the assembly process.
Step 3: Checking the Contents
Take a moment to verify that all the components listed in the product manual are present. Compare the contents with the list provided to ensure that nothing is missing or damaged. This step is crucial for a hassle-free assembly process.
Step 4: Removing Protective Coverings
Before proceeding further, remove any protective covering or wrapping from the individual components. This may include plastic film, foam inserts, or cardboard protection. Be cautious while removing these coverings to avoid any damage to the pressure washer or yourself.
Step 5: Preparing the Assembly Area
Find a suitable area to assemble your K4 pressure washer. Ensure that it is well-ventilated and has sufficient space to lay out the components. Keep the tools required for assembly nearby and prepare to move on to the next steps of the process.

Important note: Throughout the unboxing and handling process, always prioritize your safety and use caution when dealing with sharp or heavy objects. If needed, refer to the manufacturer’s manual for additional guidance on specific assembly steps.
By following these step-by-step instructions, you are now prepared to move forward with the assembly process of your K4 pressure washer. The next section will guide you through the specific steps required to assemble the pressure washer and get it ready for use.
Connecting the Hose and Nozzle
When it comes to setting up your Karcher K4 Full Control pressure washer, one important step is connecting the hose and nozzle. This is a crucial part of the assembly process as it allows you to effectively direct the water jet and control the pressure output.
To begin, make sure you have the necessary components nearby: the high-pressure hose and the nozzle attachment. The high-pressure hose is responsible for delivering the water from the pressure washer to the nozzle, while the nozzle attachment determines the spray pattern and intensity.
Start by locating the water outlet on the pressure washer unit. This is usually marked by a symbol or label indicating where the hose should be connected. Insert the threaded end of the high-pressure hose into the water outlet, ensuring a secure fit. You can use a clockwise motion to tighten it if necessary, but be careful not to overtighten.
Next, take the other end of the high-pressure hose and attach it to the nozzle. The nozzle will have a corresponding threaded connection point where the hose can be screwed on. Again, ensure a tight connection without overtightening.
Once the hose and nozzle are securely connected, you can move on to positioning the nozzle. Hold the pressure washer wand or handle in one hand and the nozzle in the other. Make sure the nozzle is aligned with the desired area to be cleaned, keeping a safe distance to avoid any potential damage.
Finally, to ensure proper functionality, check that all connections are secure and there are no leaks. Turn on the pressure washer and test the spray pattern and intensity by squeezing the trigger. Adjust as needed using the controls on the pressure washer unit.
Remember, the hose and nozzle assembly is a crucial step in setting up your Karcher K4 Full Control pressure washer. With proper connection and positioning, you can confidently tackle various cleaning tasks effectively and efficiently.
Attaching the Hose and Selecting the Right Nozzle Properly
When it comes to setting up your pressure washer and getting it ready for use, one of the most important steps is attaching the hose and selecting the appropriate nozzle. Properly connecting the hose ensures a secure and leak-free connection, while selecting the right nozzle guarantees optimal cleaning performance and efficiency. In this section, I will guide you through the proper methods for attaching the hose and choosing the ideal nozzle, ensuring that your pressure washer operates smoothly and effectively.
| Step 1: Hose Attachment | First, locate the hose connection point on your pressure washer. It is usually located at the rear of the machine. Ensure that the machine is turned off and the water supply is disconnected before proceeding. Take the end of the hose with the appropriate connectors and insert it into the hose connection point. Twist it clockwise until it is securely tightened. |
|---|---|
| Step 2: Nozzle Selection | The right nozzle can make a significant difference in the cleaning power and efficiency of your pressure washer. Most pressure washers come with a variety of nozzle options, each designed for specific cleaning tasks. Refer to the user manual or the nozzle identification chart provided by the manufacturer to determine which nozzle is suitable for your intended application. |
| Step 3: Nozzle Attachment | Once you have identified the appropriate nozzle, attach it to the end of the wand or lance. Ensure that it is aligned correctly and push it firmly into place. Some nozzles may require twisting or locking mechanisms to secure them properly. Make sure to follow the manufacturer’s instructions for attaching the nozzle securely. |
| Step 4: Hose Inspection | Before starting the pressure washer, always inspect the hose for any signs of damage or wear. Look for cracks, leaks, or bulges that may compromise the hose’s integrity. If any damage is found, replace the hose immediately to avoid potential safety hazards. |
By following these proper methods for attaching the hose and selecting the right nozzle, you can ensure that your pressure washer is set up correctly and ready to tackle any cleaning task effectively. Taking the time to properly attach the hose and choose the appropriate nozzle will not only maximize the performance of your pressure washer but also prolong its lifespan. Remember to always refer to the manufacturer’s instructions and safety guidelines for your specific pressure washer model.
Attaching the Wand and Trigger Gun
When it comes to setting up your K4 Full Control pressure washer, one crucial step is attaching the wand and trigger gun. This component is responsible for controlling the flow of water and allows you to direct the pressure wherever it’s needed.
To begin, locate the wand and trigger gun included with your pressure washer. These parts are typically packaged separately to ensure safe transportation. Once you have them in hand, you can proceed with the assembly process.
First, find the connector on the end of the trigger gun. It should have a threaded opening that matches the nozzle of the wand. Take the nozzle end of the wand and align it with the connector on the trigger gun. Make sure the threads match, as this will ensure a secure and leak-free connection.
Next, gently twist the wand onto the trigger gun in a clockwise direction. Continue twisting until it feels snug and secure. Be careful not to overtighten, as this could damage the threads or cause leakage. A firm yet gentle connection is all that’s needed.
Once the wand and trigger gun are properly attached, give it a gentle tug to make sure it’s firmly in place. You should feel resistance, indicating that the components are securely locked together. This step is important to ensure that the wand doesn’t become detached during use, potentially causing accidents or damage.
Now that you have successfully attached the wand and trigger gun, you’re one step closer to using your K4 Full Control pressure washer. It’s essential to follow the manufacturer’s guidelines and safety precautions while operating your pressure washer to ensure optimal performance and longevity.
Remember, the wand and trigger gun assembly is a crucial part of the setup process for your K4 Full Control pressure washer. Take your time and ensure a proper and secure connection to guarantee a hassle-free and efficient cleaning experience.
Simple Steps to Securely Fixing the Wand and Connecting the Trigger Gun
In this section, I will walk you through the simple steps to securely fix the wand and connect the trigger gun for your K4 Full Control pressure washer. Ensuring a secure attachment will not only enhance the performance of your pressure washer but also maximize your safety during operation.
- Inspect the wand and trigger gun for any damages or wear, such as cracks or leaks.
- Place the wand onto the designated attachment point on the pressure washer, ensuring it is firmly in place.
- Use the provided fastening mechanism, such as a screw or clip, to secure the wand onto the pressure washer. Double-check to ensure it is tightly fastened, preventing any potential accidents or detachment during use.
- Inspect the trigger gun for any damages or wear and ensure it is clean and free from debris.
- Attach the trigger gun to the other end of the wand, aligning the connecting points.
- Apply gentle pressure and twist the trigger gun clockwise to securely lock it into place.
- Give a slight tug to ensure that the wand and trigger gun are securely connected.
- Before turning on the pressure washer, recheck all connections to ensure they are properly secured. Make necessary adjustments if needed.
By following these simple steps, you can have peace of mind knowing that your wand and trigger gun are securely fixed, allowing you to operate your K4 Full Control pressure washer efficiently and safely.
Installing Detergent and Adjusting Pressure
When setting up your pressure washer for the first time, it’s important to understand how to properly install detergent and adjust the pressure for optimal performance. In this section, I will guide you through the process step by step.
Firstly, to install detergent, locate the detergent tank on your pressure washer. It is typically located at the back or side of the machine. Make sure the pressure washer is turned off before proceeding.
Next, remove the detergent tank cap by twisting it counterclockwise. Fill the tank with your preferred detergent, making sure not to overfill it. It’s important to use a detergent specifically designed for pressure washers to achieve the best cleaning results.
After filling the tank, securely place the detergent tank cap back on and tighten it by twisting clockwise. Make sure it is properly sealed to prevent any leaks during operation.
Now it’s time to adjust the pressure. Locate the pressure adjustment knob on your pressure washer. This knob allows you to control the intensity of the water spray. Turn the knob clockwise to increase the pressure or counterclockwise to decrease it.
Before starting the pressure washer, it’s important to test the pressure setting on a small area to ensure it’s suitable for the surface you’ll be cleaning. Adjust the pressure accordingly until you find the right balance of power and gentleness.
Remember, when adjusting the pressure, always start with a lower setting and gradually increase it as needed. This will help prevent damage to delicate surfaces and provide the best cleaning experience.
In conclusion, installing detergent and adjusting the pressure are crucial steps in setting up your pressure washer. By following these instructions, you’ll be well on your way to achieving efficient and effective cleaning results.
FAQ:
What tools do I need to assemble the Karcher K4 Full Control Pressure Washer?
You will need a flathead screwdriver, adjustable wrench, and a pair of pliers to assemble the Karcher K4 Full Control Pressure Washer.
Is the assembly process difficult?
No, the assembly process of the Karcher K4 Full Control Pressure Washer is quite straightforward and easy to follow. The product comes with a detailed instruction manual that guides you through the entire process step by step.
How long does it take to assemble the Karcher K4 Full Control Pressure Washer?
The assembly time can vary depending on your familiarity with the product and tools. On average, it takes around 20-30 minutes to assemble the Karcher K4 Full Control Pressure Washer.
Can I assemble the pressure washer on my own, or do I need assistance?
You can definitely assemble the Karcher K4 Full Control Pressure Washer on your own. However, if you have any difficulties or concerns during the assembly process, it is always recommended to seek assistance from a knowledgeable individual or contact the manufacturer’s customer support for guidance.
What are the main components of the Karcher K4 Full Control Pressure Washer that need to be assembled?
The main components that need to be assembled are the high-pressure hose, spray gun, lance, and the various nozzle attachments. Additionally, you will also need to attach the handle and connect the water inlet and outlet hoses.